GSNadmin
Staff member
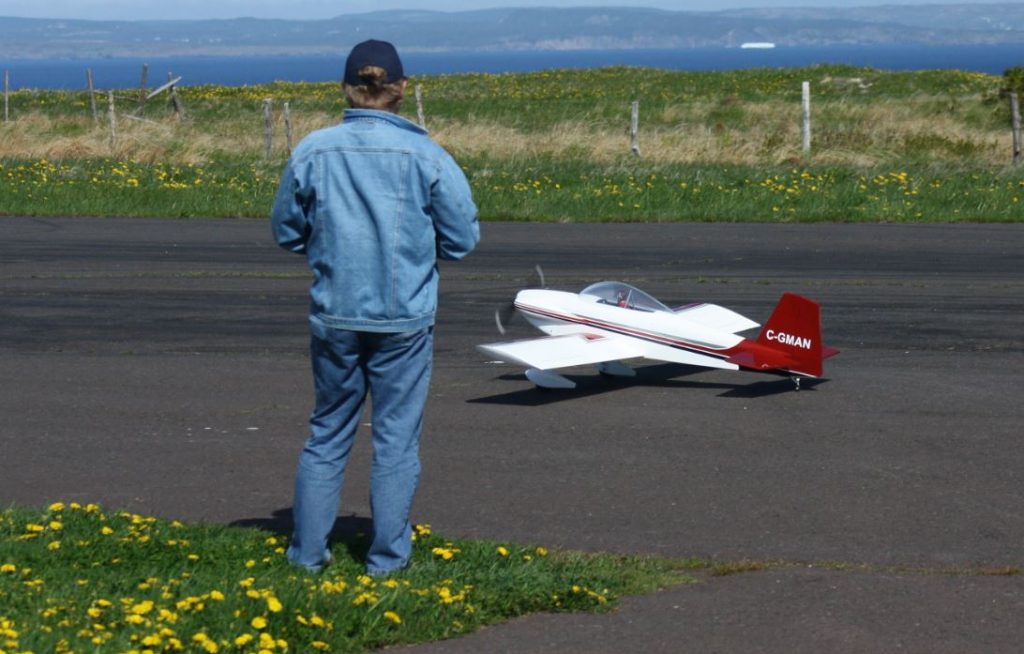
Longtime MAN contributor Carl Layden wanted a plane that would stand out on the flightline, but he didn’t have the time to custom-build a model from scratch. His solution was to dress up an ARF and make it a unique flyer. Here’s his story.
If you have been around the hobby for a long time, you’ve seen many changes in recent years. Although there are still some extreme craftsmen like Graeme Mears making masterpieces in their workshops, many of us have limited time and look forward to getting out and flying. It’s great to be able to custom build your own projects, but with the ease of off-the-shelf products and availability of time, taking on
a huge project isn’t a luxury for all. Maybe the answer is to customize or personalize your favorite ARF.
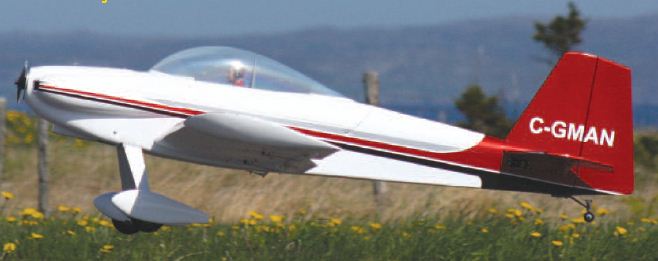
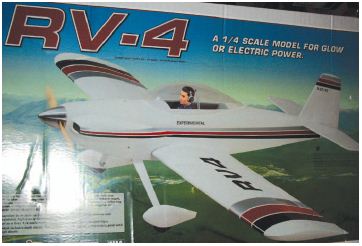
Many of today’s ARFs are of good quality, but they all suffer from one issue—an excessive amount of “sameness!” One of the most popular full-size, homebuilt aircraft is the Experimental RV-4. Recently, I purchased the Great Planes one-fourth scale ARF figuring it would make a nice everyday flyer. However, the color scheme as shown on the box was not exactly my style.

The makeover
So where to begin? Instead of starting the assembly, I started surfing the Internet looking for images of RV aircraft. After finding an attractive paint scheme, I made some rough sketches to see how I could use some of the original trim on the model.
Finding a scheme for the wing was a little more challenging. While flipping through past issues of MAN, a photo of Sam Filippelli’s
IMAC Extra 300 was the solution. A quick Google search and I had a 3-view image to draw my new scheme. After the scheme was sketched, it was time to prepare the ARF. One of the perks in choosing the GP ARF is that it’s covered with Top Flite MonoKote, making it easy to
match colors. I had white, black, and grey, and during a quick trip to the local hobby shop, I got a roll of metallic red to simplify the process of matching the cowl.
Uncovering
The first step is to remove the original covering from the horizontal and vertical stabilizers. A sharp hobby knife makes this a quick job. Make sure not to damage the structure. If you do, use a little thin CA glue to fix it. As with any heat-shrink covering, follow the instructions for iron temperature settings. If the iron is too hot it can quickly ruin all of your hard work. I then re-covered the tail feathers using the
metallic red. Take care not to over shrink the covering because this can cause warps. Cover both sides of the structure before the final shrinking to make everything tight.
Next, I made the changes to the fuselage. I removed the grey and white from the area that will be covered in red and black, and then I covered the aft part of fuselage in MonoKote to match the new design. When using heat shrink covering on a fully sheeted surface, I start in the middle of the area and work out towards the edges to minimize trapped bubbles. If you do get a bubble, use a sewing needle or a sharp razor blade to pop the bubble and then iron it down while letting the air escape.

Finishing up
Removing the trim from the wing was a little more challenging. The grey and black peeled off easily with a little heat from the iron, but the metallic red was difficult to remove, so a combination of heat, alcohol, and duct tape was needed. When you remove the covering, sometimes the colored adhesive will be left behind. Apply some duct tape to that area, rub it down well, and then quickly pull off the tape like a Band-Aid. This also works for removing one layer from another layer of covering. If there are still a few bits left they can be cleaned off using a little rubbing alcohol or some acetone solvent. Once the trim is removed, apply the new MonoKote trim to the wing.
The next step is easy. Assemble the ARF as per the instructions. I did deviate from the manual in one area. I installed the servos for the rudder and elevator in the tail of the fuselage under the horizontal stabilizer. Completing the RV-4 took approximately two weeks while spending a little time in the hobby room each day after work. There are several YouTube videos of this plane as an electric and as a gasser, but my choice was a Saito .91 2-stroke glow engine turning a 14×8 prop.
The day of the test flight was just a tad breezy with wind blowing straight down the runway. The Great Planes RV-4 handles the wind easily because it’s a smooth flying aircraft. With its new color scheme it stands out nicely at the flying field and everyone knows it is mine. It’s now my new favorite plane and I hope my article will inspire you to customize your own ARF. Have fun.
Model Airplane News - The #1 resource for RC plane and helicopter enthusiasts featuring news, videos, product releases and tech tips.
Continue reading...
If you have been around the hobby for a long time, you’ve seen many changes in recent years. Although there are still some extreme craftsmen like Graeme Mears making masterpieces in their workshops, many of us have limited time and look forward to getting out and flying. It’s great to be able to custom build your own projects, but with the ease of off-the-shelf products and availability of time, taking on
a huge project isn’t a luxury for all. Maybe the answer is to customize or personalize your favorite ARF.
Many of today’s ARFs are of good quality, but they all suffer from one issue—an excessive amount of “sameness!” One of the most popular full-size, homebuilt aircraft is the Experimental RV-4. Recently, I purchased the Great Planes one-fourth scale ARF figuring it would make a nice everyday flyer. However, the color scheme as shown on the box was not exactly my style.
The makeover
So where to begin? Instead of starting the assembly, I started surfing the Internet looking for images of RV aircraft. After finding an attractive paint scheme, I made some rough sketches to see how I could use some of the original trim on the model.
Finding a scheme for the wing was a little more challenging. While flipping through past issues of MAN, a photo of Sam Filippelli’s
IMAC Extra 300 was the solution. A quick Google search and I had a 3-view image to draw my new scheme. After the scheme was sketched, it was time to prepare the ARF. One of the perks in choosing the GP ARF is that it’s covered with Top Flite MonoKote, making it easy to
match colors. I had white, black, and grey, and during a quick trip to the local hobby shop, I got a roll of metallic red to simplify the process of matching the cowl.
Uncovering
The first step is to remove the original covering from the horizontal and vertical stabilizers. A sharp hobby knife makes this a quick job. Make sure not to damage the structure. If you do, use a little thin CA glue to fix it. As with any heat-shrink covering, follow the instructions for iron temperature settings. If the iron is too hot it can quickly ruin all of your hard work. I then re-covered the tail feathers using the
metallic red. Take care not to over shrink the covering because this can cause warps. Cover both sides of the structure before the final shrinking to make everything tight.
Next, I made the changes to the fuselage. I removed the grey and white from the area that will be covered in red and black, and then I covered the aft part of fuselage in MonoKote to match the new design. When using heat shrink covering on a fully sheeted surface, I start in the middle of the area and work out towards the edges to minimize trapped bubbles. If you do get a bubble, use a sewing needle or a sharp razor blade to pop the bubble and then iron it down while letting the air escape.
Finishing up
Removing the trim from the wing was a little more challenging. The grey and black peeled off easily with a little heat from the iron, but the metallic red was difficult to remove, so a combination of heat, alcohol, and duct tape was needed. When you remove the covering, sometimes the colored adhesive will be left behind. Apply some duct tape to that area, rub it down well, and then quickly pull off the tape like a Band-Aid. This also works for removing one layer from another layer of covering. If there are still a few bits left they can be cleaned off using a little rubbing alcohol or some acetone solvent. Once the trim is removed, apply the new MonoKote trim to the wing.
The next step is easy. Assemble the ARF as per the instructions. I did deviate from the manual in one area. I installed the servos for the rudder and elevator in the tail of the fuselage under the horizontal stabilizer. Completing the RV-4 took approximately two weeks while spending a little time in the hobby room each day after work. There are several YouTube videos of this plane as an electric and as a gasser, but my choice was a Saito .91 2-stroke glow engine turning a 14×8 prop.
The day of the test flight was just a tad breezy with wind blowing straight down the runway. The Great Planes RV-4 handles the wind easily because it’s a smooth flying aircraft. With its new color scheme it stands out nicely at the flying field and everyone knows it is mine. It’s now my new favorite plane and I hope my article will inspire you to customize your own ARF. Have fun.
Model Airplane News - The #1 resource for RC plane and helicopter enthusiasts featuring news, videos, product releases and tech tips.
Continue reading...