You are using an out of date browser. It may not display this or other websites correctly.
You should upgrade or use an alternative browser.
You should upgrade or use an alternative browser.
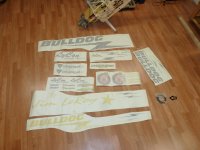
Scale Pitts S1-T, S1-S, and a Challenger.
- Thread starter acerc
- Start date
acerc
640cc Uber Pimp
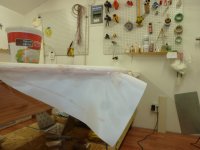
Not doing any covering today cause it is to cold to be outside brushing on the Sig. So I am spending the day doing some furniture work, recovering some cushions. This is an old two seat breakfast type table and I like it so much that when the wife wanted to replace it I told her if the table goes I go, hence the recover of the severely worn and torn covers.
acerc
640cc Uber Pimp
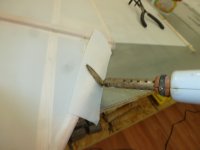
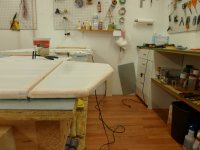
I started to do some covering Wednesday but decided to wait for the new can of Stix-it, what I had just might be to old as it was not as pungent, nor bled through, like usual. The new can arrived this morning so I got to work and covered the bottom of the stab. Now is the part I think most wanted to really know, how to keep from fraying. I attached fabric to the top of the ele as usual but don't iron it quite all the way around leaving it a bit loose for trimming. Then I brushed Poly Brush around the perimeter on the loose fabric (pic 1), let it dry, then trim it, and then using parchment paper I iron it down (pic 2). This really is no different than any other iron but without all the tugging and trimming around curves or worry about wrinkles. On the curves just pull the fabric down and around, if the radii is extreme a little heat will shrink it to fit.
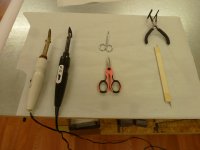
Other than a throwaway brush for the Poly all I use is in the pic, white iron on high runs 200° for attaching, the black iron is on 300° for smoothing and shrinking, a couple pairs of really good scissors, fabric puller, and a fancy pansy multidirectional cutting knife.
Other than a throwaway brush for the Poly all I use is in the pic, white iron on high runs 200° for attaching, the black iron is on 300° for smoothing and shrinking, a couple pairs of really good scissors, fabric puller, and a fancy pansy multidirectional cutting knife.
Attachments
acerc
640cc Uber Pimp
WMcNabb
150cc
I started to do some covering Wednesday but decided to wait for the new can of Stix-it, what I had just might be to old as it was not as pungent, nor bled through, like usual. The new can arrived this morning so I got to work and covered the bottom of the stab. Now is the part I think most wanted to really know, how to keep from fraying. I attached fabric to the top of the ele as usual but don't iron it quite all the way around leaving it a bit loose for trimming. Then I brushed Poly Brush around the perimeter on the loose fabric (pic 1), let it dry, then trim it, and then using parchment paper I iron it down (pic 2). This really is no different than any other iron but without all the tugging and trimming around curves or worry about wrinkles. On the curves just pull the fabric down and around, if the radii is extreme a little heat will shrink it to fit.
Other than a throwaway brush for the Poly all I use is in the pic, white iron on high runs 200° for attaching, the black iron is on 300° for smoothing and shrinking, a couple pairs of really good scissors, fabric puller, and a fancy pansy multidirectional cutting knife.
I knew the trick about applying Poly-Tak before cutting, but not Poly-Brush. Also didn’t know about fabric pullers or parchment paper.
Thanks!
Snoopy1
640cc Uber Pimp
@acerc if I get you right. You paint the stixit on the wood let dry and put the cloth over it and then with an iron iron the cloth into stixit. Once that is done paint the edges and the over hang with brush coat let dry so that it is easy to cut no ravelling takes place and then you iron the free edge to the plane.
acerc
640cc Uber Pimp
Yes, but I only do the poly brush on the outside piece, the underside I just iron it down. One other thing to note is that this is a 100% vinyl covering product, each layer melts into the next to some degree. At any point in the process one can smooth out any clump, bump, et. by simply ironing it smoot utilizing the parchment paper. I typically don't worry about getting it all really smooth until after I have sprayed two coats of the Poly Brush, at that point I will go over the whole thing and iron out any blemish. Then comes the Poly Spray, the only sand able layer of this system, I do one wet coat. This is the point in which I choose to really fine tune the finish, far more than the ironing after the brush. This is where all the final ironing, trimming hairs, covering up seams, etc, takes place. I use a piece of sponge with 600 grit to wet sand everything, being vinyl the airframe typically is sealed up real well at this point so the wet is not hurting anything. After this is all done I will use a pick to clean the hinges, being they are plastic the vinyl (Stits) does not stick to them.@acerc if I get you right. You paint the stixit on the wood let dry and put the cloth over it and then with an iron iron the cloth into stixit. Once that is done paint the edges and the over hang with brush coat let dry so that it is easy to cut no ravelling takes place and then you iron the free edge to the plane.
acerc
640cc Uber Pimp
Many years ago when I first tried Stits I did not care for the Poly Tak at all. I had used the Stix it before so I checked the ingredients and thought they were compatible, turned out I was right. But the Poly Brush for trimming I got from the EAA tutorials, they have some excellent videos of the whole covering process, I highly recommend them. http://www.eaavideo.org/search?q=fabric coveringI knew the trick about applying Poly-Tak before cutting, but not Poly-Brush. Also didn’t know about fabric pullers or parchment paper.
Thanks!