Hey. Toast you will like hus gear I sure do. But use the small cables. Then you have no worries. I did try several springs. But adding a little heavy grease sure smoothed things up. I think he may have drilled the spring tube. Hard to tell, about that. But I used a dowels to plug the upper spring. And drilled where it attached to the fuselage. Had an accident. And was hit by a quad copter.did quite a bit of damage to the left wing and fuselage attach points.it also busted several fuselage glue points. Got fed up with RC and went back to U Control. That was two years ago but really only been fling the circle for about 8 months. Great post good luck with your Champ. My AA Industries Champ was a great floater and flyer until that mis hap.Hi AJ. I built the gear from Sturla's plans for the Chief. Like yours, my gear would fall out when I picked it up off the ground until the owner of Super Chief I'm modeling asked if I left the axel tube long enough to act as a stop against the bracket. I retrofitted a couple of nylon bolts in the ends of the tubes to stop the lower oleo from falling too far inward. The plane's not completed yet, so I don't know yet if it works, butin static tests (lifting the fuse up) it does.
You are using an out of date browser. It may not display this or other websites correctly.
You should upgrade or use an alternative browser.
You should upgrade or use an alternative browser.
Scale RCM 1/3 Scale Champ Build
- Thread starter TonyHallo
- Start date
TonyHallo
150cc
Just a short update, last season I damaged the left wing while experiencing pilot induced isolations. While recovering both wings I am correcting a couple of errors in the build. The plans show the leading edge sheeting ending at the last full rib while the service manual shows it ending at the bow. The other error was I didn't extend the closer screws that hold the covering on one rib past the prop wash. Additionally the screws will be button head that are a lower profile.
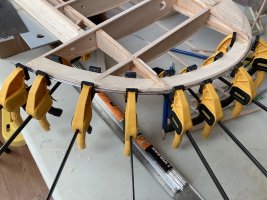
Have all the wood repair glued in place, need to sand the wing bow to shape, not looking forward to this!

Have all the wood repair glued in place, need to sand the wing bow to shape, not looking forward to this!
GorillaToast
30cc
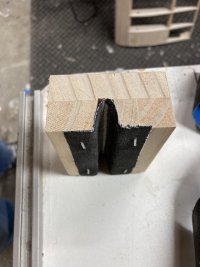
I feel your pain Tony. Sanding down those tip profiles is a bear. I made this sanding block which helped and would have made it easy had I made the tips out of balsa instead of spruce. A low angle block plane was a great help initially.
I also installed aluminum welding rod to the wingtips as added rash protection and it gives me a prominent line to sand to. Wish now I'd used balsa with the welding rod in the beginning. It would have made shaping the profile a lot easier.
btw, are your rib caps balsa, spruce, or basswood? I'm having a heck of a time chipping the edges with normal handling. I can't tell you how many I've had to cut off and replace. Kinda concerned they will continue to give me trouble even after the fabric is on.
Attachments
TonyHallo
150cc
The ribs are 1/4" x 1/8" Sitka spruce. I think you will be fine once covered. The tips are basswood, it is almost finished, had to quit for a while, sanding was boring me to tears. I used Titebond III to laminate the bows, that adds to making the sanding more difficult.
Might be ready for fabric late next week.
Might be ready for fabric late next week.
GorillaToast
30cc
Thanks for the info Tony. I think the problem with the rib caps is that I used some contest grade balsa I had left over. I've spent the better part of today chiseling off the old caps and replacing them with harder balsa. Can't wait to watch you do the fabric.

TonyHallo
150cc
Finished cleaning off the right wing yesterday, what a pain getting the screws out since I had filed the heads down to reduce the height when it was originally covered. The original screws were slotted, had to re-slot a few where the filing was aggressive. The new screws are button heads with a .028" hex, pretty sure it will be impossible to remove those in the future. Need to rework the right aileron, relocate the right aileron servo and then start to think about putting the fabric back on. It has been unseasonably warm here in the Burg this year, if this keeps up have think about painting the middle of next month.
TonyHallo
150cc
Best tool I found to remove the old fabric cement is a pin stripe removal tool ,even works on the balsa. The left aileron on the top is ready for fabric, made the lightening holes larger and replaced the 1/4" thick balsa rib sections with 1/4" x 1/8" spruce, the screws didn't work well in the balsa. Need to do the same on the right aileron.
I don't know what I was thinking when I built the plane, used a 4-40 threaded rod along with Sullivan Golden Clevis for the ailerons. These were replaced with DuBro 4-40 rod ends drilled and reamed to 1/8" and fitted with a 1/8" brass pin and cotter pin. The push rod is 3/16" x .049 wall KS aluminum tube tapped for 4-40 on each end.


I don't know what I was thinking when I built the plane, used a 4-40 threaded rod along with Sullivan Golden Clevis for the ailerons. These were replaced with DuBro 4-40 rod ends drilled and reamed to 1/8" and fitted with a 1/8" brass pin and cotter pin. The push rod is 3/16" x .049 wall KS aluminum tube tapped for 4-40 on each end.