You are using an out of date browser. It may not display this or other websites correctly.
You should upgrade or use an alternative browser.
You should upgrade or use an alternative browser.
Glassing and Painting techniques
- Thread starter Terryscustom
- Start date
BikeRacer
50cc
What do you mean by fuzzys?Be real carefull not to get the fuzzy' sit is hard to hide afterwards. And it only shows up afterwards when you are doing the final coats of paint. Add epoxy or filler or speckle to hide it stay away from the glass.
Snoopy1
640cc Uber Pimp
The Fuzzys is when you have a seam two layers of glass overlapping you try to sand it smooth so that you can not see the overlap. But what happens is that you sand into the glass. This makes tiny small fibres stand up. Which are very difficult to see or feel. At these locations you must take care not to sand into the glass it is very easy to do. It is always easier to add some epoxy and or filler to blend the seam away. Hope this makes it clear.
Jetpainter
640cc Uber Pimp
If you sand the overlap smooth after the first coat of resin, then the second coat will take care of any fuzzy or frayed spots that may jump up.
You can also get some fuzzy areas from using too much resin on the first coat. It sounds a little counter-intuitive, but what happens is you can actually make .5 ounce cloth float up off the surface. Then, when you sand it, the area that floated up gets cut through. If you have a lot of shinny wet looking spots in your first coat of resin your not squeegeeing enough. Especially on flat surfaces. Curvy areas are tougher to squeegee, so you may have some shiny areas. I like to use a 1/64 piece of ply sanded very smooth with nice rounded corners. Playing cards also work well especially the plastic ones.
You can also get some fuzzy areas from using too much resin on the first coat. It sounds a little counter-intuitive, but what happens is you can actually make .5 ounce cloth float up off the surface. Then, when you sand it, the area that floated up gets cut through. If you have a lot of shinny wet looking spots in your first coat of resin your not squeegeeing enough. Especially on flat surfaces. Curvy areas are tougher to squeegee, so you may have some shiny areas. I like to use a 1/64 piece of ply sanded very smooth with nice rounded corners. Playing cards also work well especially the plastic ones.
BikeRacer
50cc
I found these yellow spreaders at a local auto shop hat have a lot of flexibility at the edge and corners. They would work perfect for something like that.If you sand the overlap smooth after the first coat of resin, then the second coat will take care of any fuzzy or frayed spots that may jump up.
You can also get some fuzzy areas from using too much resin on the first coat. It sounds a little counter-intuitive, but what happens is you can actually make .5 ounce cloth float up off the surface. Then, when you sand it, the area that floated up gets cut through. If you have a lot of shinny wet looking spots in your first coat of resin your not squeegeeing enough. Especially on flat surfaces. Curvy areas are tougher to squeegee, so you may have some shiny areas. I like to use a 1/64 piece of ply sanded very smooth with nice rounded corners. Playing cards also work well especially the plastic ones.
Jetpainter
640cc Uber Pimp
Plastic spreaders work fine, and some are very flexible, I just prefer something a little less rigid.
Last week marked my 36th year of full time work in the bodyshop business, so sanding, spreading and painting are kind of my thing.")
Last week marked my 36th year of full time work in the bodyshop business, so sanding, spreading and painting are kind of my thing.
Jetpainter
640cc Uber Pimp
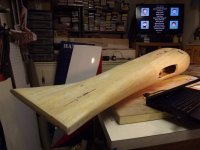
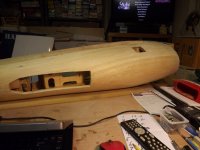
I finished sanding the first coat of resin. I'm going to try and put the second coat on this weekend.
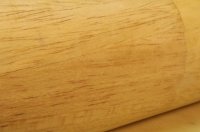
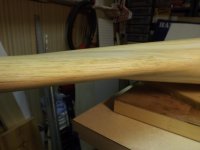
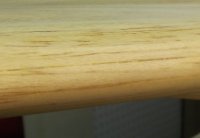
Here are a few pictures. I tried to take some close ups of the areas where the cloth overlapped
 .
.
Here are a few pictures. I tried to take some close ups of the areas where the cloth overlapped
Attachments
Jetpainter
640cc Uber Pimp
I also meant to add that I weighed the fuse after sanding.
Before glass 62.37 ounces
After sanding 1st coat of resin 65.65 ounces
So the weight gain from the .5 ounce glass cloth and first coat of resin after sanding was 3.28 ounces.
Before glass 62.37 ounces
After sanding 1st coat of resin 65.65 ounces
So the weight gain from the .5 ounce glass cloth and first coat of resin after sanding was 3.28 ounces.