You are using an out of date browser. It may not display this or other websites correctly.
You should upgrade or use an alternative browser.
You should upgrade or use an alternative browser.
Glassing and Painting techniques
- Thread starter Terryscustom
- Start date
Naughty Monkey
100cc
It was nothing really, I just copied the link to the pictures. ") I can't even fathom having mad skills like that.
I can't even fathom having mad skills like that.
I can't even fathom having mad skills like that.Snoopy1
640cc Uber Pimp
Ok Jetpainter you are now up to where you and I get to the same point and finish and weigh. Normally I will just put on one coat of primer sand it down back to the where the glass and epoxy just barely start to show through. Then stop and then start the colour coats. Please let us know what primer you used and how many coats, and sanding process. It is this part that I gain more weight than I would like.
Attachments
Snoopy1
640cc Uber Pimp
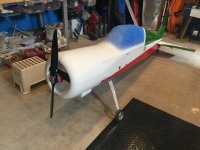
As you can see in the picture I am ready to start painting this Delts aeroplane. 1600 square inch. Will have a YS in it. But weighting to see how you do it and then see if I can get the product you use and try it. Hope you feel the big responsibility you have on the outcome of the plane "JUST KIDDING " would you please explane this 1K or 2K that you keep referring to. Thanks a lot for taking the time to help us with being able to understand painting better.
Jetpainter
640cc Uber Pimp
1K would be something like lacquer primer where you have the primer and a reducer or thinner and it air drys. 2K requires a catalyst or an activator and hardens through a chemical reaction. 2K has a lot less shrinkage.As you can see in the picture I am ready to start painting this Delts aeroplane. 1600 square inch. Will have a YS in it. But weighting to see how you do it and then see if I can get the product you use and try it. Hope you feel the big responsibility you have on the outcome of the plane "JUST KIDDING " would you please explane this 1K or 2K that you keep referring to. Thanks a lot for taking the time to help us with being able to understand painting better.
Jetpainter
640cc Uber Pimp
The primer I used was Nason 421-19 with 483-87 activator, mixed 4 parts primer to 1 part activator. I also reduced it about 10% with Nason 441-21 which is a universal urethane reducer. The reducer isn't absolutely necessary, but it helps it go on a little smoother. I applied 2 coats.Please let us know what primer you used and how many coats, and sanding process. It is this part that I gain more weight than I would like.
Here is a link to a Nason distributor locator. http://www.axaltacs.com/us/en_US/products-services/liquid-coatings/nason/distributor-locator.html
Here is a link to there product guide. http://products.axaltacs.com/dcat/us/en/nsn/catalog.html
O'reilly auto parts is a Nason distributor, if you have one in your area they may be able to get it for you.
Wacobipe
100cc
@Jetpainter...What is your sanding method during each step (glass and resin, filler, and primer)?
I've got the Raven surfaces all glassed at least one coat, some have a second coat of resin and I've used Dolphin glaze to start filling on one surface. I struggle with using a power sander as I generally damage something, but hand sanding everything sucks. Also. Despite using good quality sandpaper I always seem to load it up almost instantly, which is something I am probably doing wrong in my technique but I don't know what it is.
As long as I'm at it, what are your thoughts on wet vs. dry sanding.
Thanks in advance!
Jetpainter
640cc Uber Pimp
@Wacobipe , I hand sanded all of my resin starting with 80 grit then 120. That was done using a self adhesive sandpaper stuck on small oak blocks, foam blocks or a flexible sanding pad. My airplane is pretty curvy, if I was doing a nice flat wing I would use a larger foam block. I sanded it like that after the first and second coats. Before priming I went over all of it with a piece of 220 grit on a soft flexible block just to make it a little smoother before primer. I haven't sanded my primer yet, but when I do I will use 320 dry on a pad, then 400 wet. You could also use 600 if you wanted. If I was painting a high metallic finish I would do the 600 step, but on a solid color base clear it's really not necessary. The only wet sanding I do is that 400/600 grit of the primer before paint.
And yes, hand sanding sucks. It's a tedious labor intensive job that sucks up way to much time. But as my auto shop teacher back in the late 70's used to say "There's never enough time to do it right, but there is always enough time to do it over".
A little tip on dealing with pinholes that may show up during priming. The easiest way I've found to find them is to take the brightest flashlight you have and shine the beam parallel across the freshly primed surface. With gray primer a pinhole looks like a cave when viewed that way. They really show up well. You can use a pencil and a very light touch to circle them. Don't press hard or you'll damage the surface. Then I usually use some Dolphin glaze and smear it on with a small squeegee or most of the time with my finger. I do this before sanding the primer and force it down into the pinhole leaving as little on the surface as possible to make sanding easier.
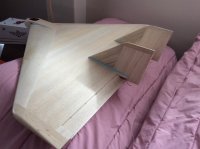
Here are some of the blocks I use. Other than these I have several oak scraps that have sandpaper stuck on them that I use constantly. The block on the left is from Dura Block. They make nice stuff and have a ton of shapes and sizes. The other is a soft curvable block for rounded areas.

And yes, hand sanding sucks. It's a tedious labor intensive job that sucks up way to much time. But as my auto shop teacher back in the late 70's used to say "There's never enough time to do it right, but there is always enough time to do it over".
A little tip on dealing with pinholes that may show up during priming. The easiest way I've found to find them is to take the brightest flashlight you have and shine the beam parallel across the freshly primed surface. With gray primer a pinhole looks like a cave when viewed that way. They really show up well. You can use a pencil and a very light touch to circle them. Don't press hard or you'll damage the surface. Then I usually use some Dolphin glaze and smear it on with a small squeegee or most of the time with my finger. I do this before sanding the primer and force it down into the pinhole leaving as little on the surface as possible to make sanding easier.
Here are some of the blocks I use. Other than these I have several oak scraps that have sandpaper stuck on them that I use constantly. The block on the left is from Dura Block. They make nice stuff and have a ton of shapes and sizes. The other is a soft curvable block for rounded areas.
Wacobipe
100cc
@Jetpainter ...thanks for the info!