GSNadmin
Staff member
Too cold/windy/snowy to fly this weekend? Use your downtime to make the upcoming flying season more successful! This classic how-to from the engine master Dave Gierke details all the steps to cleaning your nitro engine.
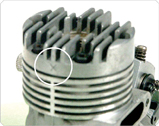
During a recent flying session, your engine let you down big time: it flamed out during a hovering maneuver at low altitude. What went wrong? The mill was almost new; you had run only about 10 gallons of fuel through it since break-in. I’ll play detective and ask several questions regarding this engine’s operation during its final flights. Did it have difficulty holding a peak rpm needle-valve setting? Were there only a few needle-valve clicks between 4-cycling rich and 2-cycling lean? Did it seem to be running hot? Did it seem to be down on power? Did you hear it detonate (make a “frying-egg” exhaust crackle) at wide-open throttle)?
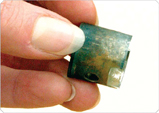
If you answered yes to at least a couple of these questions, your engine may be varnished. Those of us who prefer the added protection of castor oil in our fuel must occasionally disassemble our engines to remove varnish and carbon deposits. A poorly running, varnished engine will behave normally when it’s cool, but don’t be fooled; when you restart it, increased piston and cylinder temperatures cause the varnish to liquefy, resulting in a recurrence of the symptoms described above. To confirm that your engine needs to be cleaned internally, remove the muffler, shine a strong light into the exhaust port and rotate the crankshaft until you can see the piston crown and skirt. If the crown and skirt are stained dark brown or black, they are varnished and must be cleaned.
THE RIGHT TOOLS
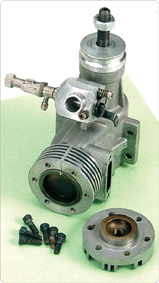
To remove varnish and carbon deposits, you’ll need to disassemble your engine. Miniature engines can be disassembled using simple tools. Most of us have an assortment of screwdrivers, wrenches, pliers and general hand tools that may or may not be suited to the task. Before you start, make sure that you have the right tools to correctly perform the required tasks. You may need to buy new screwdrivers, nut drivers and miniature wrenches in both SAE and metric sizes that are suitable for miniature engines. Screwdrivers are a good example: if you try to remove cylinder-head machine screws with a flat-blade screwdriver that’s too wide, it can break or damage the surrounding cooling fins. If you substitute needle-nose pliers for an open-end wrench or nut driver of the exact size needed to remove the carburetor’s retainer nut, you’ll end up with ugly, rounded corners.
You’ll also need some specialized tools, such as a modified automotive battery-terminal puller. On many engines, the crankshaft drive washer is retained by a collet that wedges the assembly tightly into place when the propeller nut is tightened; you’ll need a puller to remove this assembly. You’ll also need a mild chemical stripping agent, such as Demon Clean; a propane torch; 600-grit, wet-or-dry abrasive paper; 320-grit silicon-carbide abrasive paper; a no. 11 hobby knife; masking tape; steel-wool pads; an old toothbrush and Lava-brand soap. If you are reluctant to meet these minimum requirements, consider finding a competent miniature-engine mechanic or sending your engine to a professional repair and maintenance shop to be cleaned.
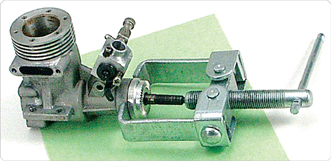
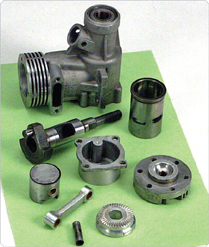
I’ll show you how I cleaned my Enya .35, a front rotary-valve induction, side-exhaust, ringed-piston design with a ball-bearing-supported crankshaft.
STEP 1. REMOVE THE EXTERNAL PARTS
1. Remove the muffler, carburetor, glow plug, propeller nut and washer. Use a hobby knife to scratch an “x” at the top of the rear cover.
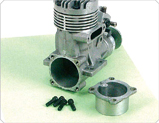
2. Remove the rear cover.
3. Scratch an “x” at the rear of the cylinder head.
4. Remove the cylinder head.
5. Scratch a mark on the cylinder flange and the top of the case; this will enable you to replace the cylinder in this exact position
STEP 2. DISASSEMBLE THE INTERNAL PARTS
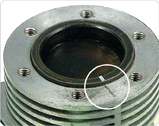
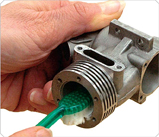
1. Here, the copper glow-plug washer has been caught between the top of the piston and the exhaust port opening.
2. Instead of putting the engine in an oven to heat it, you can use a propane torch. This will loosen the sleeve fit and make it easier to remove.
3. Turning the prop drives the piston up against the glow plug washer, which in turn pushes the sleeve up and out of the top of the engine case.
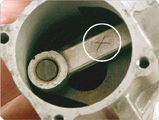
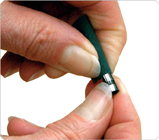
4. Scratch an “x” on the connecting rod so you can reinstall it later in the correct orientation.
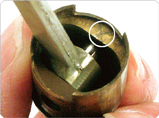
5. Before removing the wristpin, mark the rear of the wristpin land with an “x.”Never mark it on the outside surface of the piston.

6. When removing the C-clip, place the piston in a plastic bag. That way, if the clip flies off the hemostats, it won’t shoot across the shop and get lost.
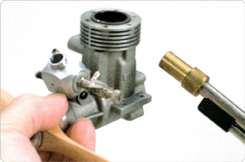
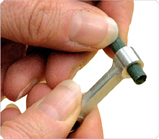
7. Remove the drive washer with a “puller” like this one made from a modified automotive battery-terminal puller. Its ends may have to be modified by grinding them to fit between the drive washers and the front crank bearing.
8. To remove the crankshaft, push on the rear of the crankcase; use a block of wood under the propshaft.
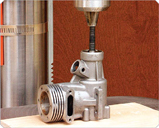
9. If the wood block doesn’t do the trick, you can also use a drill press such as an arbor press to push the crankshaft out of the engine bearings.
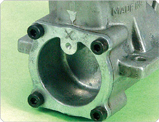
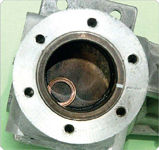
CYLINDER SLEEVE
Try to push the sleeve out of the case with your fingers, but be forewarned: this almost certainly won’t work! Don’t push it with a screwdriver or any other tool. If you weren’t able to push it out with your fingers, read on. Install a propeller on the crankshaft. Place a copper glow-plug washer on top of the piston so part of its circumference protrudes into the exhaust port. (Note: don’t use a steel washer or a machine screw; they’re too hard and will damage the piston, sleeve, or both.) Slowly rotate the propeller until the washer contacts the upper portion of the exhaust port.
Gently twist the propeller. The sleeve may now be lifted out of the case, but don’t count on it! If it doesn’t want to budge, don’t force it; you don’t want to damage the piston, ring, connecting rod, or crankpin. Some manufacturers use a light press-fit for their sleeves, or it may be stuck because of varnish deposits. In any case, you’ll need a propane torch for the next attempt. Some advisors might tell you to place the entire engine into a 200-degree F oven for 20 minutes to heat everything to the same temperature. It is said that this works well because the aluminum crankcase expands more than the steel sleeve. My method is faster, and it doesn’t get me banned from the kitchen! The objective is to heat the aluminum-alloy case just enough to make it expand and move away from the cooler sleeve. A few engine enthusiasts may wring their hands over this “brute-force” method, but I’ve found it to be safe and effective.
Light your propane torch, and constantly move the low-intensity flame to uniformly heat all portions of the upper crankcase. This process takes only 10 to 20 seconds. Wear an old oven glove to protect your hand. (Note: apply a few drops of 3-in-one oil to the inside of the sleeve as a temperature indicator; if the oil begins to smoke, turn off your torch. Melting the crankcase casting isn’t in the plan!)
Turn the propeller again; this time, the sleeve will lift right out of the crankcase.
PISTON/CONNECTING ROD/ WRISTPIN ASSEMBLY
Before you slip the piston/rod/wristpin assembly from the crankpin, mark an “x” on the rear of the rod. With the piston at the top-dead-center (TDC) position, the assembly will slip from the crankpin.
If your engine has a removable front housing, you’ll probably have to remove it from the crankcase before the connecting rod will slip off the crankpin. A few engines, including older model SuperTigres, required you to remove the wristpin through a hole in the rear of the crankcase before you could slip the rod off the crankpin. Most modern engines have eliminated this cumbersome feature.
WRISTPIN
Before you remove the wristpin from the piston and connecting rod, look inside the piston from the bottom, and mark an “x” on the rear wristpin land. When you reattach the wrist-pin, the x on the rod and piston must face the rear of the engine. (Note: never scratch an x on the outside of the piston skirt!)
To remove the C-clips (the circular music-wire clips that snap into the grooves near each edge of the piston’s wristpin), I’ve found that thin-nosed hemostats really come in handy. Even so, they often have a tendency to fly off. A neat trick that I learned years ago is to remove the C-clips inside a clear plastic zip-lock bag; if the clip accidentally flies off, it ends up inside the bag! (Note: you often need to remove only one C-clip; you can push the wristpin out from the opposite side of the piston.)
Some wristpins are equipped with Teflon end pads. Resembling two tiny mushrooms, these Teflon end pads’ stems are pressed into the hollow wristpin ends. Wristpins fitted with end pads don’t require C-clip retainers. To remove this type of wristpin, simply push it through from one end of the piston with a toothpick.
Some piston designs have only one external wristpin hole; known as blind-bore pistons, they don’t offer the convenience of pushing the wristpin out of the piston. In this case, remove the retaining C-clip (if there is one) and try wiggling the pin out with the connecting rod; if this fails, apply heat to the piston crown for a few seconds with the propane torch set at low flame. As the varnish around the wristpin hole liquefies, wiggling the conrod usually allows you to remove the pin.
CRANKSHAFT
Before you extract the crankshaft from the crankcase, you need to remove the drive washer. Many modern glow engines use a collet (split-cone sleeve) to secure the drive washer to the engine’s crankshaft. This assembly is usually jammed into place (a normal occurrence) and is often difficult to break loose. The best way to remove a collet-retained drive washer is to use a small “puller,” available at stores that sell batteries; called a battery-terminal puller, it often requires a bit of grinding for its fingers to fit neatly behind the drive washer. (Note: O.S. makes a special drive-washer puller for its engines.)
To remove the crankshaft
>Place the threaded end of the crankshaft vertical on a block of wood.
> With the palm of your hand, push on the rear of the crankcase.
> If the shaft doesn’t move, don’t pound on it with a hammer! Hammering might dent the ball-races; often, the steel balls will be flat-spotted. In short, the bearings will be ruined.
> Set the rear of the case flush on a block of wood, and use the closed end of a drill-press chuck to press the shaft out of the ball bearings.
STEP 3. REMOVE THE VARNISH
1. Before cleaning the piston, use your fingernail to cover the ends of the piston ring.
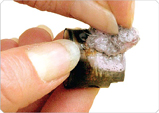
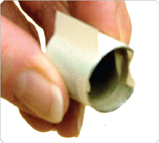
2. To remove a heavy carbon deposit, use a little elbow grease and some steel wool or abrasive paper lubricated with water or light oil.
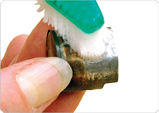
3. For light deposits of varnish, use Lava soap and an old toothbrush.
4. Before cleaning the piston crown, protect the piston rings with masking tape.
5. If the piston crown is heavily carboned, use 320-grit abrasive paper and light machine oil.
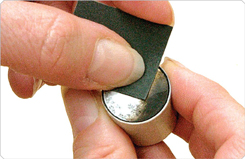
6. It is best to use steel wool to clean the inside surface of the sleeve.

7. For the outside of the sleeve, use 400-grit wet or dry silicon-carbide abrasive paper and machine oil.
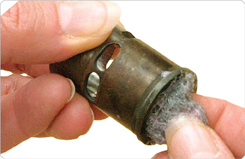
8. Use a toothbrush, Lava soap and water to clean the cylinder head. For heavy carbon buildup, you can use steel wool and a chemical cleaner.

9. Clean the crankshaft with 600-grit paper and light machine oil. If you don’t feel comfortable with sandpaper, use chemical cleaner and a toothbrush.
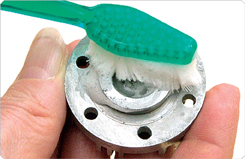
10. To get into and clean the bypass-port channels, use an old toothbrush, Lava soap and water.
11. Clean the wristpin with 600-grit sandpaper and light machine oil. Twist and roll the pin until it is shiny and smooth.
12. To remove varnish, roll 600-grit sandpaper into a tube and insert it into the ends of the connecting rods and the piston wristpin holes.
A mild chemical stripping agent such as Demon Clean is excellent at removing heavy varnish deposits but is less effective on the tough carbon deposits found on piston crowns. For this, you’ll need a little elbow grease: rubbing various grades of silicon carbide (wet or dry) abrasive paper lubricated with water or light machine oil will expedite the removal of carbon deposits.
PISTON
Running an engine rich will produce more carbon in the combustion chamber than running it lean. Some carbon will be deposited within the cylinder head, but the hot-running piston crown receives the most. Rich or lean, carbon build-up is inevitable and, sooner or later, it must be removed.
Use caution when you clean ringed pistons. Don’t remove the ring(s) unless it’s badly worn and needs to be replaced; the ring can easily be distorted or broken when you remove it. Be very careful not to snag the ends of the ring, as they can break very easily! Cover the ring ends with your fingernail while you clean around the top of the piston.
If the piston isn’t too badly varnished and has only a bit of carbon on the crown, I use Lava soap, water and an old toothbrush. The mild abrasive in the hand soap works quickly without damaging the aluminum alloy. If the piston is lightly varnished and carboned, steel wool and water do an excellent job without harming steel, cast iron, or aluminum alloys. If the piston crown is heavily carboned, you’ll need to use no. 320 abrasive paper with light machine oil (e.g., 3-in-One). Protect the piston skirt from the relatively coarse abrasive paper with masking tape.
These are the basic steps:
CYLINDER SLEEVE, HEAD, CRANKSHAFT & CRANKCASE
The inside of a sleeve is best cleaned with a piece of steel wool. The outside of a sleeve can be safely cleaned with no. 400 wet or dry silicon-carbide abrasive paper and machine oil.
Cylinder heads are made out of bar-stock aluminum or cast-aluminum alloy and are much softer than most sleeves. Use a toothbrush, Lava soap and water here because this action is gentler. I have, however, used a chemical cleaner and steel wool when the carbon build-up is heavy. Wash in warm water and dry thoroughly.
You can clean varnish deposits on the crankshaft with either no. 600 abrasive paper or steel wool. Pay particular attention to the crank journals where the two ball bearings reside. If discolored streaks appear here, it probably indicates that the shaft has been spinning within the inner bearing’s raceÔøΩnot the best condition for keeping frictional losses to a minimum. In this instance, avoid polishing these areas with either steel wool or no. 600.
Generally, a toothbrush, Lava soap and water work well for the inside of the crankcase where wall surfaces are interrupted with bypass channels. A chemical stripper also works well here. Avoid using abrasive paper on the inside of the crankcase casting. Heat transfer and cooling could be impaired if contact between the case and sleeve is diminished. Also, internal leaks often occur when excessive clearances allow fuel to pass from the crankcase (between the sleeve and case) out through the exhaust. This causes increased fuel consumption and power loss.
After you’ve finished cleaning each part, wash it in warm water, dry it thoroughly and lubricate it.
WRISTPIN, WRISTPIN HOLES (PISTON) & CONNECTING ROD
If you feel uneasy about using abrasive paper for any of these operations, use a chemical stripper and an old toothbrush. Sand the wristpin by rotating it within a piece of no. 600 abrasive paper and machine oil until it becomes uniformly shiny.
A small strip of no. 600 abrasive paper rolled into a tight cylinder and inserted into the wristpin holes of a piston and connecting rod does a nice job of removing varnish. Be sure to use machine oil on the holes to ease insertion of the abrasive paper.
Use a rotary motion; back-and-forth cleaning might remove metal. Moderation is the key; you just want to remove the varnish–not shorten the engine’s useful life! Wash in warm water, dry thoroughly, and lubricate.
STEP 4. REASSEMBLE THE ENGINE
After cleaning, washing, drying and lubricating all of the engine’s components, you are ready to reassemble it. Keep in mind that we have yet to discuss crankshaft ball bearings. For now, it’s sufficient to have de-varnished them with brushed-on chemical stripper when you cleaned the crankcase. Avoid using abrasive materials on ball-bearing assemblies. You’d be surprised by how much varnish can be swept away when you rinse these assemblies with warm water while slowly rotating the inner races.
Pay attention to the X marks that you made on components during disassembly, and reassemble the engine using plenty of Marvel Mystery Oil. Don’t forget the head gaskets (shims) and rear cover gasket (if used); if you break a paper gasket, obtain a new one from the engine’s distributor.
When you have the opportunity to try out your freshened engine, chances are good that that old, hot-running, hard-to-needle, pooped-out mill will run like new!
 http://www.modelairplanenews.com/wp-content/uploads/2016/02/MAN_Button_newsletter_WEB.jpg
Model Airplane News - The #1 resource for RC plane and helicopter enthusiasts featuring news, videos, product releases and tech tips.
Continue reading...
During a recent flying session, your engine let you down big time: it flamed out during a hovering maneuver at low altitude. What went wrong? The mill was almost new; you had run only about 10 gallons of fuel through it since break-in. I’ll play detective and ask several questions regarding this engine’s operation during its final flights. Did it have difficulty holding a peak rpm needle-valve setting? Were there only a few needle-valve clicks between 4-cycling rich and 2-cycling lean? Did it seem to be running hot? Did it seem to be down on power? Did you hear it detonate (make a “frying-egg” exhaust crackle) at wide-open throttle)?
If you answered yes to at least a couple of these questions, your engine may be varnished. Those of us who prefer the added protection of castor oil in our fuel must occasionally disassemble our engines to remove varnish and carbon deposits. A poorly running, varnished engine will behave normally when it’s cool, but don’t be fooled; when you restart it, increased piston and cylinder temperatures cause the varnish to liquefy, resulting in a recurrence of the symptoms described above. To confirm that your engine needs to be cleaned internally, remove the muffler, shine a strong light into the exhaust port and rotate the crankshaft until you can see the piston crown and skirt. If the crown and skirt are stained dark brown or black, they are varnished and must be cleaned.
THE RIGHT TOOLS
To remove varnish and carbon deposits, you’ll need to disassemble your engine. Miniature engines can be disassembled using simple tools. Most of us have an assortment of screwdrivers, wrenches, pliers and general hand tools that may or may not be suited to the task. Before you start, make sure that you have the right tools to correctly perform the required tasks. You may need to buy new screwdrivers, nut drivers and miniature wrenches in both SAE and metric sizes that are suitable for miniature engines. Screwdrivers are a good example: if you try to remove cylinder-head machine screws with a flat-blade screwdriver that’s too wide, it can break or damage the surrounding cooling fins. If you substitute needle-nose pliers for an open-end wrench or nut driver of the exact size needed to remove the carburetor’s retainer nut, you’ll end up with ugly, rounded corners.
You’ll also need some specialized tools, such as a modified automotive battery-terminal puller. On many engines, the crankshaft drive washer is retained by a collet that wedges the assembly tightly into place when the propeller nut is tightened; you’ll need a puller to remove this assembly. You’ll also need a mild chemical stripping agent, such as Demon Clean; a propane torch; 600-grit, wet-or-dry abrasive paper; 320-grit silicon-carbide abrasive paper; a no. 11 hobby knife; masking tape; steel-wool pads; an old toothbrush and Lava-brand soap. If you are reluctant to meet these minimum requirements, consider finding a competent miniature-engine mechanic or sending your engine to a professional repair and maintenance shop to be cleaned.
I’ll show you how I cleaned my Enya .35, a front rotary-valve induction, side-exhaust, ringed-piston design with a ball-bearing-supported crankshaft.
STEP 1. REMOVE THE EXTERNAL PARTS
1. Remove the muffler, carburetor, glow plug, propeller nut and washer. Use a hobby knife to scratch an “x” at the top of the rear cover.
2. Remove the rear cover.
3. Scratch an “x” at the rear of the cylinder head.
4. Remove the cylinder head.
5. Scratch a mark on the cylinder flange and the top of the case; this will enable you to replace the cylinder in this exact position
STEP 2. DISASSEMBLE THE INTERNAL PARTS
1. Here, the copper glow-plug washer has been caught between the top of the piston and the exhaust port opening.
2. Instead of putting the engine in an oven to heat it, you can use a propane torch. This will loosen the sleeve fit and make it easier to remove.
3. Turning the prop drives the piston up against the glow plug washer, which in turn pushes the sleeve up and out of the top of the engine case.
4. Scratch an “x” on the connecting rod so you can reinstall it later in the correct orientation.
5. Before removing the wristpin, mark the rear of the wristpin land with an “x.”Never mark it on the outside surface of the piston.
6. When removing the C-clip, place the piston in a plastic bag. That way, if the clip flies off the hemostats, it won’t shoot across the shop and get lost.
7. Remove the drive washer with a “puller” like this one made from a modified automotive battery-terminal puller. Its ends may have to be modified by grinding them to fit between the drive washers and the front crank bearing.
8. To remove the crankshaft, push on the rear of the crankcase; use a block of wood under the propshaft.
9. If the wood block doesn’t do the trick, you can also use a drill press such as an arbor press to push the crankshaft out of the engine bearings.
CYLINDER SLEEVE
Try to push the sleeve out of the case with your fingers, but be forewarned: this almost certainly won’t work! Don’t push it with a screwdriver or any other tool. If you weren’t able to push it out with your fingers, read on. Install a propeller on the crankshaft. Place a copper glow-plug washer on top of the piston so part of its circumference protrudes into the exhaust port. (Note: don’t use a steel washer or a machine screw; they’re too hard and will damage the piston, sleeve, or both.) Slowly rotate the propeller until the washer contacts the upper portion of the exhaust port.
Gently twist the propeller. The sleeve may now be lifted out of the case, but don’t count on it! If it doesn’t want to budge, don’t force it; you don’t want to damage the piston, ring, connecting rod, or crankpin. Some manufacturers use a light press-fit for their sleeves, or it may be stuck because of varnish deposits. In any case, you’ll need a propane torch for the next attempt. Some advisors might tell you to place the entire engine into a 200-degree F oven for 20 minutes to heat everything to the same temperature. It is said that this works well because the aluminum crankcase expands more than the steel sleeve. My method is faster, and it doesn’t get me banned from the kitchen! The objective is to heat the aluminum-alloy case just enough to make it expand and move away from the cooler sleeve. A few engine enthusiasts may wring their hands over this “brute-force” method, but I’ve found it to be safe and effective.
Light your propane torch, and constantly move the low-intensity flame to uniformly heat all portions of the upper crankcase. This process takes only 10 to 20 seconds. Wear an old oven glove to protect your hand. (Note: apply a few drops of 3-in-one oil to the inside of the sleeve as a temperature indicator; if the oil begins to smoke, turn off your torch. Melting the crankcase casting isn’t in the plan!)
Turn the propeller again; this time, the sleeve will lift right out of the crankcase.
PISTON/CONNECTING ROD/ WRISTPIN ASSEMBLY
Before you slip the piston/rod/wristpin assembly from the crankpin, mark an “x” on the rear of the rod. With the piston at the top-dead-center (TDC) position, the assembly will slip from the crankpin.
If your engine has a removable front housing, you’ll probably have to remove it from the crankcase before the connecting rod will slip off the crankpin. A few engines, including older model SuperTigres, required you to remove the wristpin through a hole in the rear of the crankcase before you could slip the rod off the crankpin. Most modern engines have eliminated this cumbersome feature.
WRISTPIN
Before you remove the wristpin from the piston and connecting rod, look inside the piston from the bottom, and mark an “x” on the rear wristpin land. When you reattach the wrist-pin, the x on the rod and piston must face the rear of the engine. (Note: never scratch an x on the outside of the piston skirt!)
To remove the C-clips (the circular music-wire clips that snap into the grooves near each edge of the piston’s wristpin), I’ve found that thin-nosed hemostats really come in handy. Even so, they often have a tendency to fly off. A neat trick that I learned years ago is to remove the C-clips inside a clear plastic zip-lock bag; if the clip accidentally flies off, it ends up inside the bag! (Note: you often need to remove only one C-clip; you can push the wristpin out from the opposite side of the piston.)
Some wristpins are equipped with Teflon end pads. Resembling two tiny mushrooms, these Teflon end pads’ stems are pressed into the hollow wristpin ends. Wristpins fitted with end pads don’t require C-clip retainers. To remove this type of wristpin, simply push it through from one end of the piston with a toothpick.
Some piston designs have only one external wristpin hole; known as blind-bore pistons, they don’t offer the convenience of pushing the wristpin out of the piston. In this case, remove the retaining C-clip (if there is one) and try wiggling the pin out with the connecting rod; if this fails, apply heat to the piston crown for a few seconds with the propane torch set at low flame. As the varnish around the wristpin hole liquefies, wiggling the conrod usually allows you to remove the pin.
CRANKSHAFT
Before you extract the crankshaft from the crankcase, you need to remove the drive washer. Many modern glow engines use a collet (split-cone sleeve) to secure the drive washer to the engine’s crankshaft. This assembly is usually jammed into place (a normal occurrence) and is often difficult to break loose. The best way to remove a collet-retained drive washer is to use a small “puller,” available at stores that sell batteries; called a battery-terminal puller, it often requires a bit of grinding for its fingers to fit neatly behind the drive washer. (Note: O.S. makes a special drive-washer puller for its engines.)
To remove the crankshaft
>Place the threaded end of the crankshaft vertical on a block of wood.
> With the palm of your hand, push on the rear of the crankcase.
> If the shaft doesn’t move, don’t pound on it with a hammer! Hammering might dent the ball-races; often, the steel balls will be flat-spotted. In short, the bearings will be ruined.
> Set the rear of the case flush on a block of wood, and use the closed end of a drill-press chuck to press the shaft out of the ball bearings.
STEP 3. REMOVE THE VARNISH
1. Before cleaning the piston, use your fingernail to cover the ends of the piston ring.
2. To remove a heavy carbon deposit, use a little elbow grease and some steel wool or abrasive paper lubricated with water or light oil.
3. For light deposits of varnish, use Lava soap and an old toothbrush.
4. Before cleaning the piston crown, protect the piston rings with masking tape.
5. If the piston crown is heavily carboned, use 320-grit abrasive paper and light machine oil.
6. It is best to use steel wool to clean the inside surface of the sleeve.
7. For the outside of the sleeve, use 400-grit wet or dry silicon-carbide abrasive paper and machine oil.
8. Use a toothbrush, Lava soap and water to clean the cylinder head. For heavy carbon buildup, you can use steel wool and a chemical cleaner.
9. Clean the crankshaft with 600-grit paper and light machine oil. If you don’t feel comfortable with sandpaper, use chemical cleaner and a toothbrush.
10. To get into and clean the bypass-port channels, use an old toothbrush, Lava soap and water.
11. Clean the wristpin with 600-grit sandpaper and light machine oil. Twist and roll the pin until it is shiny and smooth.
12. To remove varnish, roll 600-grit sandpaper into a tube and insert it into the ends of the connecting rods and the piston wristpin holes.
A mild chemical stripping agent such as Demon Clean is excellent at removing heavy varnish deposits but is less effective on the tough carbon deposits found on piston crowns. For this, you’ll need a little elbow grease: rubbing various grades of silicon carbide (wet or dry) abrasive paper lubricated with water or light machine oil will expedite the removal of carbon deposits.
PISTON
Running an engine rich will produce more carbon in the combustion chamber than running it lean. Some carbon will be deposited within the cylinder head, but the hot-running piston crown receives the most. Rich or lean, carbon build-up is inevitable and, sooner or later, it must be removed.
Use caution when you clean ringed pistons. Don’t remove the ring(s) unless it’s badly worn and needs to be replaced; the ring can easily be distorted or broken when you remove it. Be very careful not to snag the ends of the ring, as they can break very easily! Cover the ring ends with your fingernail while you clean around the top of the piston.
If the piston isn’t too badly varnished and has only a bit of carbon on the crown, I use Lava soap, water and an old toothbrush. The mild abrasive in the hand soap works quickly without damaging the aluminum alloy. If the piston is lightly varnished and carboned, steel wool and water do an excellent job without harming steel, cast iron, or aluminum alloys. If the piston crown is heavily carboned, you’ll need to use no. 320 abrasive paper with light machine oil (e.g., 3-in-One). Protect the piston skirt from the relatively coarse abrasive paper with masking tape.
These are the basic steps:
- Protect the ring ends with your fingernail.
- Clean the skirt and crown.
- Clean around the ring within the piston’s groove with extreme care.
- Rotate the ring within its groove while continuing to clean carefully. This will thoroughly clean the ring and groove.
- Wash the piston in warm water, dry it thoroughly and lubricate it.
CYLINDER SLEEVE, HEAD, CRANKSHAFT & CRANKCASE
The inside of a sleeve is best cleaned with a piece of steel wool. The outside of a sleeve can be safely cleaned with no. 400 wet or dry silicon-carbide abrasive paper and machine oil.
Cylinder heads are made out of bar-stock aluminum or cast-aluminum alloy and are much softer than most sleeves. Use a toothbrush, Lava soap and water here because this action is gentler. I have, however, used a chemical cleaner and steel wool when the carbon build-up is heavy. Wash in warm water and dry thoroughly.
You can clean varnish deposits on the crankshaft with either no. 600 abrasive paper or steel wool. Pay particular attention to the crank journals where the two ball bearings reside. If discolored streaks appear here, it probably indicates that the shaft has been spinning within the inner bearing’s raceÔøΩnot the best condition for keeping frictional losses to a minimum. In this instance, avoid polishing these areas with either steel wool or no. 600.
Generally, a toothbrush, Lava soap and water work well for the inside of the crankcase where wall surfaces are interrupted with bypass channels. A chemical stripper also works well here. Avoid using abrasive paper on the inside of the crankcase casting. Heat transfer and cooling could be impaired if contact between the case and sleeve is diminished. Also, internal leaks often occur when excessive clearances allow fuel to pass from the crankcase (between the sleeve and case) out through the exhaust. This causes increased fuel consumption and power loss.
After you’ve finished cleaning each part, wash it in warm water, dry it thoroughly and lubricate it.
WRISTPIN, WRISTPIN HOLES (PISTON) & CONNECTING ROD
If you feel uneasy about using abrasive paper for any of these operations, use a chemical stripper and an old toothbrush. Sand the wristpin by rotating it within a piece of no. 600 abrasive paper and machine oil until it becomes uniformly shiny.
A small strip of no. 600 abrasive paper rolled into a tight cylinder and inserted into the wristpin holes of a piston and connecting rod does a nice job of removing varnish. Be sure to use machine oil on the holes to ease insertion of the abrasive paper.
Use a rotary motion; back-and-forth cleaning might remove metal. Moderation is the key; you just want to remove the varnish–not shorten the engine’s useful life! Wash in warm water, dry thoroughly, and lubricate.
STEP 4. REASSEMBLE THE ENGINE
After cleaning, washing, drying and lubricating all of the engine’s components, you are ready to reassemble it. Keep in mind that we have yet to discuss crankshaft ball bearings. For now, it’s sufficient to have de-varnished them with brushed-on chemical stripper when you cleaned the crankcase. Avoid using abrasive materials on ball-bearing assemblies. You’d be surprised by how much varnish can be swept away when you rinse these assemblies with warm water while slowly rotating the inner races.
Pay attention to the X marks that you made on components during disassembly, and reassemble the engine using plenty of Marvel Mystery Oil. Don’t forget the head gaskets (shims) and rear cover gasket (if used); if you break a paper gasket, obtain a new one from the engine’s distributor.
When you have the opportunity to try out your freshened engine, chances are good that that old, hot-running, hard-to-needle, pooped-out mill will run like new!
http://www.modelairplanenews.com/wp-content/uploads/2016/02/MAN_Button_newsletter_WEB.jpgModel Airplane News - The #1 resource for RC plane and helicopter enthusiasts featuring news, videos, product releases and tech tips.
Continue reading...