GSNadmin
Staff member
Radio control model airplanes rely on two basic systems to fly, the radio system and the power system (excluding gliders). Whether you have a nitro-burning glow engine or a high-octane, gasoline-sipping powerplant, if your engine loses its fuel supply, you’ll find yourself in a dead-stick situation with a plane that wasn’t designed to be a glider. To prevent dead-stick landings, the first steps are taken at the workbench while you install the fuel tank and other necessary fuel-system components. Though this is an easy task for experienced builders, newcomers may find it a bit of a challenge. This article will highlight some of the basics of the fuel components that feed your model’s engine and will make all that plumbing more understandable.
THE BASICS
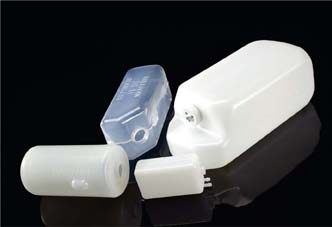
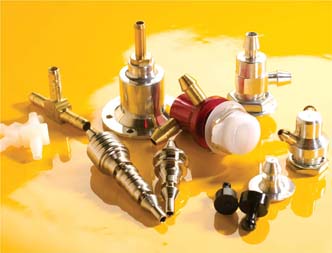
Fuel tanks come in all shapes and sizes.
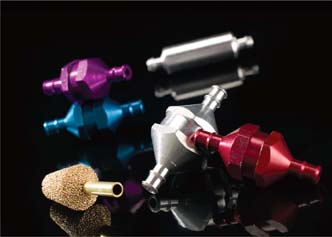
Fuel filters are worth their weight in gold! Clean fuel means no trash in the tanks.
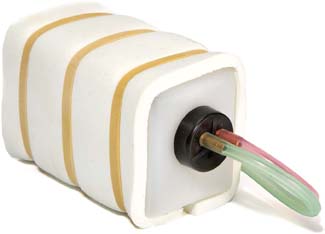
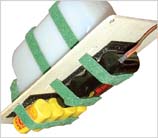
Whenever possible, pad your fuel tank with foam rubber-it helps prevent “foaming.”
Just like the family car, the fuel tank contains the engine’s fuel supply. The tank is connected to the engine’s carburetor with flexible fuel line (plastic tubing), and a rubber stopper seals it. For a tank to operate properly, it must have a vent line that allows air to enter the tank as fuel is drawn out. It relieves the vacuum left in the tank. Model airplanes don’t always fly straight and level. To allow the fuel to flow at different attitudes, the tank has a flexible internal pick-up tube. A heavy “clunk” fitting is attached to the end of the pick-up tube to always keep the end of the tube at the lowest part of the tank. If the pick-up tube wasn’t flexible, once the fuel level dropped below the pick-up tube, the supply of fuel would stop and the engine would die.
Lengths of brass tube pass through the tank’s rubber stopper, and the fuel lines that carry the fuel to the engine slip over the ends brass tubes. The rest of the fittings and accessories help the fuel system work properly and make it easier to maintain and operate.
BAD VIBES
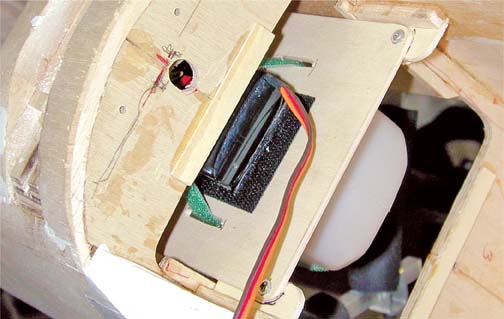
Making your fuel tank easy to get to makes maintenance of your fuel system easier to do.
The removable fuel tank tray can also secure your battery packs.
One common problem that can lead to your engine running lean is fuel foaming in the tank. Vibration causes this and it forms tiny bubbles in the fuel. The bubbles cause erratic fuel flow and the air in the bubbles causes the fuel mixture to lean out. The simple solution to this is to make sure to properly pad your fuel tank with soft foam rubber. Also, make sure that after time, you check the padding to see if any part of the unprotected tank is coming in contact with the model’s inner structure like a former or engine mount bolt or nut. I prefer to use rubber bands to hold the foam padding in place but you can also use tape. Make sure you don’t compress the foam too much as this will lessen its ability to isolate the tank from the vibration.
Regular maintenance is key to keeping your entire model in top condition. One way to keep a better eye on your fuel system is to make the tank removable. When there is no fuel tank compartment hatch, I make a slide-in tank tray from liteply and a matching set of rails inside the fuselage. This way, I can slide the tank into place and secure it with a couple of small screws. You can save more space by attaching your battery pack to the tray as well.
This system works extremely well, especially with larger, gasoline-powered planes.
To choose the correct size fuel tank for your airplane, check your kit’s directions or check the engine manufacturer’s recommendations. You’ll want a tank that can hold enough fuel for a 15 to 20 minute flight.
TWO-LINE SETUP
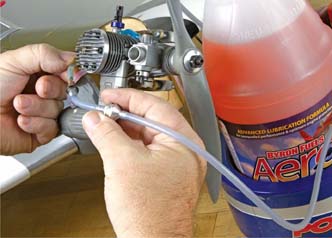
Adding a fuel filter to your fuel supply line gives you double protection.
A two-line fuel system is the simplest and almost foolproof way to go. The setup requires only two pieces of brass tube, a clunk, a rubber stopper and a short length of silicone tubing. Bend one tube 90 degrees to form the vent and insert it through the stopper. The vent lets outside air in as the fuel is drained out, and it acts as an overflow indicator when you fill the tank. The second tube is the fuel-supply for the engine and the interior pick-up tube and clunk are attached to it. To fill the tank, the fuel supply tubing is removed from the carburetor and attached to your filler pump line. When the tank is full, you simply reattach the line to your carburetor. The vent line is often attached to a pressure fitting on the engine’s muffler. This arrangement helps pressurize the tank to enhance fuel flow to the engine.
2-line setup
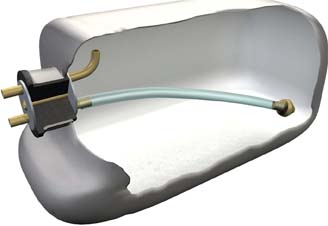
The simplest and most trouble-free setup is a two-line tank.
THREE-LINE SETUP
In a three-line tank, the setup is just like for a two-line arrangement, but a third line is added and used to fill the tank. The third line doesn’t need an interior pick-up line and clunk, but many do add them to allow the removal of fuel at the end of the day. Before running your engine, you must seal off or cap the third line to prevent fuel from leaking out. Fuel line plugs called “Fuel Dots” are available commercially to do this, but you can also use a tight-fitting machine screw or a short piece of ?-inch-diameter brass rod material as well. In a pinch, you can use a one-inch length of ?-inch dowel.
3-LINE SETUP
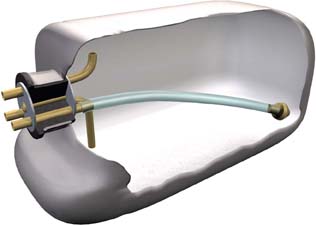
Three-line tank setups allow convenient tank filling without removing the fuel line from the engine.
ILLUSTRATIONS BY FX MODELS
GASOLINE FUEL SYSTEMS
All sorts of fuel filler fittings are available. T-fittings and fuel dots can be used for gas engine setups.
The simplest fuel systems are those for gasoline-powered engines. Unlike glow engines, which use a venturi vacuum to draw the fuel into the carburetor, most gas engines use pumper carburetor to draw fuel from the tank. The placement of the tank is not nearly as critical as for glow engines. Also, the gasoline carburetor has a diaphragm pump, which prevents fuel flowing into the engine unless it is
running.
To fill a gasoline tank, you can add a T-fitting to the engine’s fuel supply line with an added length of tubing. When you pump fuel into this line, it only flows into the tank and won’t flood the engine. When the tank is full, plug the fill line and the engine draws fuel from the tank. By adding a long fill line and using a Fuel Dot, you can place your “filler cap” anywhere you like, this is great for scale models with large fiberglass cowls that hinder easy access to the fuel lines.
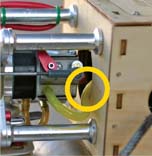
This is a typical trouble spot. Vibration can cause the fuel line to fray and cause a leak.
TROUBLESHOOTING
Properly installed, your fuel system will last a very long time and may never need to be changed. In a hard landing, however, some of its parts may be dislodged or a line can become kinked or pinched. Here are some common fuel-flow problems and fixes.
After a hard landing, the flexible pickup tube and clunk inside the fuel tank can be forced all the way forward. This can go unnoticed until the next flight when the tank stops delivering fuel to the engine in a nose-high attitude. To prevent this, solder a short piece of brass tube to your clunk. This decreases the pick-up tube’s flexibility a bit but still allows it to draw fuel in normal flying attitudes.
If your engine starts to run lean for no apparent reason, check for small pinholes in the fuel-supply lines. Check closely where ever there is a tight bend or where the fuel or line comes into contact with the firewall. To help prevent chafing at the fire-wall pass-through, drill a small hole in the firewall and use a length of brass tube in the holes. Slip the fuel lines over the brass tubes to complete the system.
If your engine begins to run erratically, debris may have gotten into your fuel system. It usually finds its way into the model’s fuel tank from your fuel storage jug, and if it blocks fuel flow, your engine will die. To prevent this, use an in-line fuel filter in the fuel supply line just before the carburetor. Install another filter in your fuel-pump line so you fill your tank with filtered fuel. Add a combination fuel clunk/filter, and you have a triple defense against dead-sticks.
Model Airplane News - The #1 resource for RC plane and helicopter enthusiasts featuring news, videos, product releases and tech tips.
Continue reading...
THE BASICS
Fuel tanks come in all shapes and sizes.
Fuel filters are worth their weight in gold! Clean fuel means no trash in the tanks.
Whenever possible, pad your fuel tank with foam rubber-it helps prevent “foaming.”
Just like the family car, the fuel tank contains the engine’s fuel supply. The tank is connected to the engine’s carburetor with flexible fuel line (plastic tubing), and a rubber stopper seals it. For a tank to operate properly, it must have a vent line that allows air to enter the tank as fuel is drawn out. It relieves the vacuum left in the tank. Model airplanes don’t always fly straight and level. To allow the fuel to flow at different attitudes, the tank has a flexible internal pick-up tube. A heavy “clunk” fitting is attached to the end of the pick-up tube to always keep the end of the tube at the lowest part of the tank. If the pick-up tube wasn’t flexible, once the fuel level dropped below the pick-up tube, the supply of fuel would stop and the engine would die.
Lengths of brass tube pass through the tank’s rubber stopper, and the fuel lines that carry the fuel to the engine slip over the ends brass tubes. The rest of the fittings and accessories help the fuel system work properly and make it easier to maintain and operate.
BAD VIBES
Making your fuel tank easy to get to makes maintenance of your fuel system easier to do.
The removable fuel tank tray can also secure your battery packs.
One common problem that can lead to your engine running lean is fuel foaming in the tank. Vibration causes this and it forms tiny bubbles in the fuel. The bubbles cause erratic fuel flow and the air in the bubbles causes the fuel mixture to lean out. The simple solution to this is to make sure to properly pad your fuel tank with soft foam rubber. Also, make sure that after time, you check the padding to see if any part of the unprotected tank is coming in contact with the model’s inner structure like a former or engine mount bolt or nut. I prefer to use rubber bands to hold the foam padding in place but you can also use tape. Make sure you don’t compress the foam too much as this will lessen its ability to isolate the tank from the vibration.
Regular maintenance is key to keeping your entire model in top condition. One way to keep a better eye on your fuel system is to make the tank removable. When there is no fuel tank compartment hatch, I make a slide-in tank tray from liteply and a matching set of rails inside the fuselage. This way, I can slide the tank into place and secure it with a couple of small screws. You can save more space by attaching your battery pack to the tray as well.
This system works extremely well, especially with larger, gasoline-powered planes.
To choose the correct size fuel tank for your airplane, check your kit’s directions or check the engine manufacturer’s recommendations. You’ll want a tank that can hold enough fuel for a 15 to 20 minute flight.
TWO-LINE SETUP
Adding a fuel filter to your fuel supply line gives you double protection.
A two-line fuel system is the simplest and almost foolproof way to go. The setup requires only two pieces of brass tube, a clunk, a rubber stopper and a short length of silicone tubing. Bend one tube 90 degrees to form the vent and insert it through the stopper. The vent lets outside air in as the fuel is drained out, and it acts as an overflow indicator when you fill the tank. The second tube is the fuel-supply for the engine and the interior pick-up tube and clunk are attached to it. To fill the tank, the fuel supply tubing is removed from the carburetor and attached to your filler pump line. When the tank is full, you simply reattach the line to your carburetor. The vent line is often attached to a pressure fitting on the engine’s muffler. This arrangement helps pressurize the tank to enhance fuel flow to the engine.
2-line setup
The simplest and most trouble-free setup is a two-line tank.
THREE-LINE SETUP
In a three-line tank, the setup is just like for a two-line arrangement, but a third line is added and used to fill the tank. The third line doesn’t need an interior pick-up line and clunk, but many do add them to allow the removal of fuel at the end of the day. Before running your engine, you must seal off or cap the third line to prevent fuel from leaking out. Fuel line plugs called “Fuel Dots” are available commercially to do this, but you can also use a tight-fitting machine screw or a short piece of ?-inch-diameter brass rod material as well. In a pinch, you can use a one-inch length of ?-inch dowel.
3-LINE SETUP
Three-line tank setups allow convenient tank filling without removing the fuel line from the engine.
ILLUSTRATIONS BY FX MODELS
GASOLINE FUEL SYSTEMS
All sorts of fuel filler fittings are available. T-fittings and fuel dots can be used for gas engine setups.
The simplest fuel systems are those for gasoline-powered engines. Unlike glow engines, which use a venturi vacuum to draw the fuel into the carburetor, most gas engines use pumper carburetor to draw fuel from the tank. The placement of the tank is not nearly as critical as for glow engines. Also, the gasoline carburetor has a diaphragm pump, which prevents fuel flowing into the engine unless it is
running.
To fill a gasoline tank, you can add a T-fitting to the engine’s fuel supply line with an added length of tubing. When you pump fuel into this line, it only flows into the tank and won’t flood the engine. When the tank is full, plug the fill line and the engine draws fuel from the tank. By adding a long fill line and using a Fuel Dot, you can place your “filler cap” anywhere you like, this is great for scale models with large fiberglass cowls that hinder easy access to the fuel lines.
This is a typical trouble spot. Vibration can cause the fuel line to fray and cause a leak.
TROUBLESHOOTING
Properly installed, your fuel system will last a very long time and may never need to be changed. In a hard landing, however, some of its parts may be dislodged or a line can become kinked or pinched. Here are some common fuel-flow problems and fixes.
After a hard landing, the flexible pickup tube and clunk inside the fuel tank can be forced all the way forward. This can go unnoticed until the next flight when the tank stops delivering fuel to the engine in a nose-high attitude. To prevent this, solder a short piece of brass tube to your clunk. This decreases the pick-up tube’s flexibility a bit but still allows it to draw fuel in normal flying attitudes.
If your engine starts to run lean for no apparent reason, check for small pinholes in the fuel-supply lines. Check closely where ever there is a tight bend or where the fuel or line comes into contact with the firewall. To help prevent chafing at the fire-wall pass-through, drill a small hole in the firewall and use a length of brass tube in the holes. Slip the fuel lines over the brass tubes to complete the system.
If your engine begins to run erratically, debris may have gotten into your fuel system. It usually finds its way into the model’s fuel tank from your fuel storage jug, and if it blocks fuel flow, your engine will die. To prevent this, use an in-line fuel filter in the fuel supply line just before the carburetor. Install another filter in your fuel-pump line so you fill your tank with filtered fuel. Add a combination fuel clunk/filter, and you have a triple defense against dead-sticks.
Model Airplane News - The #1 resource for RC plane and helicopter enthusiasts featuring news, videos, product releases and tech tips.
Continue reading...