GSNadmin
Staff member
Once you get involved with RC airplanes, it doesn’t take long for you to hear the term “FPV,” and many have already discovered how much fun this onboard video feature can be. The acronym “FPV” stands for “First-Person View,” and the equipment needed to enjoy that “from the cockpit” video experience has become one of the most popular add-on packages available today. There are several kinds of RC aircraft that now come with First-Person View function as standard equipment, you can add aftermarket FPV gear to your aircraft if it isn’t equipped with it. Let’s take a closer look.

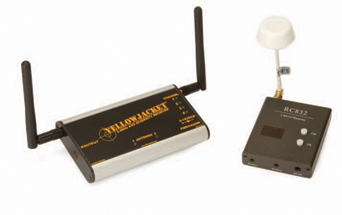
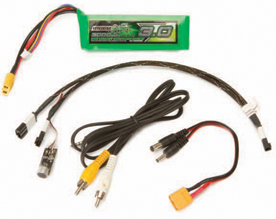
Hobby King’s RC832 5.8GH plug and play FPV set comes with everything you need except a monitor.
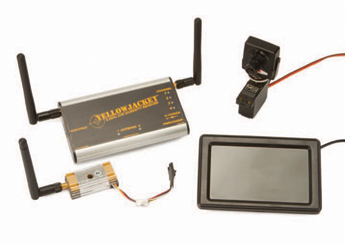
There are several sources for aftermarket FPV equipment, and here is an excellent 2.4GHz setup using mixed and matched brand products.
BASIC OPERATION
FPV requires a mini video camera, a video signal transmitter, a video receiver and a video monitor or video goggles. As with anything else involved with RC, it is always going to be easier to start with a complete FPV package where everything is designed to work together. If you buy each part by itself, you will have to figure out how to make all the connections with a custom homemade wire harness, or adaptor, which may require soldering wires and connectors together. As a rule, for your first time out, stick with a plug-and-play package.
Video Camera
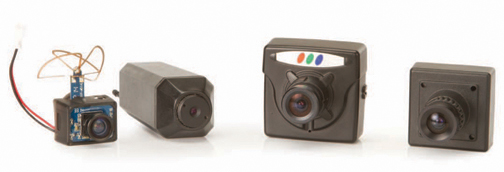
Available in all shapes, sizes and price points, whichever camera you get will have to be wired to your airborne power source and the FPV transmitter. Note Spektrum’s ultra micro FPV camera to the left comes with a built-in transmitter and antenna.
Most of the compact lightweight cameras used in FPV setups come with inexpensive plastic lenses. Once your system is set up, you may have to focus the camera so you have a sharp video image. Most have a removable/adjustable lens, and to focus it you have to loosen a set screw and then carefully screw the lens in or out to bring the video image into focus. It is also here where you can improve your optics, as there are replacement lenses available made of glass and with different viewing specs. For the best experience, use a wide-angle lens.
Airborne Video Transmitter

Transmitters for FPV systems are relatively small and compact. Some quads come with the equipment integrated while others can be upgraded with aftermarket add-ons. Transmitters produce a lot of heat, so be sure to install them where there’s proper airflow to cool them down.
This the part that converts what the camera sees into a video signal that can then be transmitted down to the FPV ground station. The camera is connected to the transmitter with a wire lead and it is important to match the wires properly. With a plug and play setup, you simply plug the connectors together. For a mix and match, the color of the wires becomes very important. The wiring for FPV is the same as with all electronics. The black and red wires are the ground (−) and power (+) wires respectively. The other wires leading from the camera will be yellow (video signal) and if there is a fourth (white) wire, it will be the audio signal.
WARNING
It is very important to first attach the antenna before applying power to the transmitter unit. The antenna is required to load the unit’s circuitry. If you apply power to the unit without the antenna attached, you can overload and burn it out. If in doubt, always follow the directions.
Ground-based Video Receiver
Your ground station can be anything from a set of goggles that have a built-in receiver to a table top supporting the FPV receiver of your choice. Various antenna arrangements are used and here you can also fine-tune choices for the best signal reception possible.
This is the matching part to the transmitter that receives the video signal transmitted from the FPV-equipped aircraft. It too is equipped with one or two antenna, and they should also be connected. Once the video transmitter and camera are powered, some transmitters will automatically lock on the video signal while others have a switch for selecting the clearest, strongest signal. Some cameras/transmitter may also have channel select switches. Matching the channels provides the best signal reception.
Monitor
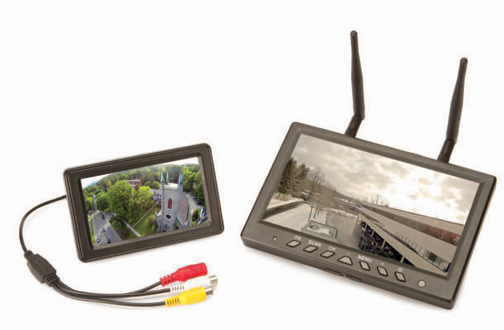
When it comes to seeing what your FPV camera is looking at, you have a lot of choices. Standard at monitors are very popular and like the smaller one to the left, can plug into your ground-based receiver. The larger one below with dual antenna is a combination of monitor and receiver. It even has built-in rechargeable batteries!
The ground-based video receiver will have an output jack that plugs into a standard AV (audio/video) cable. The cable connects the monitor to the receiver unit. Again, you have to match the colors of the jacks, yellow for video and white for audio if your FPV camera/transmitter is equipped with a microphone.
FPV Goggles
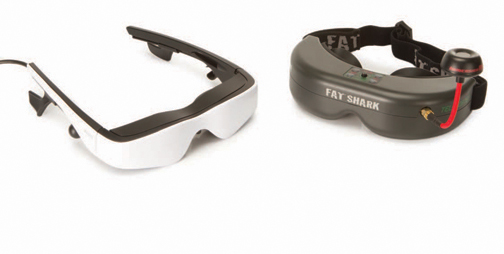
The ultimate in “geek swag,” FPV goggles are the coolest way to experience FPV video. The white Cinemizer OLED goggles from Zeiss (left) are top of the line headgear. The Fat Shark goggles above, are less expensive and are available in complete packages. Notice its mushroom antenna, the goggles have a built-in FPV receiver.
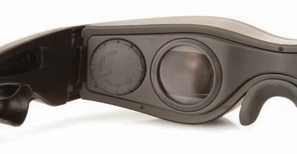
Here’s a close up of the optics in the Zeiss goggles. The are very high quality and the focus is adjustable.
A popular alternative to the flat monitor, are one-size-fits-all FPV goggles. These come in varying levels of quality and they provide a virtual experience of the video viewed directly with split images, one for each eye. Basic goggles have fixed focus and most cannot be used by people who wear glasses. It is best to wear contact lenses as the goggles do not fit over glasses.
There are also high-quality goggles that, much like a set of binoculars, have adjustable eyepieces for focus and pupil position for each eye.
There are also combo sets for both goggles and monitors that combine the viewing part of the system with the receiver all in a single unit. They have an antenna jack, and some also have rechargeable battery packs incorporated into them as well so all you have to do is put them on and turn them on to see the FPV video image.
Power
Power systems for your FPV system, as well as the wire leads and connectors, should all be compatible. Of course you will also need a battery charger for the battery pack(s) you use for power.
Once again, if you use a plug and play package you don’t have to worry about getting your setup up and running. Most airborne units can be run with a wire harness plugged into between your aircraft’s battery pack and speed control. You can also supply a separate battery pack to power your FPV equipment if your aircraft can handle the additional weight. In general, additional weight means less flight duration. You don’t need to include a power switch, just plug in the battery to turn on your system.
BOTTOM LINE
Whether you want to try piloting your aircraft using a live down feed “from the cockpit” view or you just want to give your friends a virtual “ride,” First-Person View provides a lot of fun and excitement. This electronic bird’s-eye view provides a new perspective of the world around you. Give FPV a try; you’ll never look at RC aircraft the same way again.
Model Airplane News - The #1 resource for RC plane and helicopter enthusiasts featuring news, videos, product releases and tech tips.
Continue reading...
Hobby King’s RC832 5.8GH plug and play FPV set comes with everything you need except a monitor.
There are several sources for aftermarket FPV equipment, and here is an excellent 2.4GHz setup using mixed and matched brand products.
BASIC OPERATION
FPV requires a mini video camera, a video signal transmitter, a video receiver and a video monitor or video goggles. As with anything else involved with RC, it is always going to be easier to start with a complete FPV package where everything is designed to work together. If you buy each part by itself, you will have to figure out how to make all the connections with a custom homemade wire harness, or adaptor, which may require soldering wires and connectors together. As a rule, for your first time out, stick with a plug-and-play package.
Video Camera
Available in all shapes, sizes and price points, whichever camera you get will have to be wired to your airborne power source and the FPV transmitter. Note Spektrum’s ultra micro FPV camera to the left comes with a built-in transmitter and antenna.
Most of the compact lightweight cameras used in FPV setups come with inexpensive plastic lenses. Once your system is set up, you may have to focus the camera so you have a sharp video image. Most have a removable/adjustable lens, and to focus it you have to loosen a set screw and then carefully screw the lens in or out to bring the video image into focus. It is also here where you can improve your optics, as there are replacement lenses available made of glass and with different viewing specs. For the best experience, use a wide-angle lens.
Airborne Video Transmitter
Transmitters for FPV systems are relatively small and compact. Some quads come with the equipment integrated while others can be upgraded with aftermarket add-ons. Transmitters produce a lot of heat, so be sure to install them where there’s proper airflow to cool them down.
This the part that converts what the camera sees into a video signal that can then be transmitted down to the FPV ground station. The camera is connected to the transmitter with a wire lead and it is important to match the wires properly. With a plug and play setup, you simply plug the connectors together. For a mix and match, the color of the wires becomes very important. The wiring for FPV is the same as with all electronics. The black and red wires are the ground (−) and power (+) wires respectively. The other wires leading from the camera will be yellow (video signal) and if there is a fourth (white) wire, it will be the audio signal.
WARNING
It is very important to first attach the antenna before applying power to the transmitter unit. The antenna is required to load the unit’s circuitry. If you apply power to the unit without the antenna attached, you can overload and burn it out. If in doubt, always follow the directions.
Ground-based Video Receiver
Your ground station can be anything from a set of goggles that have a built-in receiver to a table top supporting the FPV receiver of your choice. Various antenna arrangements are used and here you can also fine-tune choices for the best signal reception possible.
This is the matching part to the transmitter that receives the video signal transmitted from the FPV-equipped aircraft. It too is equipped with one or two antenna, and they should also be connected. Once the video transmitter and camera are powered, some transmitters will automatically lock on the video signal while others have a switch for selecting the clearest, strongest signal. Some cameras/transmitter may also have channel select switches. Matching the channels provides the best signal reception.
Monitor
When it comes to seeing what your FPV camera is looking at, you have a lot of choices. Standard at monitors are very popular and like the smaller one to the left, can plug into your ground-based receiver. The larger one below with dual antenna is a combination of monitor and receiver. It even has built-in rechargeable batteries!
The ground-based video receiver will have an output jack that plugs into a standard AV (audio/video) cable. The cable connects the monitor to the receiver unit. Again, you have to match the colors of the jacks, yellow for video and white for audio if your FPV camera/transmitter is equipped with a microphone.
FPV Goggles
The ultimate in “geek swag,” FPV goggles are the coolest way to experience FPV video. The white Cinemizer OLED goggles from Zeiss (left) are top of the line headgear. The Fat Shark goggles above, are less expensive and are available in complete packages. Notice its mushroom antenna, the goggles have a built-in FPV receiver.
Here’s a close up of the optics in the Zeiss goggles. The are very high quality and the focus is adjustable.
A popular alternative to the flat monitor, are one-size-fits-all FPV goggles. These come in varying levels of quality and they provide a virtual experience of the video viewed directly with split images, one for each eye. Basic goggles have fixed focus and most cannot be used by people who wear glasses. It is best to wear contact lenses as the goggles do not fit over glasses.
There are also high-quality goggles that, much like a set of binoculars, have adjustable eyepieces for focus and pupil position for each eye.
There are also combo sets for both goggles and monitors that combine the viewing part of the system with the receiver all in a single unit. They have an antenna jack, and some also have rechargeable battery packs incorporated into them as well so all you have to do is put them on and turn them on to see the FPV video image.
Power
Power systems for your FPV system, as well as the wire leads and connectors, should all be compatible. Of course you will also need a battery charger for the battery pack(s) you use for power.
Once again, if you use a plug and play package you don’t have to worry about getting your setup up and running. Most airborne units can be run with a wire harness plugged into between your aircraft’s battery pack and speed control. You can also supply a separate battery pack to power your FPV equipment if your aircraft can handle the additional weight. In general, additional weight means less flight duration. You don’t need to include a power switch, just plug in the battery to turn on your system.
BOTTOM LINE
Whether you want to try piloting your aircraft using a live down feed “from the cockpit” view or you just want to give your friends a virtual “ride,” First-Person View provides a lot of fun and excitement. This electronic bird’s-eye view provides a new perspective of the world around you. Give FPV a try; you’ll never look at RC aircraft the same way again.
Model Airplane News - The #1 resource for RC plane and helicopter enthusiasts featuring news, videos, product releases and tech tips.
Continue reading...