GSNadmin
Staff member
As a long-time-fan of the PBS show “New Yankee Workshop” I’ve seen quite a few good woodworking projects, but none more handy than the large roll around shop table. I knew I’d have to build it one day when I had the room for it in a workshop I hadn’t even yet built. Sorry to say, the show is no longer being aired, but you can watch most of Norm Abram’s project builds on YouTube, including this shop table. Even though Norm didn’t originate the idea for this table, I want to make sure I give proper credit where credit is due since Norm deserves all the kudos possible. He’s a craftsman’s craftsman – too bad he isn’t into RC Aircraft!
As to the real reason I built this table, I am into Giant Scale Warbirds and they take up lots of workbench space. One needs a table of this size to stand the giant scale model on while doing CG balance work and other final details. Since plywood usually comes in 4 x 8 foot sheets, this is about as big as you can make it without getting into some crazy woodworking and having a huge workshop. In fact, I can put two warbird fuselages on this table and work one on either side. It’s huge!

Finished moveable shop table of 4 feet by 7 feet work surface.
Overall comment here. There are no absolute dimensions to this table. You can make it totally to suit your tastes. This is a guide to getting it done, but only one thing requires any serious consideration – the size wheels or casters you use determine the installation height of the narrow end cross braces because they have to be positioned to allow the table to move when wheels are extended, yet also for the table legs to drop solidly onto the floor with them retracted.
Before beginning the job, I’ll mention that this project really requires a fairly powerful table saw of at least 10 inch diameter blade to rip the full 4×8 plywood sheets to width and a 10 to 12 inch cutoff saw to cut the parts to length, but most serious RC guys already have those anyway, so hopefully those won’t be an additional expense. I also used my pneumatic brad nailer which is just about the only way to quickly build wood projects these days. A battery powered drill motor or screw gun will speed up the assembly using drywall screws. A large bottle of yellow carpenter’s glue is needed as well as the hardware pieces (hinges, casters) I will cover along the way. I’ll make a materials list as well.
Also, if you view the video, take note that I departed from Norm’s concept of the main work surface substructure. Norm had a very nice shop area and work table already in place with the NYW so he was able to build his table using “torsion box” construction which consists of several cross pieces of plywood with a masonite top and bottom. But you cannot build this torsion box square, true, and flat unless you have a flat surface to work from. And since I refuse to work bent-over off the concrete floor, I bought a 36 inch wide solid core exterior grade door to serve as the heart of the shop table vs building the torsion box. I then mounted that on a set of saw horses and got busy. One more note, take the time to closely inspect the door for flatness both directions before you buy. Keep going until you find one that is as perfect as can be.
I watched the YouTube video once more as a refresher and began to visualize the final dimensions of the table so I could know how much wood to buy at the local home store. The material that I chose for the body is 3/4” Birch, fine-lamination plywood that was primed on one side and super-fine bare finish on the other. This fancy plywood was kinda expensive per sheet, and you can make this out of less expensive and rougher plywood, but I felt it just wouldn’t be as smooth and finished in appearance as the more expensive plywood. I was able to find this plywood at Lowe’s but Home Depot may have it as well. Virtually the entire table is made out of this plywood so it won’t go to waste, anything not used can be put aside for future projects. The same fine-lamination plywood is used for the work top, except it’s 1/2″.
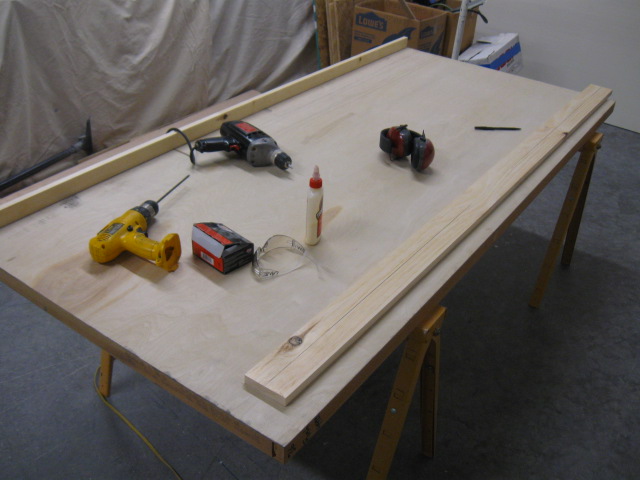
Solid core exterior grade door, 36” by 6’8” by 1-3/4” on the saw horses. 1×4 white wood side rails being installed to provide a nailing surface for the legs.
The only non plywood parts I used are the 1″ by 4” white wood side rails for the door edging to provide more strength for the legs to nail to – hand pick them for straightness. No need to miter the ends as they won’t be seen on the finished table. Glue, nail, and screw these to the door edges. I used the brad gun to tack the pieces in place and came back with 2” drywall screws to totally secure them in place. From there, then you can rip the legs out of plywood on your table saw. I made my table a bit tall since I am fairly tall and ended up at around 38 inches overall height because I like to stand and work most of the time. But, since this is a custom table, make the legs to suit how you like to work. I wouldn’t mind making another table much lower so I could comfortably work while sitting. Once you rip the 8’ plywood to width for the legs, chop-saw two pieces for each leg, which are glued and screwed at 90 degrees to attach to the white wood 1 by 4’s as shown. For a more professional look, one half of the leg will be about 1 inch less wide that the other. Once glued together, they will appear to be the same width.
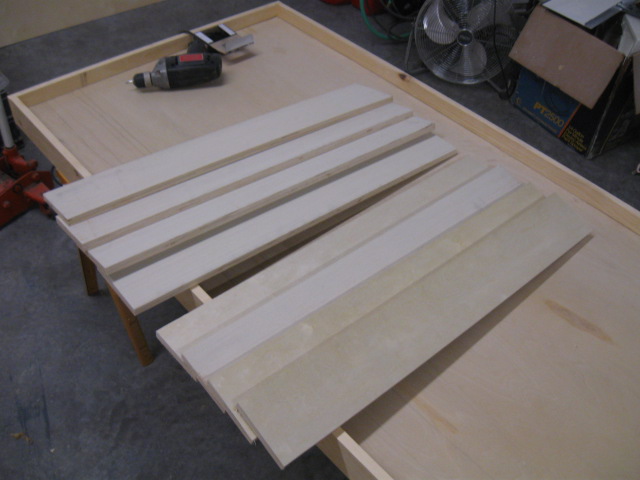
Cut-to-length plywood panels for the legs. Now is the time to change your mind on the height of the table! Ha. Also, level the exterior door on the sawhorses in both directions now.
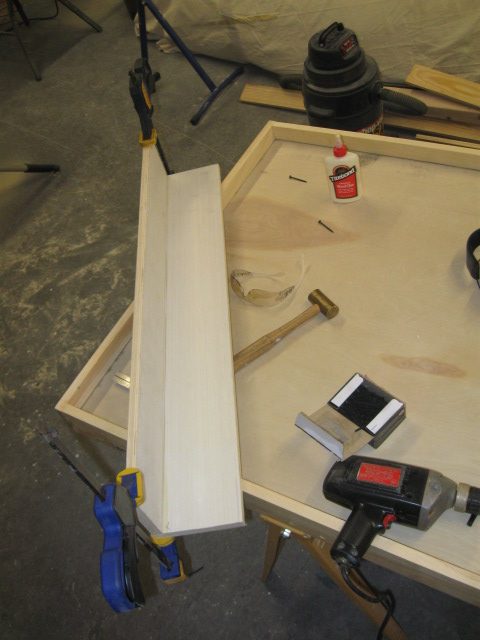
Next you glue and screw them together. Not impossible to make shorter at this point, but more work – last chance …

… because now the leg gets glued and screwed to the white wood side rails. Make sure it’s square and plumb!
Press on with the leg construction for 3 more legs, making sure they are as true to plumb as possible. Measure between the opposite legs for squareness as well. Once square, flat, and level with the world, you can add the stringers to the long sides of the table. These are also ripped out of the plywood sheet and positioned at the height that suits you – not too high because you can add a shelf there later for additional storage as I did.

Stringers added to long sides of the table. They give lots of lateral support. Starting to look like something!

Narrow end-of-table cross brace. The installed height of that cross brace depends on what sized wheels you use.

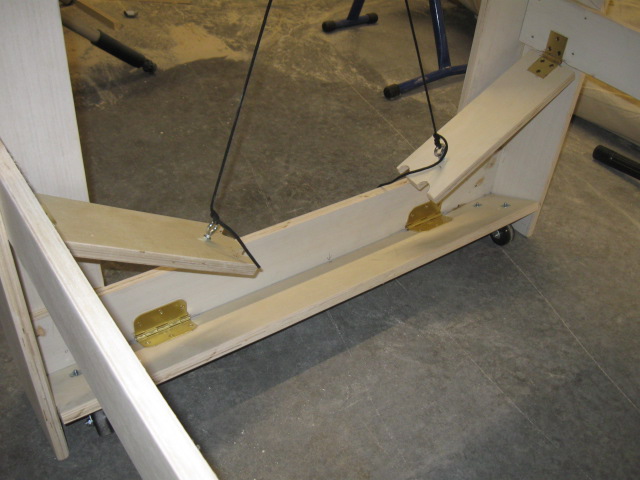
Jumping ahead a bit, wheels extended. Wheels must be mounted and hinged to the cross brace to determine placement. Not too high and not too low. Use larger wheels than I used (2”).
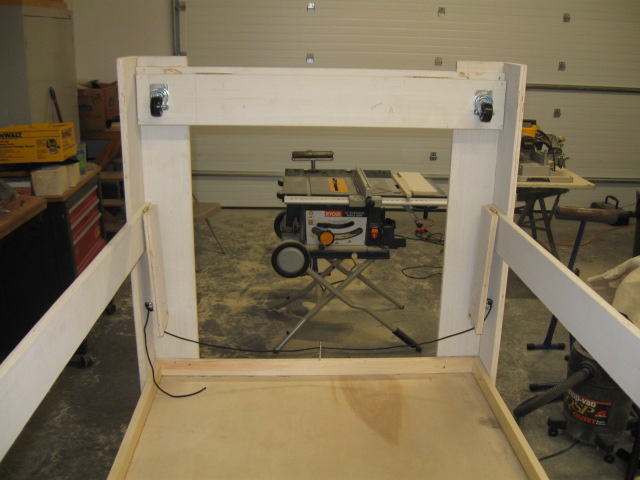
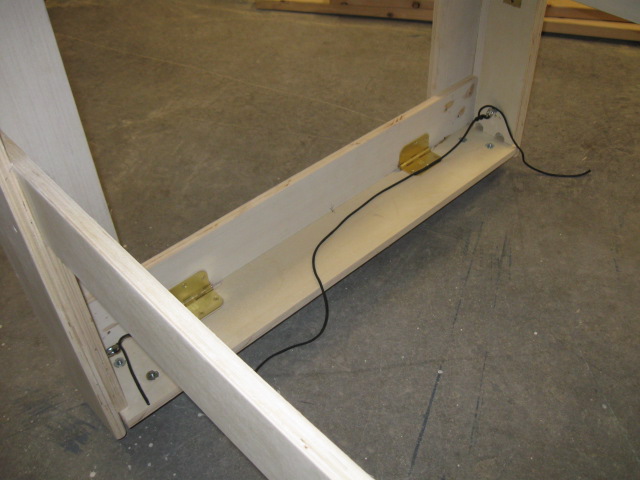
Wheels in the retracted position. Also seen are the hinged side stops (dropped) that keep the wheels in the extended position. Note the portable 10” table saw which handled the plywood ripping job well.
Since we are getting to the point of adding the wheels, I will make a recommendation here and say that LARGER wheels are BETTER. Why, you might ask? Well, very simply, the larger wheels are much easier to move the table with. I used the fully castoring wheels here but you might want to use two fully castoring and two fixed wheels, just depends on how you like to move your table around. I bought these wheels at Lowe’s but most any hardware store will have something similar. Hinges for the wheel braces are standard 3 or 4 inch door hinges and the side stop/block hinges can be just about any hinge you want to pick up. Of course, in the matter of raising and lowering the table, the lighter you build the table, the easier it is to lift up to either get on the wheels or off the wheels. By the time I added the shelf and have tools and planes on the table top, it is a pretty good load to lift. The original concept of this table was to be light and easily moved. I find I don’t move it around too much so far, but nice to have that option.
Once you get the wheels and cross braces installed on the narrow ends, you can flip the table upright. Now, you can lift the table up and drop the wheels down-and-locked and roll her around.
Hinged side stops pulled out and legs on the concrete floor. Rope holds the side stops out of the way.

Table lifted up and the hinged side stops dropped into position. Table can now be moved about as needed.
Only thing missing is the top working surface. Finished table is very strong yet very light.
Table lifted up and the hinged side stops dropped into position. Table can now be moved about as needed.
One note on adding the top plywood work surface is that you should keep the overlap to a maximum of 6 inches all the way around or you may get some droop on the edges and it won’t be true and flat across the top. I cut the 4 by 8 foot plywood top to 7 feet long since the exterior door is only 6’8” long – too much over hang on the narrow ends. But, I left the overlap all around because this gives you a great surface to clamp to later on, for reasons presently unknown, but you’ll be glad you left some overhang. Also, on the top plywood, I used the slightly thinner 1/2” high grade plywood to save some weight and some money. I seem to recall the 3/4” plywood was about $50 a sheet and the 1/2” about $35. You can flip the plywood top over when you get it thoroughly torn up and get double use of it, so, don’t glue or nail it down – 12 evenly spaced drywall screws will do nicely.
The list of materials follows:
1 Exterior door – 1-3/4” by 36” by 6’8” solid core
1 sheet – 4’ by 8’ 3/4” Birch plywood (legs and stringers) Hand pick for no warps
1 sheet – 4’ by 8’ 1/2” Birch plywood (table top) Hand pick for no warps
3 – 1″ by 4” by 8’ white wood boards (door edging)
4 castors (4” or larger)
4 – 3 to 4 inch door hinges
4 – 2 inch flat hinges
Boxes of 1-1/2” and 2″ drywall screws ( or whatever length you prefer)
Yellow carpenter’s glue
General table numbers are as follows. Main body less plywood top = 3′ wide x 6’8″ long (using a heavy exterior grade door) Legs = 6″ wide one half, 5″ wide other half (glue and screw them together to make one leg). 3/4″ plywood. Stringers = 4″ wide. 3/4″ plywood. Height = about 36 to 38 inches, or to suit Topper = 4′ wide x 7′ long. 1/2″ plywood. Wheels = 4″ diameter, 2 or all 4 fully castering Hinges = 3″ to 4″ pairs for main wheel mounts, 2″ for the side stops Use glue and screws on all wood joints except for the moving parts. Norm’s Video https://www.youtube.com/watch?v=G6Hs-6mfnVM
Shelf added later. Very handy to keep your balsa box and covering materials. Adds LOTS of weight to the table and makes harder to lift on/off the wheels.

Power strip added for Dremel tool and covering irons.
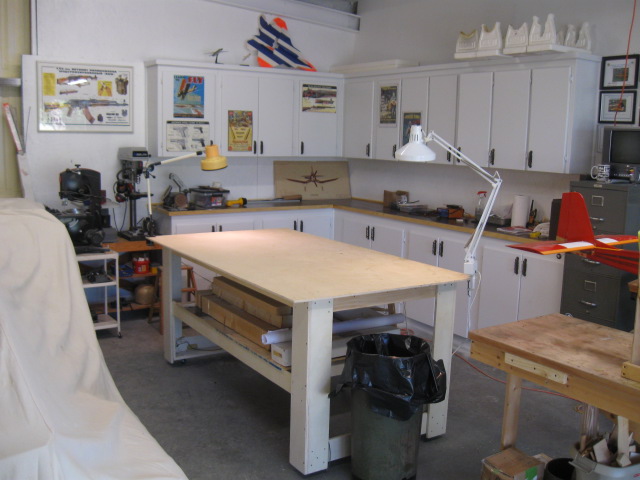
Roll around table is the centerpiece of my new workshop. Most useful tool I have in the entire shop.
TEXT AND PHOTOS BY LANE CRABTREE
Model Airplane News - The #1 resource for RC plane and helicopter enthusiasts featuring news, videos, product releases and tech tips.
Continue reading...
As to the real reason I built this table, I am into Giant Scale Warbirds and they take up lots of workbench space. One needs a table of this size to stand the giant scale model on while doing CG balance work and other final details. Since plywood usually comes in 4 x 8 foot sheets, this is about as big as you can make it without getting into some crazy woodworking and having a huge workshop. In fact, I can put two warbird fuselages on this table and work one on either side. It’s huge!
Finished moveable shop table of 4 feet by 7 feet work surface.
Overall comment here. There are no absolute dimensions to this table. You can make it totally to suit your tastes. This is a guide to getting it done, but only one thing requires any serious consideration – the size wheels or casters you use determine the installation height of the narrow end cross braces because they have to be positioned to allow the table to move when wheels are extended, yet also for the table legs to drop solidly onto the floor with them retracted.
Before beginning the job, I’ll mention that this project really requires a fairly powerful table saw of at least 10 inch diameter blade to rip the full 4×8 plywood sheets to width and a 10 to 12 inch cutoff saw to cut the parts to length, but most serious RC guys already have those anyway, so hopefully those won’t be an additional expense. I also used my pneumatic brad nailer which is just about the only way to quickly build wood projects these days. A battery powered drill motor or screw gun will speed up the assembly using drywall screws. A large bottle of yellow carpenter’s glue is needed as well as the hardware pieces (hinges, casters) I will cover along the way. I’ll make a materials list as well.
Also, if you view the video, take note that I departed from Norm’s concept of the main work surface substructure. Norm had a very nice shop area and work table already in place with the NYW so he was able to build his table using “torsion box” construction which consists of several cross pieces of plywood with a masonite top and bottom. But you cannot build this torsion box square, true, and flat unless you have a flat surface to work from. And since I refuse to work bent-over off the concrete floor, I bought a 36 inch wide solid core exterior grade door to serve as the heart of the shop table vs building the torsion box. I then mounted that on a set of saw horses and got busy. One more note, take the time to closely inspect the door for flatness both directions before you buy. Keep going until you find one that is as perfect as can be.
I watched the YouTube video once more as a refresher and began to visualize the final dimensions of the table so I could know how much wood to buy at the local home store. The material that I chose for the body is 3/4” Birch, fine-lamination plywood that was primed on one side and super-fine bare finish on the other. This fancy plywood was kinda expensive per sheet, and you can make this out of less expensive and rougher plywood, but I felt it just wouldn’t be as smooth and finished in appearance as the more expensive plywood. I was able to find this plywood at Lowe’s but Home Depot may have it as well. Virtually the entire table is made out of this plywood so it won’t go to waste, anything not used can be put aside for future projects. The same fine-lamination plywood is used for the work top, except it’s 1/2″.
Solid core exterior grade door, 36” by 6’8” by 1-3/4” on the saw horses. 1×4 white wood side rails being installed to provide a nailing surface for the legs.
The only non plywood parts I used are the 1″ by 4” white wood side rails for the door edging to provide more strength for the legs to nail to – hand pick them for straightness. No need to miter the ends as they won’t be seen on the finished table. Glue, nail, and screw these to the door edges. I used the brad gun to tack the pieces in place and came back with 2” drywall screws to totally secure them in place. From there, then you can rip the legs out of plywood on your table saw. I made my table a bit tall since I am fairly tall and ended up at around 38 inches overall height because I like to stand and work most of the time. But, since this is a custom table, make the legs to suit how you like to work. I wouldn’t mind making another table much lower so I could comfortably work while sitting. Once you rip the 8’ plywood to width for the legs, chop-saw two pieces for each leg, which are glued and screwed at 90 degrees to attach to the white wood 1 by 4’s as shown. For a more professional look, one half of the leg will be about 1 inch less wide that the other. Once glued together, they will appear to be the same width.
Cut-to-length plywood panels for the legs. Now is the time to change your mind on the height of the table! Ha. Also, level the exterior door on the sawhorses in both directions now.
Next you glue and screw them together. Not impossible to make shorter at this point, but more work – last chance …
… because now the leg gets glued and screwed to the white wood side rails. Make sure it’s square and plumb!
Press on with the leg construction for 3 more legs, making sure they are as true to plumb as possible. Measure between the opposite legs for squareness as well. Once square, flat, and level with the world, you can add the stringers to the long sides of the table. These are also ripped out of the plywood sheet and positioned at the height that suits you – not too high because you can add a shelf there later for additional storage as I did.
Stringers added to long sides of the table. They give lots of lateral support. Starting to look like something!
Narrow end-of-table cross brace. The installed height of that cross brace depends on what sized wheels you use.
Jumping ahead a bit, wheels extended. Wheels must be mounted and hinged to the cross brace to determine placement. Not too high and not too low. Use larger wheels than I used (2”).
Wheels in the retracted position. Also seen are the hinged side stops (dropped) that keep the wheels in the extended position. Note the portable 10” table saw which handled the plywood ripping job well.
Since we are getting to the point of adding the wheels, I will make a recommendation here and say that LARGER wheels are BETTER. Why, you might ask? Well, very simply, the larger wheels are much easier to move the table with. I used the fully castoring wheels here but you might want to use two fully castoring and two fixed wheels, just depends on how you like to move your table around. I bought these wheels at Lowe’s but most any hardware store will have something similar. Hinges for the wheel braces are standard 3 or 4 inch door hinges and the side stop/block hinges can be just about any hinge you want to pick up. Of course, in the matter of raising and lowering the table, the lighter you build the table, the easier it is to lift up to either get on the wheels or off the wheels. By the time I added the shelf and have tools and planes on the table top, it is a pretty good load to lift. The original concept of this table was to be light and easily moved. I find I don’t move it around too much so far, but nice to have that option.
Once you get the wheels and cross braces installed on the narrow ends, you can flip the table upright. Now, you can lift the table up and drop the wheels down-and-locked and roll her around.
Hinged side stops pulled out and legs on the concrete floor. Rope holds the side stops out of the way.
Table lifted up and the hinged side stops dropped into position. Table can now be moved about as needed.
Only thing missing is the top working surface. Finished table is very strong yet very light.
Table lifted up and the hinged side stops dropped into position. Table can now be moved about as needed.
One note on adding the top plywood work surface is that you should keep the overlap to a maximum of 6 inches all the way around or you may get some droop on the edges and it won’t be true and flat across the top. I cut the 4 by 8 foot plywood top to 7 feet long since the exterior door is only 6’8” long – too much over hang on the narrow ends. But, I left the overlap all around because this gives you a great surface to clamp to later on, for reasons presently unknown, but you’ll be glad you left some overhang. Also, on the top plywood, I used the slightly thinner 1/2” high grade plywood to save some weight and some money. I seem to recall the 3/4” plywood was about $50 a sheet and the 1/2” about $35. You can flip the plywood top over when you get it thoroughly torn up and get double use of it, so, don’t glue or nail it down – 12 evenly spaced drywall screws will do nicely.
The list of materials follows:
1 Exterior door – 1-3/4” by 36” by 6’8” solid core
1 sheet – 4’ by 8’ 3/4” Birch plywood (legs and stringers) Hand pick for no warps
1 sheet – 4’ by 8’ 1/2” Birch plywood (table top) Hand pick for no warps
3 – 1″ by 4” by 8’ white wood boards (door edging)
4 castors (4” or larger)
4 – 3 to 4 inch door hinges
4 – 2 inch flat hinges
Boxes of 1-1/2” and 2″ drywall screws ( or whatever length you prefer)
Yellow carpenter’s glue
General table numbers are as follows. Main body less plywood top = 3′ wide x 6’8″ long (using a heavy exterior grade door) Legs = 6″ wide one half, 5″ wide other half (glue and screw them together to make one leg). 3/4″ plywood. Stringers = 4″ wide. 3/4″ plywood. Height = about 36 to 38 inches, or to suit Topper = 4′ wide x 7′ long. 1/2″ plywood. Wheels = 4″ diameter, 2 or all 4 fully castering Hinges = 3″ to 4″ pairs for main wheel mounts, 2″ for the side stops Use glue and screws on all wood joints except for the moving parts. Norm’s Video https://www.youtube.com/watch?v=G6Hs-6mfnVM
Shelf added later. Very handy to keep your balsa box and covering materials. Adds LOTS of weight to the table and makes harder to lift on/off the wheels.
Power strip added for Dremel tool and covering irons.
Roll around table is the centerpiece of my new workshop. Most useful tool I have in the entire shop.
TEXT AND PHOTOS BY LANE CRABTREE
Model Airplane News - The #1 resource for RC plane and helicopter enthusiasts featuring news, videos, product releases and tech tips.
Continue reading...