GSNadmin
Staff member
After gluing the wing panels together the next step is to install the one-piece wing structure to the fuselage.

Here is the completed wing structure. The center bottom section has been left unsheeted so the dihedral braces could be epoxied into place. This also keeps the wing blocks that will support the wing attachment bolts exposed making the next part a bit easier to accomplish.

Once the wing halves were glued together, the front alignment dowel is fully supported and it is ready to be inserted into the former bulkhead forward of the wing saddle.
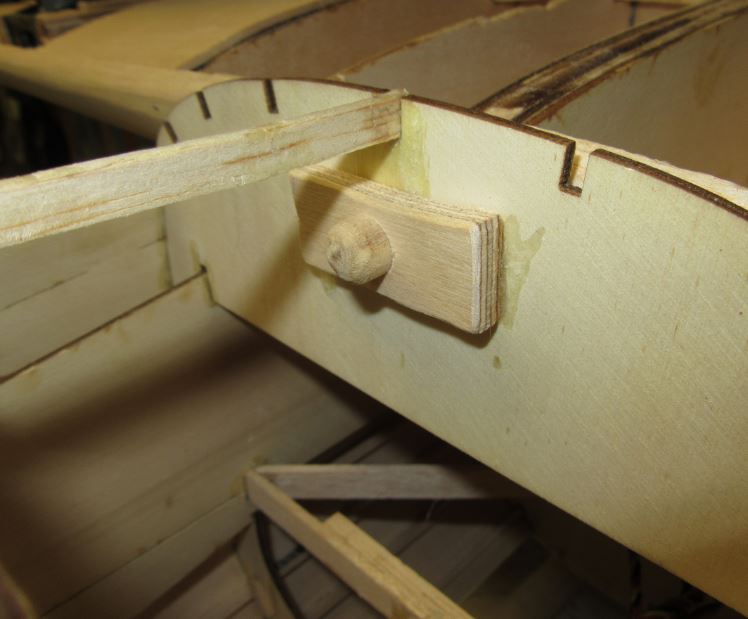
Here the dowel has been inserted through the bulkhead and the 1/4 inch plywood doubler has been tack glued in place over the dowel. When it comes time to fine tune the wing incidence, the doubler can be moved up or down slightly to change the incidence.

The anchor blocks for the wing hold-down bolts are made of hardwood and are epoxied in place between the wing saddle profiles in either side of the fuselage.

The wing is then placed in the wing saddle then centered and aligned by measuring from the wing tips to the tail post. Once it is in the proper position, I used T-pins and secured the trailing edge so it would not move. I then drilled through the wing blocks and down into the anchor blocks in the fuselage. Drill small pilot holes makes it easy to properly located the bolt holes. After the holes are drilled I enlarged the holes in the wing blocks to 1/4 inch so the tap can be inserted to tape the anchor blocks below.

Here the two 3 1/2 inch long aluminum 1/4-20 bolts have been inserted and screwed into the threaded anchor blocks. They hold the wing in place securely. Before I sheet the open wing structure I will add plywood hard plates where the bolt heads and washers will be.

Here’s the wing attached to the fuselage. It’s starting to look like a real airplane. Stay tuned and we will finish up the retracts installation and get the Skyraider up on its feet.
For the previous Post: Click Here
Model Airplane News - The #1 resource for RC plane and helicopter enthusiasts featuring news, videos, product releases and tech tips.
Continue reading...
Here is the completed wing structure. The center bottom section has been left unsheeted so the dihedral braces could be epoxied into place. This also keeps the wing blocks that will support the wing attachment bolts exposed making the next part a bit easier to accomplish.
Once the wing halves were glued together, the front alignment dowel is fully supported and it is ready to be inserted into the former bulkhead forward of the wing saddle.
Here the dowel has been inserted through the bulkhead and the 1/4 inch plywood doubler has been tack glued in place over the dowel. When it comes time to fine tune the wing incidence, the doubler can be moved up or down slightly to change the incidence.
The anchor blocks for the wing hold-down bolts are made of hardwood and are epoxied in place between the wing saddle profiles in either side of the fuselage.
The wing is then placed in the wing saddle then centered and aligned by measuring from the wing tips to the tail post. Once it is in the proper position, I used T-pins and secured the trailing edge so it would not move. I then drilled through the wing blocks and down into the anchor blocks in the fuselage. Drill small pilot holes makes it easy to properly located the bolt holes. After the holes are drilled I enlarged the holes in the wing blocks to 1/4 inch so the tap can be inserted to tape the anchor blocks below.
Here the two 3 1/2 inch long aluminum 1/4-20 bolts have been inserted and screwed into the threaded anchor blocks. They hold the wing in place securely. Before I sheet the open wing structure I will add plywood hard plates where the bolt heads and washers will be.
Here’s the wing attached to the fuselage. It’s starting to look like a real airplane. Stay tuned and we will finish up the retracts installation and get the Skyraider up on its feet.
For the previous Post: Click Here
Model Airplane News - The #1 resource for RC plane and helicopter enthusiasts featuring news, videos, product releases and tech tips.
Continue reading...