• If you are new to GiantScaleNews.com, please register, introduce yourself, and make yourself at home.

    We're 1st in Giant Scale RC because we've got the best membership on the internet! Take a look around and don't forget to register to get all of the benefits of GSN membership!

    Welcome!

Scale Curtiss XP-55 Ascender

Larry B

70cc twin V2
Jetpainter,
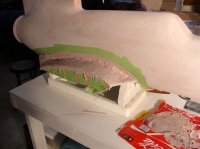
Nope, I have never had any issues with the Bondo eating up the blue foam. I had never thought about it but polyester based resins do eat up some foams and Bondo is a polyester based stuff. I remember while doing the plug for the 109E I used a bunch of blue foam around the nose because of the shape, but it seemed to work well.

F6.JPG
F8.JPG
 

Jetpainter

640cc Uber Pimp
I've been in the body shop business for 37 years so I've sanded my share of body filler, but it looks like you've sanded your share as well.;)
 

acerc

640cc Uber Pimp
Thank you @Larry B, that look's to be a much simpler and more accurate method than the others I have seen. I know I could make a plug that way relatively easily.
 

Larry B

70cc twin V2
I am glad that this is helping you out, making your own glass parts is a bunch of fun and there is no limit to the possibilities.
The next step in making your fuse plug is to decide on how you want to make the wing fillets. I opted to incorporate the Ascender's huge fillets into the fuse mold, this is harder to lay-up but it does save some work in making separate fillet molds.
Decide on what airfoil you are going to use and then hot-wire a short wing section with your airfoil. This will allow you to build up the fillets on top of the wing section giving you a nice shape, remember to hot-wire the airfoil figuring in the sheeting thickness otherwise when you sheet the wing it won't fit the fuse!
After you get the top of the fillets like you want them remove the wing section and then smooth out the wing saddle area, this will need to be completely sheeted & Bondo-ed making a enclosed wing saddle area. Also be sure you have the incidence where you want it now or it will forever be wrong.
-
 

Attachments

  • H5.JPG
    H5.JPG
    286.7 KB · Views: 282
  • H7.JPG
    H7.JPG
    319.5 KB · Views: 300
  • I2.JPG
    I2.JPG
    339.5 KB · Views: 293
  • I6.JPG
    I6.JPG
    311.5 KB · Views: 304
Last edited:

Larry B

70cc twin V2
One important side note; After you get to this point and are happy with the overall shape you will find that you have sanded down to the plywood cross sections in lots of spots. This is how you can tell that you are getting close to the right shape, your cross sections will start to appear as you block sand down to them.
If you leave these visible they will show up in your mold! Take a Dremel tool with a router bit and cut them away about an 1/8th inch below the surface. Once you have cut away all the plywood just go back and refill the area with more Bondo.
 

Attachments

  • F9.JPG
    F9.JPG
    335.8 KB · Views: 327
  • G2.JPG
    G2.JPG
    294.7 KB · Views: 303

Larry B

70cc twin V2
If you are thinking that this process takes a bit of Bondo, then you would be correct, it took 6 full gallons to do this plug. Even doing the strip planking a 1/4 inch below the mold line takes about 50lbs of Bondo when you are at this point.
 

Attachments

  • P9.JPG
    P9.JPG
    556.1 KB · Views: 283
Last edited:

Larry B

70cc twin V2
After a good final block sanding with 80 grit paper you are ready for the next step, Dura-Tec. This a a special stuff designed just for plugs and mold making. It will spray right over your 80 grit sanding marks and you'll never know it. I spray the stuff on really thick, this will allow you to do some more sanding if you want to and it gives you a nice thick coating to polish for the final finish.
If you want to make some panel lines in the plug this is the time to do it, just mask off the area you want to have an edge on and spray another coat of Dura-Tec. This gives you a little edge to mark the panel line. If you don't like it then just sand it off back down to the first layer.
After you have polished the Dura-Tec you should have a nice smooth plug that is the right shape.
 

Attachments

  • L9.JPG
    L9.JPG
    418.7 KB · Views: 286
  • J1.JPG
    J1.JPG
    188.3 KB · Views: 287
  • L4.JPG
    L4.JPG
    298.6 KB · Views: 290
Last edited:

acerc

640cc Uber Pimp
That has got to be the simplest process I have seen. Definitely doable for even a noob like myself, I will most definitely give it a go on the next needed cowl. Thanks for sharing.
 

Jetpainter

640cc Uber Pimp
Thanks! The Duratec primer looks interesting. I use a similar product at work, but it looks like the Duratec is about half the price!
 

Larry B

70cc twin V2
Glad that some of this stuff is useful, I have continued to experiment and improve my process every mold is a improvement.

The next step is to build the parting board, this is nothing fancy but it needs to be as flat as you can make it in order to give you a nice straight parting flange. I just use some 3/4" plywood and 2x4's as a base frame. Now you take that paper profile that you used to make the plug profile shape. This is then cutout in the top of the parting board so that the plug can be supported along it's centerline. I build a couple of wood cradle shapes to support the plug on the bottom side of the parting board, be sure they are good and strong due to the weight of the plug.

I put a final sheet of smooth white 1/8th" Masonite on top of the parting board with the profile cut out of this stuff also. This smooth white surface makes a good surface for the mold flange to be formed on.
 

Attachments

  • K4.JPG
    K4.JPG
    376.1 KB · Views: 317
  • L2.JPG
    L2.JPG
    451.3 KB · Views: 305
  • K8.JPG
    K8.JPG
    421.6 KB · Views: 304
  • K5.JPG
    K5.JPG
    370 KB · Views: 305
Top