GSNadmin
Staff member
Over the past several years, the arrival of ARFs has provided a means for many to quickly get into RC flying. Today, preassembled models have improved to the point where many exceed the level of ability, interest, and even flying skills of the purchaser. No matter the reason, ARFs do fill a very necessary niche in the RC airplane marketplace. While I personally enjoy creating a model from materials or a builder’s kit, I still find a great deal of satisfaction in being able to get a new model airborne in short order.
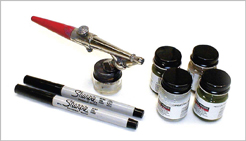
All the necessary tools and material to execute your “mini makeover”- airbrush, markers, and paint!
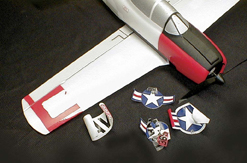
All the factory-applied markings have been removed prior to paint application.
However, there is one thing that ARFs don’t do well and that’s provide unique models with personality or an appearance that’s different from that of its production line mates. If you want to learn some new skills, let’s personalize that typical cookie-cutter flyer!Weathering and detailing an ARF isn’t something to be done only to larger and more expensive warbirds. The nice part about this adventure is that you start with a relatively inexpensive model with proven performance. We can dramatically change its appearance without affecting that impressive flight performance. The techniques involved are the same regardless of the size, cost or complexity of the basic model. I was initially concerned that this treatment would add significant weight to the model and affect its fun-flying qualities. Have no fear; the ParkZone Ultra Micro T-28 Trojan flies just as well as it ever did and only gains 2.5 grams in the process.
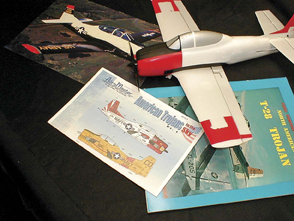
The first step is using documentation to choose the full-scale version you want to duplicate. Most popular subjects have nearly unlimited schemes.
The first step is to choose a color scheme that you like and want to apply to your model. This can be as involved or as simple as you’d like but today, unlike the “olden days,” there are tons of images available from a variety of Internet sources-all you have to do is pick one! In the case of my T-28, I chose a restored Trojan that duplicated the markings used in Southeast Asia in the 1970s. It’s the typical brown and green “camo” scheme that was worn by most airplanes at the time. It creates a whole new look on the model, distinctly different from the bright “Navy trainer” colors in which the model is supplied. Other choices might include an alternative Navy trainer scheme of all yellow with red or green mission bands, the attractive early USAF aluminum and orange/red scheme, or even the Desert camo seen on the Fennec version. The choices are nearly unlimited and there just has to be one out there for you.
Since the Micro Trojan is molded foam, you need to use foam-safe paint for your makeover. Do not use lacquer-based spray cans as many of the solvents and propellants used can damage the Trojan’s surfaces. To be safe, use acrylic, water-based paint such as the Model Master series by Testors. These paints are a perfect match to the actual colors used on the full-scale aircraft. They’re available in small bottles that can be brushed or airbrushed on to your model. Some colors are also available in easy to use spray cans. Either way, make certain the paint you choose is foam friendly. Another benefit of the Model Master paints is this it bonds well to the surface and isn’t easily separated by using masking tape for color separation lines.
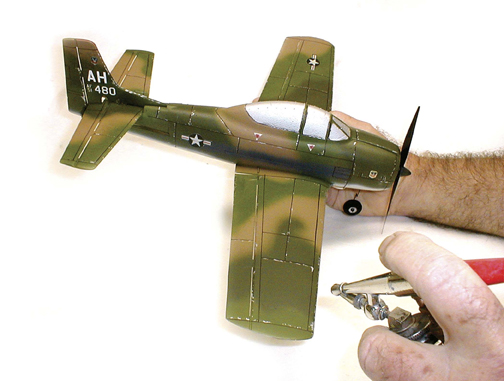
In the case of camo schemes, the airbrush is used to freehand apply the colors with an airbrush. No masking required!
SCALE MARKINGS
OK, now that all the paint is applied, there only three things left-the markings, panel lines and the weathering. Nothing particularly complicated here, as long as you have a computer and decent printer. To produce the markings I needed, I scanned a set of after-market decals that I had in my collection and enlarged them to the appropriate size for my micro model and printed them out in “high-quality” mode with my ink jet printer. I printed them onto self-adhesive label paper sheets to which I had applied clear tape over the printed images. I scuffed the tape down with a Scotch Brite pad to remove the gloss and then carefully cut around the edges with a new no. 11 hobby blade. I then removed the backing and applied the markings to the model. Everything seemed to stick very well, even the smaller markings. Since the T-28 is electric powered, no clear top coat or fuel-proofing is necessary.
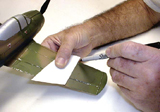
Small pieces of card stock or posterboard are used as straight edges for the application of panel lines.
PANEL LINES
Using photos or reference drawings, apply your panel lines with a fine-tip, permanent marker. The application can be as simple or elaborate as you choose. I use heavy card stock as a straightedge and cut a slight arc in a length of card stock to form a guide for applying the panel lines to round contours like the fuselage. The inclusion of these lines adds a visual interest and creates a pleasing and realistic overall effect.
WEATHERING
While obviously not essential, a bit of weathering adds to the model and further enhances realism. The technique is really easy. Use a small, pointed brush and some silver paint, and dab the surface randomly to create a worn, chipped-paint effect. Pictures can be helpful but imagination is really what gets the job done. Just imagine how aluminum panels, vibrating against each other, pounded by kicked-up dirt, sand and small stones would affect the airplane’s finish. Leading edges are generally impacted the worst with the paint being completely gone on some of the more dramatic examples. Take your time and work carefully. Don’t fall into the “if some is good, more must be better” trap. Subtlety always appears more realistic than heavy-handed applications!
A final touch comes with the application of exhaust staining on the fuselage sides. The T-28 was notorious for discoloration and staining in this area, so much so that many of the standard factory paint schemes often included black-painted panels to minimize the dirty appearance and to make maintenance easier. I used the airbrush and a grayish-black color to simulate the exhaust. Note how the density is reduced the further the exhaust gets away from the source.
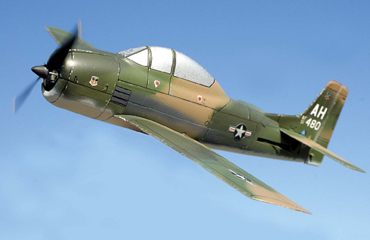
The mini Trojan flies by in its handsome new “skin.” Quite a difference from the stock version! Note exhaust staining on fuselage side.
TIME TO ADMIRE
This is the part that makes it all worthwhile. Place your model on your workbench and just look at it. Compare it to the one pictured on the box in which your Trojan arrived. Some difference, huh? You think you’re impressed? Wait until your flying buddies see it! You’ll clearly be identified as the newly emerging scale guru. The nice part about the exercise is that the technique, research and materials are the same, regardless of the size or scope of the project. You’ll have learned some new techniques, created a distinctively different model and, hopefully, sparked an interest in doing even more on your next model!
Model Airplane News - The #1 resource for RC plane and helicopter enthusiasts featuring news, videos, product releases and tech tips.
Continue reading...
All the necessary tools and material to execute your “mini makeover”- airbrush, markers, and paint!
All the factory-applied markings have been removed prior to paint application.
However, there is one thing that ARFs don’t do well and that’s provide unique models with personality or an appearance that’s different from that of its production line mates. If you want to learn some new skills, let’s personalize that typical cookie-cutter flyer!Weathering and detailing an ARF isn’t something to be done only to larger and more expensive warbirds. The nice part about this adventure is that you start with a relatively inexpensive model with proven performance. We can dramatically change its appearance without affecting that impressive flight performance. The techniques involved are the same regardless of the size, cost or complexity of the basic model. I was initially concerned that this treatment would add significant weight to the model and affect its fun-flying qualities. Have no fear; the ParkZone Ultra Micro T-28 Trojan flies just as well as it ever did and only gains 2.5 grams in the process.
The first step is using documentation to choose the full-scale version you want to duplicate. Most popular subjects have nearly unlimited schemes.
The first step is to choose a color scheme that you like and want to apply to your model. This can be as involved or as simple as you’d like but today, unlike the “olden days,” there are tons of images available from a variety of Internet sources-all you have to do is pick one! In the case of my T-28, I chose a restored Trojan that duplicated the markings used in Southeast Asia in the 1970s. It’s the typical brown and green “camo” scheme that was worn by most airplanes at the time. It creates a whole new look on the model, distinctly different from the bright “Navy trainer” colors in which the model is supplied. Other choices might include an alternative Navy trainer scheme of all yellow with red or green mission bands, the attractive early USAF aluminum and orange/red scheme, or even the Desert camo seen on the Fennec version. The choices are nearly unlimited and there just has to be one out there for you.
Since the Micro Trojan is molded foam, you need to use foam-safe paint for your makeover. Do not use lacquer-based spray cans as many of the solvents and propellants used can damage the Trojan’s surfaces. To be safe, use acrylic, water-based paint such as the Model Master series by Testors. These paints are a perfect match to the actual colors used on the full-scale aircraft. They’re available in small bottles that can be brushed or airbrushed on to your model. Some colors are also available in easy to use spray cans. Either way, make certain the paint you choose is foam friendly. Another benefit of the Model Master paints is this it bonds well to the surface and isn’t easily separated by using masking tape for color separation lines.
In the case of camo schemes, the airbrush is used to freehand apply the colors with an airbrush. No masking required!
SCALE MARKINGS
OK, now that all the paint is applied, there only three things left-the markings, panel lines and the weathering. Nothing particularly complicated here, as long as you have a computer and decent printer. To produce the markings I needed, I scanned a set of after-market decals that I had in my collection and enlarged them to the appropriate size for my micro model and printed them out in “high-quality” mode with my ink jet printer. I printed them onto self-adhesive label paper sheets to which I had applied clear tape over the printed images. I scuffed the tape down with a Scotch Brite pad to remove the gloss and then carefully cut around the edges with a new no. 11 hobby blade. I then removed the backing and applied the markings to the model. Everything seemed to stick very well, even the smaller markings. Since the T-28 is electric powered, no clear top coat or fuel-proofing is necessary.
Small pieces of card stock or posterboard are used as straight edges for the application of panel lines.
PANEL LINES
Using photos or reference drawings, apply your panel lines with a fine-tip, permanent marker. The application can be as simple or elaborate as you choose. I use heavy card stock as a straightedge and cut a slight arc in a length of card stock to form a guide for applying the panel lines to round contours like the fuselage. The inclusion of these lines adds a visual interest and creates a pleasing and realistic overall effect.
WEATHERING
While obviously not essential, a bit of weathering adds to the model and further enhances realism. The technique is really easy. Use a small, pointed brush and some silver paint, and dab the surface randomly to create a worn, chipped-paint effect. Pictures can be helpful but imagination is really what gets the job done. Just imagine how aluminum panels, vibrating against each other, pounded by kicked-up dirt, sand and small stones would affect the airplane’s finish. Leading edges are generally impacted the worst with the paint being completely gone on some of the more dramatic examples. Take your time and work carefully. Don’t fall into the “if some is good, more must be better” trap. Subtlety always appears more realistic than heavy-handed applications!
A final touch comes with the application of exhaust staining on the fuselage sides. The T-28 was notorious for discoloration and staining in this area, so much so that many of the standard factory paint schemes often included black-painted panels to minimize the dirty appearance and to make maintenance easier. I used the airbrush and a grayish-black color to simulate the exhaust. Note how the density is reduced the further the exhaust gets away from the source.
The mini Trojan flies by in its handsome new “skin.” Quite a difference from the stock version! Note exhaust staining on fuselage side.
TIME TO ADMIRE
This is the part that makes it all worthwhile. Place your model on your workbench and just look at it. Compare it to the one pictured on the box in which your Trojan arrived. Some difference, huh? You think you’re impressed? Wait until your flying buddies see it! You’ll clearly be identified as the newly emerging scale guru. The nice part about the exercise is that the technique, research and materials are the same, regardless of the size or scope of the project. You’ll have learned some new techniques, created a distinctively different model and, hopefully, sparked an interest in doing even more on your next model!
Model Airplane News - The #1 resource for RC plane and helicopter enthusiasts featuring news, videos, product releases and tech tips.
Continue reading...