You are using an out of date browser. It may not display this or other websites correctly.
You should upgrade or use an alternative browser.
You should upgrade or use an alternative browser.
Pilot 40% 330 Recover and Build
- Thread starter stangflyer
- Start date
dhal22
GSN Sponsor Tier 1
K... I be hurrying. Lol
Done yet?
stangflyer
I like 'em "BIG"!
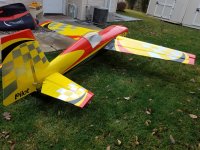
Ok friends, family and all that have so faithfully followed along with this thread. Interjecting suggestions, ideas, appreciation for what I was doing, and most of all for the constant and never faltering encouragement... Were it not for each and every one of you I have no doubt I would not have pressed myself to make this restoration as pristine as I could. At times I was burned out and just didn't even want to look at the 330, let alone work on it. But day by day, I would see a little more accomplishment and it would help keep the fires kindled. For every comment and compliment you all sent, it pushed me harder to get to a point where I could see the light at the end of the tunnel. Remembering back to when I started the "Covering Contest", I had all but given up on the idea of getting this thing done anytime soon. As you all remember, I wanted a scheme that was different, unique and something not everyone had. I just could not put my finger on it. My sons girlfriend (bless her loving little heart) worked very hard to help pen out a scheme that would fit the bill. But to her true appreciation and admiration of this hobby, there was just something that was "missing". It wasn't until I looked at my sons Pilot RC 50cc Yak 54. Done in the original Gary Ward Yellow... I looked at it at the field one day and envisioned it in the colors I wanted. Green, White, Black and Silver. And it just snapped. "That's it..." I told my son...That's it. The scheme I have been looking for. I promptly had Shawna (Shaynes Girly girl) pen the scheme in the colors I wanted and "BOOM"...that was what was missing. Upon contacting Tony at Pilot RC and informing him of my plans, he interjected that the precut colors probably would not fit due to the airframe they were intended for. I told him that was ok because I anticipated having to make some adjustments and what not. About three weeks or so later, I had my precut covering and I went to work. And now after what? Seven? Eight? Nine months, we have a nearly completed ready to fly out of the ordinary and unique scheme. I will admit, it was pretty when I got the covering on. But Eric and B&E just really hit this one out of the park on Graphix. I turn to him first as I think he has a feeling of just what I am looking for. After all the planes he has wrapped in his awesomeness, I think he really "GETS" what I am wanting. My hat is off to him. Also to Richard Johnson and Kevin from Wings West RC Paint. Those boys know how to mix a "mean ass" soup of paint. Always so kind and willing to help. Never ever was there a time that I called them to ask the silliest of silly assed questions did they get irritated. Always answered and always had the answers I need. So thanks Richard and Kevin. But again, most of all... Thanks to all of you here at GSN, for following along and making this endeavor worth the work.
Ok...now the photos. I can't wait to get it to the field. I can almost imagine this Behemoth 330 with her nose pointed straight up giving some attitude of "Yeah.... How do you like me now"? LOL.


Heck, even the evening knats and bugs were so taken with the sexy looks of this new ride, they just had to find their way to the top of my cowl. Obviously they wanted their photo taken too. LOL.


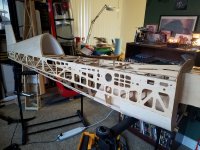
From this...


To this....!

I still need to epoxy in the wing bolt 1/4x20 studs and baffle the 157cs. I am going to try to get to that this evening. But to be more realistic, won't finish it up until tomorrow. I want to take the Jtec Pitts out flying tomorrow morning and have my weekly appointment with the car wash for the Red Rocket Behemoth Plane Hauler. By this same time tomorrow evening, the newly restored Pilot RC 330sc will be complete. I will spend the next week going over all the wiring, set ups, overall assembly and basically double checking then triple checking everything to prepare for the inaugural maiden flight slated for next weekend.
So there we have it. Pretty much done. I will keep you all posted on the last details and maiden flight.
Ok...now the photos. I can't wait to get it to the field. I can almost imagine this Behemoth 330 with her nose pointed straight up giving some attitude of "Yeah.... How do you like me now"? LOL.
Heck, even the evening knats and bugs were so taken with the sexy looks of this new ride, they just had to find their way to the top of my cowl. Obviously they wanted their photo taken too. LOL.
From this...


To this....!
I still need to epoxy in the wing bolt 1/4x20 studs and baffle the 157cs. I am going to try to get to that this evening. But to be more realistic, won't finish it up until tomorrow. I want to take the Jtec Pitts out flying tomorrow morning and have my weekly appointment with the car wash for the Red Rocket Behemoth Plane Hauler. By this same time tomorrow evening, the newly restored Pilot RC 330sc will be complete. I will spend the next week going over all the wiring, set ups, overall assembly and basically double checking then triple checking everything to prepare for the inaugural maiden flight slated for next weekend.
So there we have it. Pretty much done. I will keep you all posted on the last details and maiden flight.
Last edited:
Jetpainter
640cc Uber Pimp
That looks awesome Rob!
One thing I need to add, epoxy the crap out of those cowl blind nuts. If they spin in the plywood it will truly ruin your day. Ask me how I know.
One thing I need to add, epoxy the crap out of those cowl blind nuts. If they spin in the plywood it will truly ruin your day. Ask me how I know.
stangflyer
I like 'em "BIG"!
Oh my god....rotflmao….You are quite clever and witty with your verbiage my friend. LOLCenterfold shoot obviously.....Always loved the July issue of "Fly-Boy". The Red Heads made every plane Green with envy
.
stangflyer
I like 'em "BIG"!
Oh good plan. I CA'd them to the inside of the cowl. (The wooden backer blocks) But you are so right. I best be for mixing up a good strong batch of epoxy. Thanks Doug for reminding me.That looks awesome Rob!
One thing I need to add, epoxy the crap out of those cowl blind nuts. If they spin in the plywood it will truly ruin your day. Ask me how I know.
pawnshopmike
Staff member
Snoopy1
640cc Uber Pimp
Well it has been a long journey and very enjoyable. And as many above have said Bravo and great, you hit this out of the park. When I look back at were you started we have come a long way. The plane is unique and the graphics are really do make the plane. Hope you have many years of enjoyment from the plane well done.
