Tom Hintz
50cc
[h=1]Chaos had snuck into my airplane hauler[/h]Text, photos and video by Tom Hintz
Posted – 3-11-2016
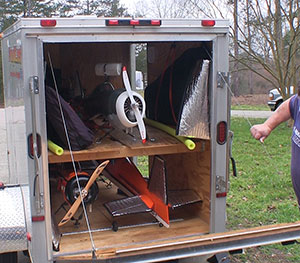
Since the day I brought my (then) new Continental Cargo Trailer home I have been winging it when it comes to the layout of its interior. I was totally reactionary, finding a home for whatever I came home with that needed to go to the field. Most of the time I gave no thought to what might need to be tied down in the future. As plans of action go, mine sucked majorly.
In addition to the planes and equipment that actually need to go to the flying field or event I slowly developed a growing number of “I might need†things that I never did. I certainly can’t afford a bigger trailer so I have to make better use of the 5 by 8-foot space within my Continental Cargo Trailer. Part of that process meant being more realistic about what went along and what did not need to. Complicating that process is the addition of two must-haves in the form of a spare tire/wheel for the Continental Cargo Trailer and a decent fire extinguisher. I already had a first aid kit in the trailer but it needed to be moved to a more accessible location.
After taking virtually everything out of the trailer I removed the top shelf which originally was to be a safe place for wings to travel. I seldom used the top shelf and it made putting large planes on the middle shelf an exercise in twisting and angling trying to get it in place without dinging the rudder and vertical stabilizer. For the few times I used the top shelf I would have to find a temporary space for the trip.
The first thing to get mounted was the spare tire. I wanted the tire as close to the door as possible so if needed I wouldn’t have to take everything out of the trailer to get to it. The V-shape of the Continental Cargo Trailer nose let me mount the spare tire to the side of that V-shape right next to the side door. That made it easy to get at if needed.
Something else I wanted near the side door is our pop-up canopy and folding fabric chairs. The pop-up canopy is very heavy and a bit awkward to handle I didn’t want to be lifting it over my planes. The V-shape at the front of the Continental Cargo Trailer allowed securing the canopy and chairs right next to the spare tire while using precious little floor space outside of the V-shaped nose.
While I was working up front I installed the new fire extinguisher just inside of the side door, above the spare tire. I also put a “Fire Extinguisher†sign on the door against the side where the extinguisher was. I also moved the first aid kit to the inside surface of the door where it would be easily accessible if I or someone else managed to draw blood at the field. We obviously have a bunch of safe people in our club as the only time I had to bandage anyone up with one of the clubs first aid kits the paper packaging surrounding the bandage turned to dust when I tried to open it. I bought a new first aid kit for my trailer the next day so I knew we had fresh bandages wherever we went.
One of the things that got me working on re fitting the Continental Cargo Trailer was the one-piece wing for the Top-Flite Giant Scale P47 Razorback.With the top shelf gone I noted that the side wall opposite of the side door was big and blank. I found some wall-mounted U-shaped hangars at a local store so bought four and mounted two of them on each of the side walls, just above the mid-height shelf. Then I added two cargo rings at each of these hangars, one high and one low for elastic straps that would keep the wings secure in the hangars on the road.
The more I looked at the Continental Cargo Trailer the more I thought about carrying three instead of four planes to most events. I seldom flew more than one plane at an event and carrying just one on the mid-level shelf just made sense. I can tie the plane down in middle of the shelf which made access to the sides easier. In a pinch I can still get two planes on the shelf but I doubt that will be necessary.
I had the rear edge of the shelf covered with pieces of folded up rugs but had a better idea. I removed both of those rolled-up rugs, found a 3-foot-long piece of 2X4 and covered that with part of the rug on all but the bottom surface. I screwed that to the forward edge of the shelf, centered on the width. That provided support for the tail section on the Top-Flite Giant Scale P47 Razorback that will spend most travel times alone on the shelf. There is enough room to store two planes on the shelf if the situation requires it.
I carry a few bottles around, cleaner for the plane, oil for when my incessant touch-and-goes make the wheel’s squeal and some of those wet cloths meant to sanitize stuff. I have serious doubts that they can clean up everything with which a dedicated RC’r can get dirty. To keep them where I can find them I made a wooden tray that hangs on the wall just inside the side door. A small bungee cord keeps them from jumping out on the road.
The final part of the re fit was getting the floor figured out. I wanted to keep two planes there, the tent and chairs were already strapped into the V-shape at the nose and I still needed to get my tool box and gas containers in there. When I put my Aeroworks 50cc Edge 540 on the left and theRedwingRC 50cc YAK 55 on the right as I had been doing it showed clearly that the YAK is longer than the Edge. They both crowded the tool box in front.
I swapped the planes around, YAK against the blank wall and Edge on the side with the door. That was better but the tail feathers didn’t get along so I took the Edge out, turned it around and put it in nose first. Magic. I had to rearrange the gas containers and toolbox a couple times but I finally got everything in with enough room between everything to be hopeful nothing will get trashed on the way to and from the field.
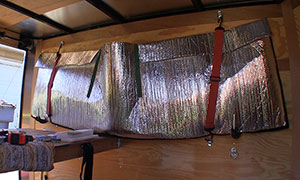
In the course of this re fit I once again made use of my questionable sewing skills using the Reflectix material I made wing bags from earlier. First I made a bag for extra props that protected them and the planes around them, plus kept them out of the way. Being a realist (of sorts) I recognized the possibility of bringing a plane home in a different shape than when it left. A selection of bungee cords can help prevent additional damage on the way home. I gathered up all of my spare bungees and made a bag for them once again from the Reflectix material.
Posted – 3-11-2016
Since the day I brought my (then) new Continental Cargo Trailer home I have been winging it when it comes to the layout of its interior. I was totally reactionary, finding a home for whatever I came home with that needed to go to the field. Most of the time I gave no thought to what might need to be tied down in the future. As plans of action go, mine sucked majorly.
In addition to the planes and equipment that actually need to go to the flying field or event I slowly developed a growing number of “I might need†things that I never did. I certainly can’t afford a bigger trailer so I have to make better use of the 5 by 8-foot space within my Continental Cargo Trailer. Part of that process meant being more realistic about what went along and what did not need to. Complicating that process is the addition of two must-haves in the form of a spare tire/wheel for the Continental Cargo Trailer and a decent fire extinguisher. I already had a first aid kit in the trailer but it needed to be moved to a more accessible location.
After taking virtually everything out of the trailer I removed the top shelf which originally was to be a safe place for wings to travel. I seldom used the top shelf and it made putting large planes on the middle shelf an exercise in twisting and angling trying to get it in place without dinging the rudder and vertical stabilizer. For the few times I used the top shelf I would have to find a temporary space for the trip.
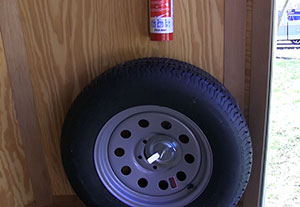
The first thing to get mounted was the spare tire. I wanted the tire as close to the door as possible so if needed I wouldn’t have to take everything out of the trailer to get to it. The V-shape of the Continental Cargo Trailer nose let me mount the spare tire to the side of that V-shape right next to the side door. That made it easy to get at if needed.
|
|
| Realizing that I needed a spare tire (left) and that my top shelf (right) was wasted space this re fit became even more important. Click images to enlarge | � |
While I was working up front I installed the new fire extinguisher just inside of the side door, above the spare tire. I also put a “Fire Extinguisher†sign on the door against the side where the extinguisher was. I also moved the first aid kit to the inside surface of the door where it would be easily accessible if I or someone else managed to draw blood at the field. We obviously have a bunch of safe people in our club as the only time I had to bandage anyone up with one of the clubs first aid kits the paper packaging surrounding the bandage turned to dust when I tried to open it. I bought a new first aid kit for my trailer the next day so I knew we had fresh bandages wherever we went.
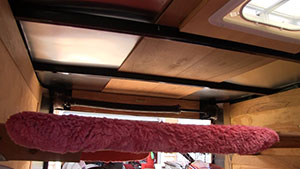
One of the things that got me working on re fitting the Continental Cargo Trailer was the one-piece wing for the Top-Flite Giant Scale P47 Razorback.With the top shelf gone I noted that the side wall opposite of the side door was big and blank. I found some wall-mounted U-shaped hangars at a local store so bought four and mounted two of them on each of the side walls, just above the mid-height shelf. Then I added two cargo rings at each of these hangars, one high and one low for elastic straps that would keep the wings secure in the hangars on the road.
The more I looked at the Continental Cargo Trailer the more I thought about carrying three instead of four planes to most events. I seldom flew more than one plane at an event and carrying just one on the mid-level shelf just made sense. I can tie the plane down in middle of the shelf which made access to the sides easier. In a pinch I can still get two planes on the shelf but I doubt that will be necessary.
|
|
| As soon as the top shelf was removed (left) I could see that mounting the P47 one-piece wing in that spot (right) made l sorts of sense. Click images to enlarge | � |
I carry a few bottles around, cleaner for the plane, oil for when my incessant touch-and-goes make the wheel’s squeal and some of those wet cloths meant to sanitize stuff. I have serious doubts that they can clean up everything with which a dedicated RC’r can get dirty. To keep them where I can find them I made a wooden tray that hangs on the wall just inside the side door. A small bungee cord keeps them from jumping out on the road.
The final part of the re fit was getting the floor figured out. I wanted to keep two planes there, the tent and chairs were already strapped into the V-shape at the nose and I still needed to get my tool box and gas containers in there. When I put my Aeroworks 50cc Edge 540 on the left and theRedwingRC 50cc YAK 55 on the right as I had been doing it showed clearly that the YAK is longer than the Edge. They both crowded the tool box in front.
I swapped the planes around, YAK against the blank wall and Edge on the side with the door. That was better but the tail feathers didn’t get along so I took the Edge out, turned it around and put it in nose first. Magic. I had to rearrange the gas containers and toolbox a couple times but I finally got everything in with enough room between everything to be hopeful nothing will get trashed on the way to and from the field.
In the course of this re fit I once again made use of my questionable sewing skills using the Reflectix material I made wing bags from earlier. First I made a bag for extra props that protected them and the planes around them, plus kept them out of the way. Being a realist (of sorts) I recognized the possibility of bringing a plane home in a different shape than when it left. A selection of bungee cords can help prevent additional damage on the way home. I gathered up all of my spare bungees and made a bag for them once again from the Reflectix material.
| |
| I spent a couple days doing this re fit but I am happy with the results and I think my planes are safer to boot. Click image to enlarge | � |