GSNadmin
Staff member
I have always admired early aircraft, especially those flown during WW I. The evolution of aircraft from 1914 to 1918 is simply amazing. I have built and flown several WW I airplanes built from Balsa USA kits.

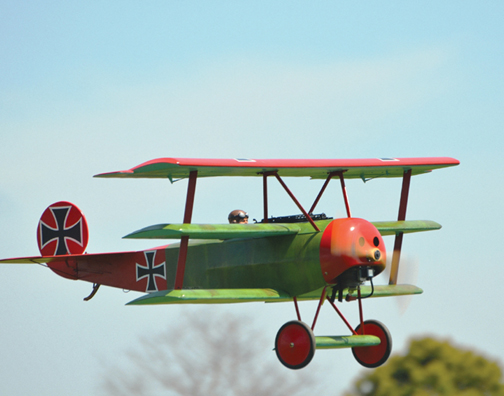
Well designed, they fly great but sometimes my landings can be less than perfect. I wanted to design a way to increase the shock-absorbing capability of the kit landing gear. What I came up with not only reduces stress on the airframe, but can also be fabricated without having to solder any of the wire parts together. Here’s what I did for my ¼-scale Fokker Dr. I Triplane.
MATERIALS USED:

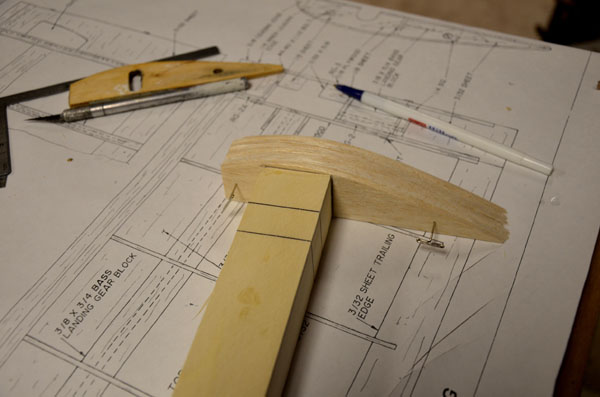
Step 1: The first three parts needed are the most difficult pieces to make in the entire project. These are the three plywood supports, or “knuckles,” that are 1 3/16-inch tall by 1 ⅜-inch wide and ¾-inch thick. Start with a sheet of ⅜-inch aircraft plywood and glue two pieces together to make a ¾-inch thick block. Then using a band saw, cut the three identical pieces out. Tack glue the three blocks on top of each other and use a drill press to drill a ¼-inch hole as shown, about ⅛-inch from the lower edge.
Step 2: Separate the top block and drill out the remaining two blocks to form a slot that is just shy of 1-inch long. You will need to use a slightly larger drill size for the slots so the ¼-inch axle moves freely within the slot.

Step 3: Cut two light-ply strips 1 3/16-inches by 15-inches long to form the sides of the landing gearbox. Mark the centerline and 1-inch inboard on each end. Glue the blocks onto the light ply as pictured and make sure the center knuckle is lined up with the slots properly.


Step 4: Glue on the second light-ply side strip and then measure across the top of the assembly to determine the correct width for the box top cover.

Step 5: Make sure you glue the cover on the top side. The top side is the furthest distance from the axle hole.
Step 6: Mark the locations of the outer support knuckles on the outside of the box. This is the finished landing gear support structure and everything else just goes along for the ride!

Step 7: Using your plans as a guide, cut your ⅛-inch balsa ribs that will form the sub wing shape. You will need to make these slightly higher than the box structure.


Step 8: For my Triplane, I cut out seven ribs around 6 inches in length and trial fitted them to the gearbox. Do not glue the ribs onto the box structure at this time.


Step 9: Install the ¼-inch music wire axle and leave it a little long for now. Mark the center of the axle and roughen it up with some sandpaper. The axle should be a tight fit in the center block. Use a piece of hard wood to tap the axle into position, then use your favorite epoxy to glue the center of the axle in place.

Step 10: Install the balsa ribs and the two outboard light-ply ribs. The light-ply ribs have a slot for the axle and are laminated to the outer balsa ribs.
Tech Tip The operation of this shock-absorbing landing gear depends on the flexibility of the music wire. With a ¼-scale Fokker Triplane or similar biplane, ¼-inch music wire provides just about the right amount of spring flex without needing any bungee cord material for additional support. However, if you would like to use a smaller diameter music wire axle, or you are building a larger model, then the 1/16-inch anchor pins installed into both outer gear knuckles are used to wrap the bungee material around the axle


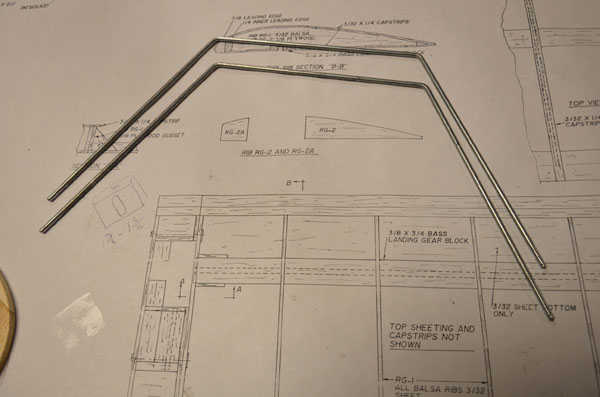
Step 11: Using the existing landing gear wire from the kit, cut off the lower horizontal ends with a Moto-Tool and grind to a point on the ends of the strut wires. Rough up the ends, as they will be epoxied into the gearbox in a later step.

Step 12: Here you see the positions where the landing wire will be installed. You may have to adjust the existing bend angles on the wire gear depending on how wide you decide to make the whole assembly.


Step 13: Install the bottom 3/32-inch balsa sheeting but do not cover the areas where the bungee and anchor pins are accessible.


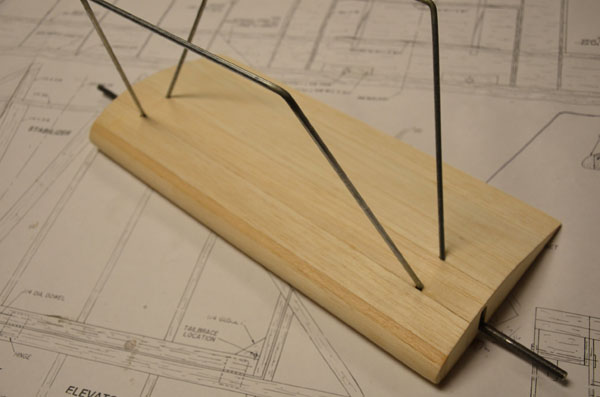
STEP 14: This next step is probably the most important—the proper installation and alignment of the landing gear. Attach the landing gear wires to the fuselage, and then support the fuselage tail so it’s level to your work surface. I use a small bubble level set on a bench and on the upper fuselage longeron to confirm. Now use a drill bit slightly larger than the gear wire diameter and drill the four holes at similar approximate angles where the gear wire will enter the sub-wing structure. Since you are using a larger diameter bit, you do not have to drill the exact angle where the wire enters the gear structure.

Drill the holes about ⅜-inch deep, but stay away from the center of the block where the slots are. Like they say, “close enough for government work” will be just fine and the epoxy used to glue in the gear wire will fill in any voids.

STEP 15: Now you can insert the landing gear wire into the four holes in the gear structure. Use a straightedge to make sure the gear is aligned properly. You may have to adjust the length of the gear wire slightly to accomplish this. Once you’re happy with the fit and alignment, epoxy the landing gear wire in place and let it cure overnight.

STEP 16: After the epoxy has cured, remove the gear assembly from the fuselage and sheet the upper surface of the sub wing, install the leading edge, and sand everything to shape. You can then refer to your kit instructions to finish your landing gear by adding strut-fairing wood, covering, painting, and mounting your wheels.

That’s it! I have used this technique on several airplanes and the landing gear has proved to be very rugged and almost maintenance free. By adjusting the dimensions of the material used, the system can be adapted for any size model that is equipped with a sub wing. Happy landings!
About the Author: Sal Calvagna
A regular at most East Coast warbird events, Sal Calvagna grew up on Long Island as the eldest of five boys. Sal learned to fly RC aircraft with the Northern Virginia RC Club in Chantilly, VA, prior to his military deployment. In 1975 he enlisted in the U.S. Air Force and graduated from the School of Applied Cryptologic Sciences. He served active duty for a little over four years and then joined the State Department’s Diplomatic Telecommunications Service and worked at U.S. Embassies and Consulates in Africa and the Far East. Sal built and flew RC models at several overseas posts, and he built the first giant-scale airplane to fly in the Philippines in the mid-1980s.
Sal has been building and flying giant-scale planes for 30 years and is an active member of the Long Island Skyhawks, Giant Scale club. Sal is also the “RC Giants” columnist for Model Aviation.
Model Airplane News - The #1 resource for RC plane and helicopter enthusiasts featuring news, videos, product releases and tech tips.
Continue reading...

Well designed, they fly great but sometimes my landings can be less than perfect. I wanted to design a way to increase the shock-absorbing capability of the kit landing gear. What I came up with not only reduces stress on the airframe, but can also be fabricated without having to solder any of the wire parts together. Here’s what I did for my ¼-scale Fokker Dr. I Triplane.
MATERIALS USED:
- ⅜-inch aircraft-grade plywood
- ⅛ light ply
- ¼- ⅛- and 3/32-in. balsa sheets
- ¼- and 1/16-in. music wire
- CA glue and epoxy adhesive

Step 1: The first three parts needed are the most difficult pieces to make in the entire project. These are the three plywood supports, or “knuckles,” that are 1 3/16-inch tall by 1 ⅜-inch wide and ¾-inch thick. Start with a sheet of ⅜-inch aircraft plywood and glue two pieces together to make a ¾-inch thick block. Then using a band saw, cut the three identical pieces out. Tack glue the three blocks on top of each other and use a drill press to drill a ¼-inch hole as shown, about ⅛-inch from the lower edge.

Step 2: Separate the top block and drill out the remaining two blocks to form a slot that is just shy of 1-inch long. You will need to use a slightly larger drill size for the slots so the ¼-inch axle moves freely within the slot.


Step 3: Cut two light-ply strips 1 3/16-inches by 15-inches long to form the sides of the landing gearbox. Mark the centerline and 1-inch inboard on each end. Glue the blocks onto the light ply as pictured and make sure the center knuckle is lined up with the slots properly.


Step 4: Glue on the second light-ply side strip and then measure across the top of the assembly to determine the correct width for the box top cover.

Step 5: Make sure you glue the cover on the top side. The top side is the furthest distance from the axle hole.
Step 6: Mark the locations of the outer support knuckles on the outside of the box. This is the finished landing gear support structure and everything else just goes along for the ride!

Step 7: Using your plans as a guide, cut your ⅛-inch balsa ribs that will form the sub wing shape. You will need to make these slightly higher than the box structure.


Step 8: For my Triplane, I cut out seven ribs around 6 inches in length and trial fitted them to the gearbox. Do not glue the ribs onto the box structure at this time.


Step 9: Install the ¼-inch music wire axle and leave it a little long for now. Mark the center of the axle and roughen it up with some sandpaper. The axle should be a tight fit in the center block. Use a piece of hard wood to tap the axle into position, then use your favorite epoxy to glue the center of the axle in place.

Step 10: Install the balsa ribs and the two outboard light-ply ribs. The light-ply ribs have a slot for the axle and are laminated to the outer balsa ribs.
Tech Tip The operation of this shock-absorbing landing gear depends on the flexibility of the music wire. With a ¼-scale Fokker Triplane or similar biplane, ¼-inch music wire provides just about the right amount of spring flex without needing any bungee cord material for additional support. However, if you would like to use a smaller diameter music wire axle, or you are building a larger model, then the 1/16-inch anchor pins installed into both outer gear knuckles are used to wrap the bungee material around the axle


Step 11: Using the existing landing gear wire from the kit, cut off the lower horizontal ends with a Moto-Tool and grind to a point on the ends of the strut wires. Rough up the ends, as they will be epoxied into the gearbox in a later step.

Step 12: Here you see the positions where the landing wire will be installed. You may have to adjust the existing bend angles on the wire gear depending on how wide you decide to make the whole assembly.


Step 13: Install the bottom 3/32-inch balsa sheeting but do not cover the areas where the bungee and anchor pins are accessible.


STEP 14: This next step is probably the most important—the proper installation and alignment of the landing gear. Attach the landing gear wires to the fuselage, and then support the fuselage tail so it’s level to your work surface. I use a small bubble level set on a bench and on the upper fuselage longeron to confirm. Now use a drill bit slightly larger than the gear wire diameter and drill the four holes at similar approximate angles where the gear wire will enter the sub-wing structure. Since you are using a larger diameter bit, you do not have to drill the exact angle where the wire enters the gear structure.

Drill the holes about ⅜-inch deep, but stay away from the center of the block where the slots are. Like they say, “close enough for government work” will be just fine and the epoxy used to glue in the gear wire will fill in any voids.

STEP 15: Now you can insert the landing gear wire into the four holes in the gear structure. Use a straightedge to make sure the gear is aligned properly. You may have to adjust the length of the gear wire slightly to accomplish this. Once you’re happy with the fit and alignment, epoxy the landing gear wire in place and let it cure overnight.

STEP 16: After the epoxy has cured, remove the gear assembly from the fuselage and sheet the upper surface of the sub wing, install the leading edge, and sand everything to shape. You can then refer to your kit instructions to finish your landing gear by adding strut-fairing wood, covering, painting, and mounting your wheels.

That’s it! I have used this technique on several airplanes and the landing gear has proved to be very rugged and almost maintenance free. By adjusting the dimensions of the material used, the system can be adapted for any size model that is equipped with a sub wing. Happy landings!
About the Author: Sal Calvagna

A regular at most East Coast warbird events, Sal Calvagna grew up on Long Island as the eldest of five boys. Sal learned to fly RC aircraft with the Northern Virginia RC Club in Chantilly, VA, prior to his military deployment. In 1975 he enlisted in the U.S. Air Force and graduated from the School of Applied Cryptologic Sciences. He served active duty for a little over four years and then joined the State Department’s Diplomatic Telecommunications Service and worked at U.S. Embassies and Consulates in Africa and the Far East. Sal built and flew RC models at several overseas posts, and he built the first giant-scale airplane to fly in the Philippines in the mid-1980s.
Sal has been building and flying giant-scale planes for 30 years and is an active member of the Long Island Skyhawks, Giant Scale club. Sal is also the “RC Giants” columnist for Model Aviation.
Model Airplane News - The #1 resource for RC plane and helicopter enthusiasts featuring news, videos, product releases and tech tips.
Continue reading...
