• If you are new to GiantScaleNews.com, please register, introduce yourself, and make yourself at home.

    We're 1st in Giant Scale RC because we've got the best membership on the internet! Take a look around and don't forget to register to get all of the benefits of GSN membership!

    Welcome!

IMAC Dalton 260 Restoration

HRRC Flyer

GSN Sponsor Tier 1
Hey @stangflyer,

I have a dumb question for you. How old do you think the plane is? Maybe the original builder had to use two servos to get the torque that was needed (with shorter arms of course). Then again, the rails in the "inside" holes look allot more worn that the rails in the outside. So maybe someone made new pockets and never worried about fixing the old ones.
 

Jetpainter

640cc Uber Pimp
And since the stabs will have the ears on the root end of the stabs, this "hinky" method of securing the stabs will no longer be needed. I truthfully would "NEVER" use a bolt or a screw in a carbon fiber rod to keep the wings or stabs on. But that is just me.
It works fine on a Carf, and I believe Krill uses it too. Carf likes to use an aluminum tube, but a lot of people switch to carbon fiber with a blind nut epoxied in. It's a bit finicky to set up, but works fine.
 
Hello, wow, I am in with the rest of the guys here. This will be fun to rehabilitate!

I would like to make one suggestion. If possible, you may want to consider of adding a fuselage side support, which was not part of the original kits, but later, was added by Tony to the kits.

Let me see If I can find a picture of one.

The FSS is between F1 and F2, and it connects the motor-box to the front fuselage sides. It prevents the front of the fuselage sides, where the wings go, from getting damaged. All I can say is that the Dalton you have to work on (have you given her a name we can call her?) has been one tough ole gal!

IMG_4282.JPG


you can also make one yourself out of 1/4" thick aircraft quality plywood:

IMG_0390.JPG
IMG_0391.JPG
 

stangflyer

I like 'em "BIG"!
Hello, wow, I am in with the rest of the guys here. This will be fun to rehabilitate!

I would like to make one suggestion. If possible, you may want to consider of adding a fuselage side support, which was not part of the original kits, but later, was added by Tony to the kits.

Let me see If I can find a picture of one.

The FSS is between F1 and F2, and it connects the motor-box to the front fuselage sides. It prevents the front of the fuselage sides, where the wings go, from getting damaged. All I can say is that the Dalton you have to work on (have you given her a name we can call her?) has been one tough ole gal!

View attachment 51095


you can also make one yourself out of 1/4" thick aircraft quality plywood:

View attachment 51096 View attachment 51097
Sweet, thanks Ortho. I will definitely consider that add on. As for name? Well, since I am doing this for a friend, I'll leave the name callin' to him. She really looks to have been rode pretty hard. But I am determined to whip her into shape.
 

stangflyer

I like 'em "BIG"!
Hey @stangflyer,

I have a dumb question for you. How old do you think the plane is? Maybe the original builder had to use two servos to get the torque that was needed (with shorter arms of course). Then again, the rails in the "inside" holes look allot more worn that the rails in the outside. So maybe someone made new pockets and never worried about fixing the old ones.
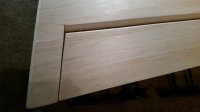
Not sure how old David. But if I had to venture a guess, I would say somewhere around six or so years old. Maybe more. I think the scheme is at least that old. I know the covering is. In trying to remove it as I normally do, it is so thin...like literally whisper thin, it is flaking off like ash. Ugh...
 

49dimes

Damn I'm hungry
It works fine on a Carf, and I believe Krill uses it too. Carf likes to use an aluminum tube, but a lot of people switch to carbon fiber with a blind nut epoxied in. It's a bit finicky to set up, but works fine.

When I had the 33% H-9 Cap 232 both wings and stabs held in place with 4-40 screws through them in to the tapped tubes. I remember cutting dowel rods to go inside the wing and stab tubes to get more threaded area so the screws would not back out.
 

stangflyer

I like 'em "BIG"!
When I had the 33% H-9 Cap 232 both wings and stabs held in place with 4-40 screws through them in to the tapped tubes. I remember cutting dowel rods to go inside the wing and stab tubes to get more threaded area so the screws would not back out.
I had a Dave Patrick 330 a couple of years ago. Of course it was grossly over powered with a DLE 55. (Like that's a bad thing...lol) It flew really nice but was also very heavy. I remember the stabs were set up with adjustable incedence. The set screws could be adjusted to compensate for bad flight characteristics. Strange system but it worked. I do like the way the newer airframes are set up. Just going to be a little extra work in getting the correct incedence set and attaching a permanent bolt down apparatus.
 

stangflyer

I like 'em "BIG"!
RIGHT WING:
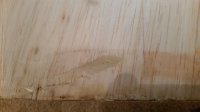
After getting the covering completely removed from the right wing, I discovered it is in fair condition. At least the top is.
20160220_213530.jpg 20160220_213543.jpg 20160220_213609.jpg 20160220_213742.jpg
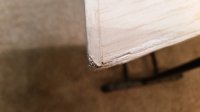
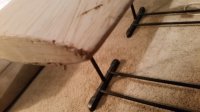
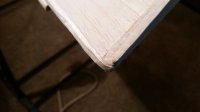
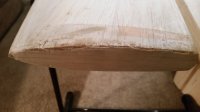
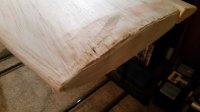
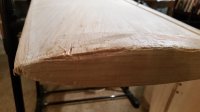
Other than a few bumps and bruises, the top of the wing is ok. The bottom on the other hand is beat up pretty bad at the tip. Clear indication a dropped wing landing.
20160220_213834.jpg 20160220_213856.jpg 20160220_213911.jpg 20160220_214526.jpg
Besides the sheeting at the tip being badly crushed, the wing tip rib has also been badly damaged. The foam core beneath the sheeting is very soft as well. I feel the most appropriate repair will be to NOT cut anything out. Build a complete new wing tip rib and epoxy it into place. I'm also going to attempt to wick epoxy under the sheeting at the wound area to help support that portion of the sheeting. Once the tip rib is in place and sanded to shape, I will probably fill the repaired area with filler then final sand to correct shape and contour. The wing tip is damaged, but being a sheeting foam wing I think this is probably about the best choice in repairing it. Anyone have a better idea or procedure for this type of ouchy? Would love to hear you guys' input and suggestions.
 
Last edited:
I believe your plan is good and it will work.
On the 1st Dalton I built, my stabs had some tip damage from when I landed the airplane in a tree. I had more of a problem than Betsy's wings you have there. What I did was cut out full sickness foam and sheeting, then carefully removed about 3 inches of sheeting all the way around where I removed the foam. Obtained a new piece of foam, shaped it, glued that in with some dowels into the other foam. I used Poly - u glue. Then once that cured, sanded the donor foam flush with the host foam. Then I glued the top and bottom sheeting to it all, allowed it to cure, then sanded it smooth, added a new root cap, sanded that down, prepped it, then covered.
Real PITA. But, I think what you will do will work very well.
 
Top