You are using an out of date browser. It may not display this or other websites correctly.
You should upgrade or use an alternative browser.
You should upgrade or use an alternative browser.
IMAC Dalton 300 ml build thread.
- Thread starter orthobird
- Start date
I called KlassKote today, before i proceeded to do this, and i asked if he sold any epoxy primers in a can. he must have thought i was stupid, since epoxy has to be 2 parts!! LOL, i told him i had purchased all my paints from him, and was trying to find an easy way out!! LOL, in that, try to avoid using the HVLP gun and the air compressor. he suggested i look into and possibly purchase the PREVAL system! SO off i went to Lowes, and purchased this for 3.99 cents!! wow!! much easier. I did all of above with this PREVAL sprayer. I need to buy stock in this company!

Dooinit
70cc twin V2
That looks like a neat setup. But just so you know, they do sell 2 part epoxy in a aerosol can. I use it all the time at work. There is a button on the bottom of the can that once to press, releases the hardener. The can is then good for 4 days. It works great, sprays nice, and dries pretty quick. The stuff is made by "spraymax". They have a whole line of products. They also have a 2 part clear that is awesome.
got a little bit more done today and past few days. the top of the hatch is now smooth, just needs second coat of primer. i need to sand down the top and bottom of the cowl, and prep the wheel pants, so that i can prime all of them together and save time.
i did final install of the motor and the KS cans. this was not an easy task, especially working with those comfort mounts. very difficult to install. But now, it is a solid install. if anyone wants details of how i did this, i will be more than glad to elaborate.
there was a question raised, and concern for me, regarding the contact stresses from the standoffs on the firewall. i have considered this, and also on the back side.
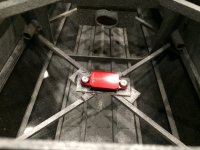
MY solution is to be able to spread these forces out more evenly, and prevent wood deformation. I have included here a photograph of the install with the steel plate, 1" wide, 1/8" thick. i have spray painted it to appear more cosmetic, but now the standoffs are not on the wood but on a steel plate., on the back side of the firewall, there is a 1/4" thick aluminum plate that has the same shape of the SWB mounts that are available, it is cut out of aluminum
and lightened, weighs under 1.5 ounces. all in all, doing all this still weighs less than had i used the plywood block spacer mount.


i did final install of the motor and the KS cans. this was not an easy task, especially working with those comfort mounts. very difficult to install. But now, it is a solid install. if anyone wants details of how i did this, i will be more than glad to elaborate.
there was a question raised, and concern for me, regarding the contact stresses from the standoffs on the firewall. i have considered this, and also on the back side.
MY solution is to be able to spread these forces out more evenly, and prevent wood deformation. I have included here a photograph of the install with the steel plate, 1" wide, 1/8" thick. i have spray painted it to appear more cosmetic, but now the standoffs are not on the wood but on a steel plate., on the back side of the firewall, there is a 1/4" thick aluminum plate that has the same shape of the SWB mounts that are available, it is cut out of aluminum
and lightened, weighs under 1.5 ounces. all in all, doing all this still weighs less than had i used the plywood block spacer mount.
i have now installed the servos into the stabs, i have also created a new model on my transmitter for this bird, so it is now official!!! the stabs have now been programmed, they will require final turnbuckle adjustments once i install the stabs to the fuselage. I am waiting for the servo extensions to arrive, before i install the rudder servos. i also have servo wire conduits for the tail servos, that way, there is least amount of chaffing.
the receiver mount has been installed as well.
the receiver mount has been installed as well.
Attachments
Notorious B.E.N.
100cc
Very nice!