You are using an out of date browser. It may not display this or other websites correctly.
You should upgrade or use an alternative browser.
You should upgrade or use an alternative browser.
IMAC Double Build, Carden Pro 124" Extra 300 40%
- Thread starter orthobird
- Start date
-
- Tags
- 40% airplane build thread imac
Now, to figure out how to install the pipe mounts. Real PITA!!
I have quit for now!
Still more to do, but I need to walk away from it for a while. I am still having a hard time understanding how the pipe can be moved in and out. Seems impossible, once the mounts are installed, the stinger of the tuned pipes will have to way to clear the 2nd mount.

I have quit for now!
Still more to do, but I need to walk away from it for a while. I am still having a hard time understanding how the pipe can be moved in and out. Seems impossible, once the mounts are installed, the stinger of the tuned pipes will have to way to clear the 2nd mount.
Fixed Wing
30cc
Hi Cam,
Attached are some pictures showing how I added extensions to the shortened stingers (after cutting them back for installation purposes like you did). These can be added after the pipes are installed so the exhaust clears the belly pan of the plane. The aluminum tubes are very light and have an ID very close to the OD of the stingers. Anyway, the pictures might explain better what I'm trying to say.
Dean
.JPG")
.JPG")
.JPG")
.JPG")
Attached are some pictures showing how I added extensions to the shortened stingers (after cutting them back for installation purposes like you did). These can be added after the pipes are installed so the exhaust clears the belly pan of the plane. The aluminum tubes are very light and have an ID very close to the OD of the stingers. Anyway, the pictures might explain better what I'm trying to say.
Dean
I think it is working with grab and drop.
OK, here we are.
Yesterday, I was having some issues with installing the tuned pipe, and then understanding the F2 former and the cowl ring. But now all is good.
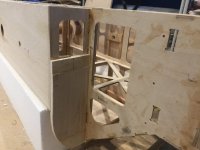
so here are the two mounts. Since this picture, I have also smoothed out the corners, so that it will fit snug into the foam. I have started to sheet the tunnel.

so, F2, I first had to extend it down. Then, I calculated where the three 6-32 screws will be going thru. There are two screws for the bottom cowl (on each side), and one screw for the top cowl, which will go in from inside to the front. the plans call for placing 1/4" balsa in front of F2, but, as Dean had pointed out, if this is done, then with repeat cowl on and off, the balsa can get crushed.
this is the hard point for the middle screw..

gives you an idea of where the two screws will be on the bottom cowl.

this is the downward extension of F2, using plywood.

once I glue on the deck, then I will sand this flush.

this is location of the hard point in the bottom part.

I have flipped the airplane, so up is up. this is after gluing on the bottom and middle hard point, and the 1/4" balsa.

Here is the hard point and balsa on the top aspect.

once this cures, then I will sand it flush.
Started to work on the cowl. These are Ohio Superstar threaded plastic. I still need to glue on the plywood donuts.


the orange are for 6-32 screws.
OK, here we are.
Yesterday, I was having some issues with installing the tuned pipe, and then understanding the F2 former and the cowl ring. But now all is good.
so here are the two mounts. Since this picture, I have also smoothed out the corners, so that it will fit snug into the foam. I have started to sheet the tunnel.
so, F2, I first had to extend it down. Then, I calculated where the three 6-32 screws will be going thru. There are two screws for the bottom cowl (on each side), and one screw for the top cowl, which will go in from inside to the front. the plans call for placing 1/4" balsa in front of F2, but, as Dean had pointed out, if this is done, then with repeat cowl on and off, the balsa can get crushed.
this is the hard point for the middle screw..
gives you an idea of where the two screws will be on the bottom cowl.
this is the downward extension of F2, using plywood.
once I glue on the deck, then I will sand this flush.
this is location of the hard point in the bottom part.
I have flipped the airplane, so up is up. this is after gluing on the bottom and middle hard point, and the 1/4" balsa.
Here is the hard point and balsa on the top aspect.
once this cures, then I will sand it flush.
Started to work on the cowl. These are Ohio Superstar threaded plastic. I still need to glue on the plywood donuts.
the orange are for 6-32 screws.