You are using an out of date browser. It may not display this or other websites correctly.
You should upgrade or use an alternative browser.
You should upgrade or use an alternative browser.
Sport JTEC RADIOWAVE 26% Pitts Model 12
- Thread starter stangflyer
- Start date
Bunky.F.Knuckle
150cc
Actually two full sheets of those came with a "glow" ARF I purchased....hmm, like 5 or 6 or 20 years ago. I honestly do not remember. I will try to remember and let you know. The sheets consist of a huge variety of decals from choke to power to rx. to, well lots of things. I wish I could remember where I got them.
Appreciate the heads up on the ignition. So far it has proved to be bullet proof. Pretty sure though if something goes amiss with it, I will simply replace it with an RC Excel. They have proved themselves worth their weight in gold on my 157 and 170. As for the foam under the igniton...this was only a temporary setup to test run the engine. I actually have a TDRC Anti-Shock Ignition Mount I plan to install. Just haven't gotten around to some of the last minute details yet. I have these same units installed on my 260, my Sukhoi and my Yak. Personally my absolute answer to ignition mounting. Especially the 3w's.
View attachment 93710
Im happy that it was just a temporary thing. I was down at Chads just before Christmas, and he had just 3 or so of the ignition mounts, so I just decided not to get them. I'll get some when he gets more in stock.
stangflyer
I like 'em "BIG"!
I bought extra mounts. I knew I would be using them.Im happy that it was just a temporary thing. I was down at Chads just before Christmas, and he had just 3 or so of the ignition mounts, so I just decided not to get them. I'll get some when he gets more in stock.
Snoopy1
640cc Uber Pimp
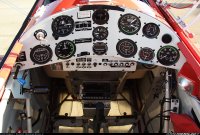
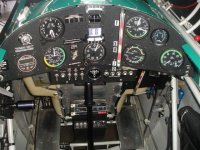
Here are a couple more that I used when designing mine.
View attachment 93729 View attachment 93730
Ugh!!! I wish I could find just the "right" configuration.
View attachment 93731
Love to look at them, but I just do not have the patience to do it I find it very frustrating and I never get to look like I want. Tried a couple of times but I will leave that to others.
stangflyer
I like 'em "BIG"!
@pawnshopmike here is what I have left of the decals you were asking about. It took only a minute (even though this old brain can't hardly remember what day it is at times) to remember from whence they came. 27% Great Planes Edge 540. I've about used them up. The gent I sold the plane to still flies the crap outta it. I find myself missing it at times. Not a monster by today's standards but that RCG 50 was as dependable and strong, (for its size) as any of my "dubs". It would swing the same size prop at the same rpm as any of the DLE 55's I've had. Anyway, that's where the decals came from.
pawnshopmike
Staff member
@pawnshopmike here is what I have left of the decals you were asking about. It took only a minute (even though this old brain can't hardly remember what day it is at times) to remember from whence they came. 27% Great Planes Edge 540. I've about used them up. The gent I sold the plane to still flies the crap outta it. I find myself missing it at times. Not a monster by today's standards but that RCG 50 was as dependable and strong, (for its size) as any of my "dubs". It would swing the same size prop at the same rpm as any of the DLE 55's I've had. Anyway, that's where the decals came from.
Thanks bro. I found the decal set but it been discontinued.
stangflyer
I like 'em "BIG"!
Gee...what surprise right? Ugh...lol. From time to time I run across extra little thingys. I'll keep my eye balls peeled.
stangflyer
I like 'em "BIG"!
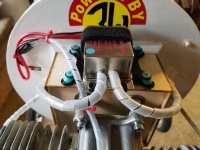
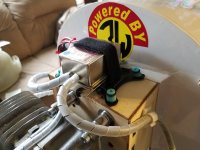
Lets chip away a little at that list of remaining last minute items shall we? I got started this morning with a quick 15 minute swap. I added the TDRC Anti Vibration Ignition mount to the dub 70 twin ignition module. Nothing real big about this task. Remove module from top of motor box, drill (4) 1/16" holes, harden with thin ca, place "AVIM", screw into place and replace ignition module. Done!
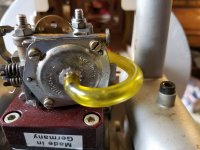
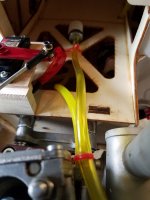
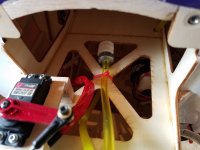
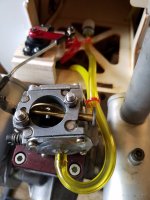
Next, I have been thinking about a "pulse" tube for the front of the carby as I have seen others have issues in the past with an unbalanced air flow and negative air pressure affect the operation of some engines. Though I don't do this on any of my other engines, My friend I got the 70 twin from did have some issues with it until he ran a line inside the fuse to equalize the air pressure. I have heard...(though I don't know if it is true) the 70 twin was a little finicky sometimes. We had never seen that but what the heck, easy enough to do and could be a good insurance policy. I don't need this heavy paper weight falling out of the sky. First, I ran a Tygon fuel tube looped around the front of the carb, back along the carb fuel feed line and terminated inside the canister tunnel with a felt clunk attached to the end then zip tied to the cross bracing of the bottom of the motor box floor. It should breath air quite nicely and keep that diaphragm balanced well.
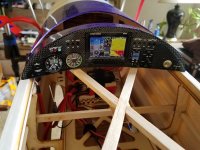
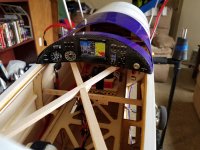
The instrument cluster has had me pretty bothered so I fixed that little annoyance. Not perfect, but it will work and I am not going to worry about it any longer. I will say this, if I ever do a larger build project that I have to fashion and manufacture any sort of gauges or instrumentation, I will simply find some bad ass gauges and buy them.
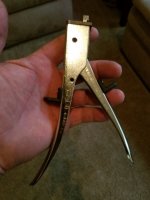
After a little snacky-snack of left over Broiled Rib Eye steak, I attacked that darn spinner. I really don't like cutting spinners because in the past I have had some that didn't turn out too well. But I guess experience and practice has some how finally paid off. I do like using the "Nibbler" tool though. It certainly does make things a lot easier and so much quicker.
With the first of "MANY" bites taken out of the original prop openings, I started chewing away the entire radius of the prop opening.
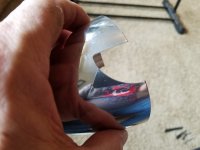
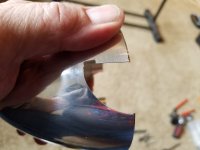
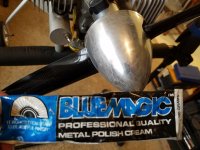
I ended up taking out about 1/4" of the opening all the way around from leading edge to trailing edge. Once that was done, I used the small drum sander on my dremel tool to finish up the shape and to smooth out all the rough teeth, (and let me tell you it had some pretty knarly teeth) all the way around. Once shaped, sanded and final size was acquired, I washed the spinner with warm water and dish detergent then bolted it in place. I have three different kinds of metal polish I use for different projects. I chose my Blue Magic for this one. Rub it on with a soft cloth, allow it to haze...then polish it off.
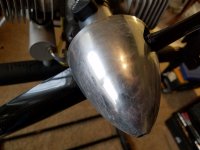
Oh my...!!! Ok, I will keep this one. I like how it came out. The cut and shape of the prop openings is "juussst" right. I am pretty pleased with this one.
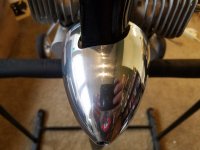
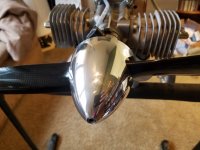
There we go. A few more things removed from the never ending Pitts build list. LOL. I will probably start baffling the engine tonight and doing a final fit of the cowl as well. I would like to get the engine compartment completed so that all I have to worry about is paint the cowl and add the "dummy" radial decal to the face. I may....install the canopy over the next couple of days. I would really like to have the pilot bust in place before I do so, but I feel there will be plenty of room to slide him into place when he becomes available. I think at this time I have decided to "not" paint the bracing support along the front top of the canopy. In looking at all the single seat Pitts, they had a complete clear canopy. Guess we will see for sure when I get it placed.
More to come and almost done.


Next, I have been thinking about a "pulse" tube for the front of the carby as I have seen others have issues in the past with an unbalanced air flow and negative air pressure affect the operation of some engines. Though I don't do this on any of my other engines, My friend I got the 70 twin from did have some issues with it until he ran a line inside the fuse to equalize the air pressure. I have heard...(though I don't know if it is true) the 70 twin was a little finicky sometimes. We had never seen that but what the heck, easy enough to do and could be a good insurance policy. I don't need this heavy paper weight falling out of the sky. First, I ran a Tygon fuel tube looped around the front of the carb, back along the carb fuel feed line and terminated inside the canister tunnel with a felt clunk attached to the end then zip tied to the cross bracing of the bottom of the motor box floor. It should breath air quite nicely and keep that diaphragm balanced well.


The instrument cluster has had me pretty bothered so I fixed that little annoyance. Not perfect, but it will work and I am not going to worry about it any longer. I will say this, if I ever do a larger build project that I have to fashion and manufacture any sort of gauges or instrumentation, I will simply find some bad ass gauges and buy them.


After a little snacky-snack of left over Broiled Rib Eye steak, I attacked that darn spinner. I really don't like cutting spinners because in the past I have had some that didn't turn out too well. But I guess experience and practice has some how finally paid off. I do like using the "Nibbler" tool though. It certainly does make things a lot easier and so much quicker.

With the first of "MANY" bites taken out of the original prop openings, I started chewing away the entire radius of the prop opening.


I ended up taking out about 1/4" of the opening all the way around from leading edge to trailing edge. Once that was done, I used the small drum sander on my dremel tool to finish up the shape and to smooth out all the rough teeth, (and let me tell you it had some pretty knarly teeth) all the way around. Once shaped, sanded and final size was acquired, I washed the spinner with warm water and dish detergent then bolted it in place. I have three different kinds of metal polish I use for different projects. I chose my Blue Magic for this one. Rub it on with a soft cloth, allow it to haze...then polish it off.


Oh my...!!! Ok, I will keep this one. I like how it came out. The cut and shape of the prop openings is "juussst" right. I am pretty pleased with this one.


There we go. A few more things removed from the never ending Pitts build list. LOL. I will probably start baffling the engine tonight and doing a final fit of the cowl as well. I would like to get the engine compartment completed so that all I have to worry about is paint the cowl and add the "dummy" radial decal to the face. I may....install the canopy over the next couple of days. I would really like to have the pilot bust in place before I do so, but I feel there will be plenty of room to slide him into place when he becomes available. I think at this time I have decided to "not" paint the bracing support along the front top of the canopy. In looking at all the single seat Pitts, they had a complete clear canopy. Guess we will see for sure when I get it placed.
More to come and almost done.

pawnshopmike
Staff member
I like shinny.


