• If you are new to GiantScaleNews.com, please register, introduce yourself, and make yourself at home.

    We're 1st in Giant Scale RC because we've got the best membership on the internet! Take a look around and don't forget to register to get all of the benefits of GSN membership!

    Welcome!

3D Viper 120cc ARF is HERE!!!!!

Terryscustom

640cc Uber Pimp
Getting a little Viper time in today! I'm doing a little customizing on my canopy(s). There are lots of little things that you can do to your ARF airplanes to separate them from the rest of the ARF's at the fly field. Many of these things are small and only only take a few minutes and very little cost.

By doing this one, I not only give it a cool custom look, but also removes the covering that would extend under the canopy and potentially wrinkle in the sun:198:

Pics pretty much say it all, but basically mark it with a sharpie, cut about 1/2" in, clean off marks with alcohol. Mask, paint, texture, and remove tape. Let this dry for a few days and go over the covering where the tape was to iron the covering back down.
 

Attachments

  • image001.jpg
    image001.jpg
    52.9 KB · Views: 329
  • image002.jpg
    image002.jpg
    48.5 KB · Views: 310
  • image003.jpg
    image003.jpg
    72 KB · Views: 326
  • image004.jpg
    image004.jpg
    67.5 KB · Views: 336
  • image005.jpg
    image005.jpg
    74.6 KB · Views: 378
  • image006.jpg
    image006.jpg
    85.2 KB · Views: 336
  • image007.jpg
    image007.jpg
    73 KB · Views: 323
  • image008.jpg
    image008.jpg
    80.6 KB · Views: 320

Terryscustom

640cc Uber Pimp
Even when it's an older engine just back from a check-up, don't you just feel like Christmas when an engine shows up at your house / shop!?!?!
Engine has been in three different airframes and doing into fourth year of service. Nothing better than a clean bill of health and a couple updates. Oh, and fix the wires because some dumb-A$$ got crazy with the goop adhesive :oblong: LOL.
So I cleaned up my J&A mufflers with scotch brite, then sanded the stingers down to 400 grit and polished with Mothers. It's a hot-rod plane, needs a little bling bling!!!
Also, not a bad idea even with new mufflers is to run the inlets over some 220-320 sandpaper on a smooth surface. Most mufflers are sand-blasted so the surface is rough. This will help keep leaks at a minimum.
 

Attachments

  • image001.jpg
    image001.jpg
    63.1 KB · Views: 340
  • image002.jpg
    image002.jpg
    76.5 KB · Views: 332
  • image003.jpg
    image003.jpg
    48.8 KB · Views: 306
  • image004.jpg
    image004.jpg
    54.3 KB · Views: 354
  • image005.jpg
    image005.jpg
    61.8 KB · Views: 364

Terryscustom

640cc Uber Pimp
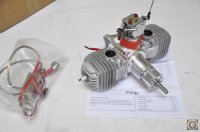
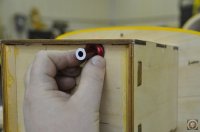
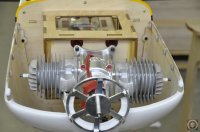
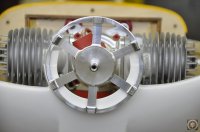
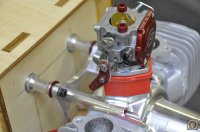
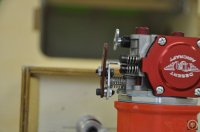
Time to mount some engines on the Vipers! Pretty basic setup here. It appears that they did a good job lining up the cross hairs on the firewall with the new cowl, so that's a plus!!
Pretty straight forward:
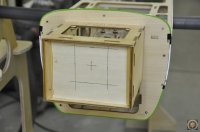
- Put cowl bottom on plane, measure to firewall
- Measure your engine from back plate to prop hub
- Subtract the engine from the measurement off the plane
- Add your cowl spacing to that number, and voila......your engine spacer length!
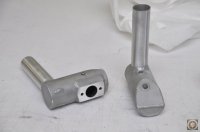
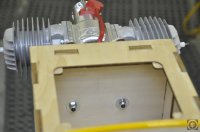
On these I ended up using about 1-3/16". So what you will need is an SWB 1" engine standoff kit and it comes with 1/8 and 1/16" precision spacers to get you to 1 3/16!!
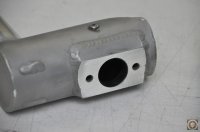
Make sure you use 3/4"-1" fender washers on the back side of the firewall. I used a tin-snips to clip off part of the upper ones to fit properly.
Install with Nylock nuts and test fit the cowl top and bottom to make sure you are happy.
image012.jpg
 

Attachments

  • image001.jpg
    image001.jpg
    53.2 KB · Views: 311
  • image002.jpg
    image002.jpg
    65.8 KB · Views: 283
  • image006.jpg
    image006.jpg
    64.5 KB · Views: 325
  • image007.jpg
    image007.jpg
    56.1 KB · Views: 295
  • image008.jpg
    image008.jpg
    51.4 KB · Views: 283
  • image009.jpg
    image009.jpg
    81.6 KB · Views: 335
  • image010.jpg
    image010.jpg
    71.8 KB · Views: 288
  • image011.jpg
    image011.jpg
    60.6 KB · Views: 306

RePete

30cc
Nice job on the canopy paint. I use the same type of pant on the engine box's. dresses it up a bit.
Hoistguy, young Thomas is going to love the Viper. That's if we can get him out of his new truck lol.
 

Terryscustom

640cc Uber Pimp
One thing that bugs me on the DA carb arms is they point the wrong way (for me anyway). For a twin it's nice to have a short(er) pushrod and mount the servo in the bottom of the engine box.

Lots of guy's look at me cross eyed when I say you can flip the arm on this engine but here is proof of how easy it is.

>> You'll need a couple 3/8" x 4-40 bolts, a tapered washer from a dubro ball link, at least one 4-40 washer and some red loc-tite.

- Remove the two bolts holding the stock arm, keep the nuts.
- Put one bolt in the top hole and at least one washer as a spacer
- Put the arm on with the tapered washer facing the large hole in the throttle arm on the carb. (the tapered part centers in the large hole).
- Once happy put the nuts on with red loc-tite to keep them in place semi-permanently and you are good to go.
image006.jpg
 

Attachments

  • image001.jpg
    image001.jpg
    82.5 KB · Views: 313
  • image002.jpg
    image002.jpg
    61 KB · Views: 311
  • image003.jpg
    image003.jpg
    67 KB · Views: 295
  • image004.jpg
    image004.jpg
    71.8 KB · Views: 323
  • image005.jpg
    image005.jpg
    69.9 KB · Views: 299
  • image007.jpg
    image007.jpg
    59.7 KB · Views: 299
Last edited:
Terry, question for you. I plan on running a push-pull rudder on my viper. Can you confirm that I'll mount my rudder servos in the servo slots on the fuse under the stabilizers? Almost under the stab tube.

Thanks,

Jeff


Sent from my iPhone using Tapatalk
 
Top