GSNadmin
Staff member
One of the most challenging and admired maneuvers in all of aerobatics is the rolling circle. As a rule, you can achieve early success learning most maneuvers as long as you first understand the proper control inputs, and hand-eye coordination adds the final touches to perform the maneuver nearly perfectly. The rolling circle, however, is even more challenging in that it depends almost entirely on hand-eye coordination from the start. This article covers the steps to flying a rolling circle, but you’ll execute the actual maneuver by reacting to your plane.
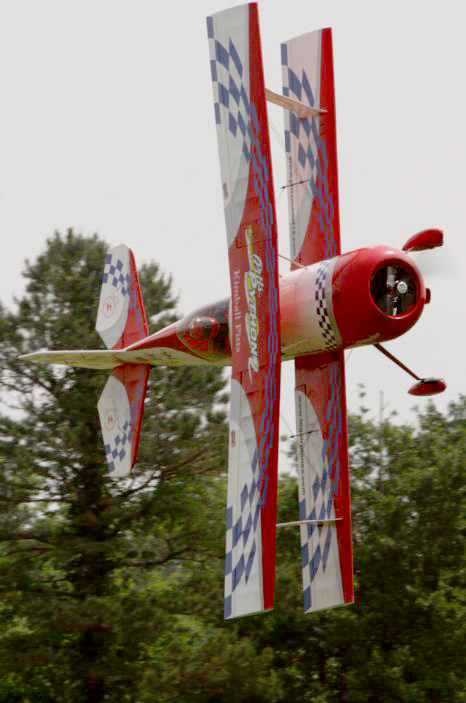
Let’s begin by noting that using rudder in a rolling circle is a high-end refinement used mostly to keep the turn radius perfectly round and perfectly level. But because you need to be able to fly a rolling turn before you can refine it, we’ll initially leave rudder out so you can concentrate on the primary controls of aileron and elevator, and thus more quickly achieve some success to build upon.
The best way to learn a rolling circle is to first learn one 90-degree segment with the airplane rolling to the outside of the turn (e.g., rolling right while turning left). Most people find that rolling to the outside of the turn is easier because, as I’ll explain, each rolling turn ends with you comfortably pulling elevator instead of pushing elevator. You’ll initially want to perform this maneuver so that the airplane will be turning away from you. For example, when you enter the rolling turn from left to right and initiate a slow right roll, your first elevator input pushes the nose of the airplane into a left turn and away from you. It is also wise to enter your first attempts from a slight climb, so that you can concentrate on using the elevator to effect the rolling turn without worrying about controlling altitude.
LET’S GET STARTED
ROLLING CIRCLE
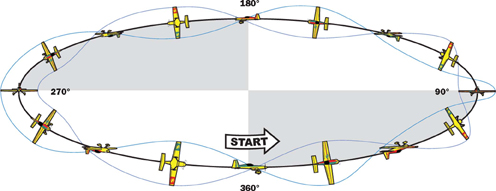
Begin by maintaining a small (right) aileron input to achieve a slow roll rate and give you time to react. As the wing approaches knife-edge-with the bottom of the plane facing the inside of the turn-smoothly push enough forward elevator to induce a turn, and then smoothly take out the push. As the wing approaches knife-edge-with the top of the plane facing the inside of the turn-pull enough elevator to continue the turn. Neutralize the controls when the wings return to level. Don’t be too concerned initially with turning exactly 90 degrees. The early goals are to be able to maintain a small aileron input and to push and pull at the correct times.
It’s best to pace your push and pull with the time it normally takes to say or think “push” and “pull.” By smoothly inputting the elevator at this pace and starting as the wing approaches knife-edge, the elevator will peak at knife-edge, where it is most effective at causing the turn, and be returned to neutral well before the wing approaches level. Note that almost all errors at this point are the result of increasing the aileron and changing the roll rate, leading to an inability to manage the elevator properly. In this event, you’ll need to pay more attention to your input and maintain less aileron while pushing and pulling. Keep in mind that the pushes and pulls are typically much larger control inputs than the aileron input.
REFINING THE ROLLING 90
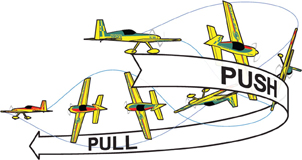
“OUTSIDE” ROLLING 90o LEFT TURN
Flying left to right, climb slightly before initiating a slow right roll, then push the airplane into a left turn away from you as the wings approach knife-edge.
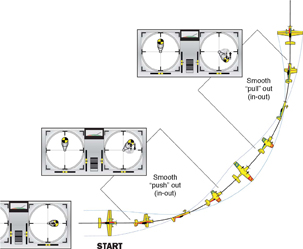
The periods when the wings are banked 45 degrees and steeper is when the elevator is most effective at turning the airplane. Therefore, those are the keys times to smoothly push and pull during the roll.
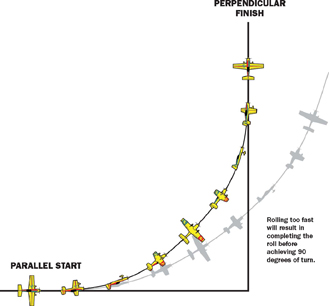
AS YOUR ABILITIES INCREASE, YOU SHOULD AIM TO COMPLETE ONE ROLL IN A 90-DEGREE TURN
The eventual objective is to complete the roll at the 90-degree point of the turn. If the roll is projected to finish before reaching 90 degrees of turn, slow everything down. If the roll is projected to finish past (over-shoot) the 90-degree point, speed everything up. Rolling too fast will result in completing the roll before achieving 90 degrees of turn.
As your abilities increase, you should aim to complete one roll in a 90-degree turn. For example, if you start the maneuver parallel to the runway, aim to complete the roll perpendicular to the runway. If, for example, you find that you’re completing the roll before reaching 90 degrees of turn, slow down the roll rate to lengthen the time that the plane is on its side. In doing so, you will also lengthen the duration of the push and pull and effect more turn. In other words, when you slow the roll rate, the pace of the elevator inputs also has to be slowed down to correspond to the longer periods when the plane is on its side.
ROLLING 180-DEGREE TURN

“OUTSIDE” TWO-ROLL ROLLING 180o TURN

If a climb is observed, decrease the size and pace of all the inputs. If a descent is observed, increase the size of the elevator pushes and pulls.
The next phase is to perform a two-roll, rolling 180-degree turn. A rolling 180 is flown as one rolling 90 to the cardinal point perpendicular to the runway and, without hesitation, continuing into another rolling 90 to the next cardinal point parallel to the runway. There is little additional challenge to performing a rolling 180 compared to the 90, although altitude changes become more apparent during multiple-roll rolling turns.
As a rule, when the airplane loses altitude during a rolling turn, the pushes and pulls are too small and/or too brief. Thus, if the plane starts losing altitude, increase the size of your pushes and pulls, which naturally extends the length of time that they are held in and helps to keep the rolling turn level. If your plane starts to climb, lay off a bit on the size of the pushes and pulls. But remember, if you reduce the size of your elevator inputs, the turn will also widen, so you will likely have to reduce the roll rate to buy more time to reach the cardinal points.
OUTSIDE ROLLING 360 CIRCLE

“OUTSIDE” FOUR-ROLL ROLLING 180o TURN
Simplify the process of performing a four-roll rolling circle by thinking of it as a rolling 90, which is then repeated again, and again, and again. I.e., rather than thinking about t he entire maneuver, confine your thoughts to thinking about rolling to the next 90 degree cardinal point.
A full rolling circle is comprised of four consecutive, rolling, 90-degree turns. The most common mistake at this point is getting caught up in a rhythm of pushing and pulling that results in inputting elevator before you need to, which would force the airplane into a descent. Remember that any change in the roll rate will change the elevator timing, so always watch the wing to trigger your elevator inputs and avoid falling into a rhythm of blindly inputting the elevator back and forth.
PERFECTING WITH RUDDER
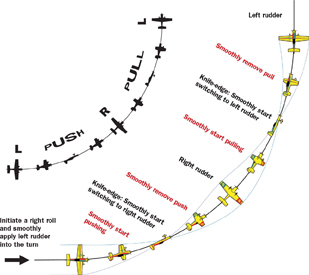
LEFT TO RIGHT ENTRY
Initiate a right roll and smoothly apply left rudder into the turn
Introducing rudder into your rolling turn will help to keep the turn radius constant when the wings are level and ensure that the nose does not drop during knife-edge. The rudder is not nearly as influential as the elevator, so you don’t need to be too concerned with how much rudder you apply and can instead concentrate on getting the timing of the rudder inputs correct.
When you can perform a reasonably good “outside” rolling turn, you can use rudder to perfect the maneuver. Start by simultaneously initiating a gentle right roll and smoothly applying left rudder into the turn. As the wing passes through knife-edge, start smoothly switching to right rudder. And when the wings reach knife-edge again, start smoothly switching back to left rudder. Altogether, the input sequence upon initiating right aileron is, “Left rudder, push elevator, right rudder, pull elevator.” Repeat this sequence three more times, and you will have performed a precision rolling circle. Congratulations!
FLIGHT TIP
Maintaining the same aileron input and roll rate is the result of a lot of practice. It is greatly helped by:
TEXT & ILLUSTRATIONS BY DAVID SCOTT, 1st US RC FLIGHT SCHOOL
Model Airplane News - The #1 resource for RC plane and helicopter enthusiasts featuring news, videos, product releases and tech tips.
Continue reading...

Let’s begin by noting that using rudder in a rolling circle is a high-end refinement used mostly to keep the turn radius perfectly round and perfectly level. But because you need to be able to fly a rolling turn before you can refine it, we’ll initially leave rudder out so you can concentrate on the primary controls of aileron and elevator, and thus more quickly achieve some success to build upon.
The best way to learn a rolling circle is to first learn one 90-degree segment with the airplane rolling to the outside of the turn (e.g., rolling right while turning left). Most people find that rolling to the outside of the turn is easier because, as I’ll explain, each rolling turn ends with you comfortably pulling elevator instead of pushing elevator. You’ll initially want to perform this maneuver so that the airplane will be turning away from you. For example, when you enter the rolling turn from left to right and initiate a slow right roll, your first elevator input pushes the nose of the airplane into a left turn and away from you. It is also wise to enter your first attempts from a slight climb, so that you can concentrate on using the elevator to effect the rolling turn without worrying about controlling altitude.
LET’S GET STARTED

ROLLING CIRCLE
Begin by maintaining a small (right) aileron input to achieve a slow roll rate and give you time to react. As the wing approaches knife-edge-with the bottom of the plane facing the inside of the turn-smoothly push enough forward elevator to induce a turn, and then smoothly take out the push. As the wing approaches knife-edge-with the top of the plane facing the inside of the turn-pull enough elevator to continue the turn. Neutralize the controls when the wings return to level. Don’t be too concerned initially with turning exactly 90 degrees. The early goals are to be able to maintain a small aileron input and to push and pull at the correct times.
It’s best to pace your push and pull with the time it normally takes to say or think “push” and “pull.” By smoothly inputting the elevator at this pace and starting as the wing approaches knife-edge, the elevator will peak at knife-edge, where it is most effective at causing the turn, and be returned to neutral well before the wing approaches level. Note that almost all errors at this point are the result of increasing the aileron and changing the roll rate, leading to an inability to manage the elevator properly. In this event, you’ll need to pay more attention to your input and maintain less aileron while pushing and pulling. Keep in mind that the pushes and pulls are typically much larger control inputs than the aileron input.
REFINING THE ROLLING 90

“OUTSIDE” ROLLING 90o LEFT TURN
Flying left to right, climb slightly before initiating a slow right roll, then push the airplane into a left turn away from you as the wings approach knife-edge.

The periods when the wings are banked 45 degrees and steeper is when the elevator is most effective at turning the airplane. Therefore, those are the keys times to smoothly push and pull during the roll.

AS YOUR ABILITIES INCREASE, YOU SHOULD AIM TO COMPLETE ONE ROLL IN A 90-DEGREE TURN
The eventual objective is to complete the roll at the 90-degree point of the turn. If the roll is projected to finish before reaching 90 degrees of turn, slow everything down. If the roll is projected to finish past (over-shoot) the 90-degree point, speed everything up. Rolling too fast will result in completing the roll before achieving 90 degrees of turn.
As your abilities increase, you should aim to complete one roll in a 90-degree turn. For example, if you start the maneuver parallel to the runway, aim to complete the roll perpendicular to the runway. If, for example, you find that you’re completing the roll before reaching 90 degrees of turn, slow down the roll rate to lengthen the time that the plane is on its side. In doing so, you will also lengthen the duration of the push and pull and effect more turn. In other words, when you slow the roll rate, the pace of the elevator inputs also has to be slowed down to correspond to the longer periods when the plane is on its side.
ROLLING 180-DEGREE TURN

“OUTSIDE” TWO-ROLL ROLLING 180o TURN

If a climb is observed, decrease the size and pace of all the inputs. If a descent is observed, increase the size of the elevator pushes and pulls.
The next phase is to perform a two-roll, rolling 180-degree turn. A rolling 180 is flown as one rolling 90 to the cardinal point perpendicular to the runway and, without hesitation, continuing into another rolling 90 to the next cardinal point parallel to the runway. There is little additional challenge to performing a rolling 180 compared to the 90, although altitude changes become more apparent during multiple-roll rolling turns.
As a rule, when the airplane loses altitude during a rolling turn, the pushes and pulls are too small and/or too brief. Thus, if the plane starts losing altitude, increase the size of your pushes and pulls, which naturally extends the length of time that they are held in and helps to keep the rolling turn level. If your plane starts to climb, lay off a bit on the size of the pushes and pulls. But remember, if you reduce the size of your elevator inputs, the turn will also widen, so you will likely have to reduce the roll rate to buy more time to reach the cardinal points.
OUTSIDE ROLLING 360 CIRCLE

“OUTSIDE” FOUR-ROLL ROLLING 180o TURN
Simplify the process of performing a four-roll rolling circle by thinking of it as a rolling 90, which is then repeated again, and again, and again. I.e., rather than thinking about t he entire maneuver, confine your thoughts to thinking about rolling to the next 90 degree cardinal point.
A full rolling circle is comprised of four consecutive, rolling, 90-degree turns. The most common mistake at this point is getting caught up in a rhythm of pushing and pulling that results in inputting elevator before you need to, which would force the airplane into a descent. Remember that any change in the roll rate will change the elevator timing, so always watch the wing to trigger your elevator inputs and avoid falling into a rhythm of blindly inputting the elevator back and forth.
PERFECTING WITH RUDDER

LEFT TO RIGHT ENTRY
Initiate a right roll and smoothly apply left rudder into the turn
Introducing rudder into your rolling turn will help to keep the turn radius constant when the wings are level and ensure that the nose does not drop during knife-edge. The rudder is not nearly as influential as the elevator, so you don’t need to be too concerned with how much rudder you apply and can instead concentrate on getting the timing of the rudder inputs correct.
When you can perform a reasonably good “outside” rolling turn, you can use rudder to perfect the maneuver. Start by simultaneously initiating a gentle right roll and smoothly applying left rudder into the turn. As the wing passes through knife-edge, start smoothly switching to right rudder. And when the wings reach knife-edge again, start smoothly switching back to left rudder. Altogether, the input sequence upon initiating right aileron is, “Left rudder, push elevator, right rudder, pull elevator.” Repeat this sequence three more times, and you will have performed a precision rolling circle. Congratulations!
FLIGHT TIP
Maintaining the same aileron input and roll rate is the result of a lot of practice. It is greatly helped by:
- Stiffer control stick tension.
- A good grip on the transmitter.
- Supporting your thumb with your index finger.
TEXT & ILLUSTRATIONS BY DAVID SCOTT, 1st US RC FLIGHT SCHOOL
Model Airplane News - The #1 resource for RC plane and helicopter enthusiasts featuring news, videos, product releases and tech tips.
Continue reading...
