• If you are new to GiantScaleNews.com, please register, introduce yourself, and make yourself at home.

    We're 1st in Giant Scale RC because we've got the best membership on the internet! Take a look around and don't forget to register to get all of the benefits of GSN membership!

    Welcome!
  • Unless you are a paid advertiser NO more posting advertisement in the individual vendor forums. You may post in the Manufacturer's Announcements section only but only ONCE a month unless your a paid advertiser.

Extreme Flight 60" Laser Build Thread

Fast3D

50cc
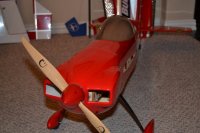
I used Welder's glue to strengthen the hatch latch; probably not a good idea. The welder melts that foam inside like butter!! immediately. I used small amount so it melted the foam and went down to balsa and I think it is secure now--I hope I wont need to change this thing anytime in the future.
 

Tim H.

50cc
If somebody has the ability to trace the rear cockpit former on a piece of paper, then scan it or take a photo of it, I can edit the file to the correct shape. Just attach it to a post and I'll pick it up.

I'll also include a graphic with no headrest. That way you can cut out the headrest for 3d effect, but still have a clean rear bulkhead. If you just print some paper black, then create a small hood, I think it would look great.
 
Last edited by a moderator:

Ohio AV8TOR

Just Do It
If somebody has the ability to trace the rear cockpit former on a piece of paper, then scan it or take a photo of it, I can edit the file to the correct shape. Just attach it to a post and I'll pick it up.

I'll also include a graphic with no headrest. That way you can cut out the headrest for 3d effect, but still have a clean rear bulkhead. If you just print some paper black, then create a small hood, I think it would look great.

Tim I can do that but only accurately to the outside of the canopy, is that good for you? I can email you tomorrow.
 

Ohio AV8TOR

Just Do It
We late yesterday my motor finally made it back to me from Ken via some kind of tour of Dallas out late partying or something. Funny thing was Ken wanted to wait one more day before we ordered a new motor.

Anyway here it is mounted. When I used this motor on my 60" EF Edge I used 3/8" spacers because there was not much room for the cowl overlap. The Laser cowl has a lot of overlap. With the 3/8" spacers and eyeballing the spinner gap it looked like the cowl screws would be around 7/8" to 1" back from the edge of the cowl which looked longer than picture 40 in the manual. Switching to 1/2" spacers looked more like the manual picture.

Edit; After installing my cowl I highly recommend now that you use the 1/2" spacers to get the screws closer to the edge of the cowl. With the 1/2" spacers the top screws get close to the inlet bulge, not a place for screw heads.
 

Attachments

  • DSC_08.JPG
    DSC_08.JPG
    127.3 KB · Views: 365
Last edited by a moderator:

Ohio AV8TOR

Just Do It
If you have seen my Edge build thread I have used this method for years with great success. All you need is some card stock, tape, coffee stirrer sticks (thank you Starbucks) and some double sided tape. I like using the manila folder card stock because it is a little stiffer than just using tape so feel free you use what you have and are comfortable with. Tape on the card stock to your fuse so it is centered and over the screw tabs on the fuse and place some dots for the drill template. Cut three stirrer sticks about an inch long. Remember a three legged stool never rocks. Place double sided tape on both sides of the stick, then center your spinner backplate on the cowl. Slide the cowl on and this way your motor shaft is centered to the spinner backplate. This cowl is longer than most so I found it hard to center out all of the motor incidence but you can get pretty close. Finger tighten a prop on and drill your holes. I like to put in a screw right after drilling each so nothing walks.
That is some serious air inlet.
 

Attachments

  • DSC__0277.jpg
    DSC__0277.jpg
    93.2 KB · Views: 280
  • DSC__0278.JPG
    DSC__0278.JPG
    379.7 KB · Views: 258
  • DSC__0279.jpg
    DSC__0279.jpg
    75.3 KB · Views: 278
  • DSC__0280.JPG
    DSC__0280.JPG
    356.4 KB · Views: 268
  • DSC__0281.jpg
    DSC__0281.jpg
    60.5 KB · Views: 274
  • DSC__0282.jpg
    DSC__0282.jpg
    90.5 KB · Views: 316

Fast3D

50cc
IMG_0428[1].jpg

Av8tor, Can you please take a look at this picture? I rushed myself and my hinge gap is wider inside one of the ailerons. Do you think that will cause some problems? should I fix it or leave it alone? I appreciate the input.
 

Ohio AV8TOR

Just Do It
From the picture the gap does not look sealed, unless clear. I had to have some larger than desired gap on a 47" 3DHS Extra on the Elevator so I could get extreme throw and after sealing it worked fine. I would seal it and fly it first, much easier to do and if the roll is not right then cut off the hinges and start over. I think you will be okay. If you are worried about how it looks use yellow to seal it.
 
Last edited by a moderator:

gyro

GSN Contributor
I agree with Ray, just seal the hinge and go fly! I too have had some large gaps and its no biggie.
Matter of fact, most of my big gassers have gaps like that.
 

Fast3D

50cc
Thank you guys. I did a good job on the other aileron and on the elevator; just messed up this one!
Yes I will definitely seal it.
 
Top