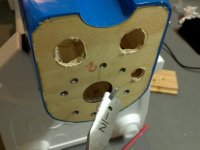
Will be a bit of a delay as I wait on parts to arrive. One thing I'm replacing right off is the nylon clevis part # HAN3610 that it comes with. These are probably ok and maybe just as strong but I'm opting to go with steel ones made by Great Planes ordered today along with a 70A ZTW ESC.
You are using an out of date browser. It may not display this or other websites correctly.
You should upgrade or use an alternative browser.
You should upgrade or use an alternative browser.
Hangar 9 Toledo Special
- Thread starter rpstar
- Start date
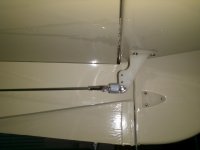
Elevator control with great planes metal clevis:
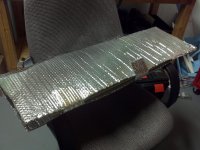
Homemade wingbag with reflectix foam from Home Depot. I guess this is a common idea as model airplane news just featured it here:
http://www.modelairplanenews.com/blog/2012/11/08/tips-tricks-custom-fit-for-your-wing-november/
Trays for the servos went ok but I did not realize the included blocks to attach to were too short for both screws of the servo to screw into until after the epoxy had dried. No big deal as I just put in the bottom screw and then wrapped the servos in tape and epoxied them to the servo trays with 30 minute epoxy. Should be easy to remove if ever needed by cutting the tape.
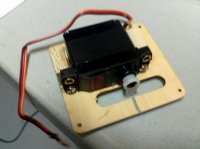
Servo tray installed:
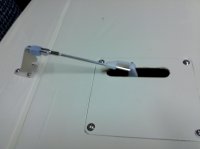
The only issue with the aileron servos is that the included servo horn is a bit short to get the high rate throw on the aileron. I'll fly it first and then decide if i want to upgrade to a longer control horn.
Also, have a good bit of shrinking to do on the covering and both ailerons have some slight warp to take care of but that should be easy to fix as I'm shrinking the covering.

Homemade wingbag with reflectix foam from Home Depot. I guess this is a common idea as model airplane news just featured it here:
http://www.modelairplanenews.com/blog/2012/11/08/tips-tricks-custom-fit-for-your-wing-november/

Trays for the servos went ok but I did not realize the included blocks to attach to were too short for both screws of the servo to screw into until after the epoxy had dried. No big deal as I just put in the bottom screw and then wrapped the servos in tape and epoxied them to the servo trays with 30 minute epoxy. Should be easy to remove if ever needed by cutting the tape.

Servo tray installed:

The only issue with the aileron servos is that the included servo horn is a bit short to get the high rate throw on the aileron. I'll fly it first and then decide if i want to upgrade to a longer control horn.
Also, have a good bit of shrinking to do on the covering and both ailerons have some slight warp to take care of but that should be easy to fix as I'm shrinking the covering.
Last edited by a moderator:
Steve_B
70cc twin V2
The only issue with the aileron servos is that the included servo horn is a bit short to get the high rate throw on the aileron. I'll fly it first and then decide if i want to upgrade to a longer control horn.
Why not just move the pushrod to a hole that's further in in the aileron control horn?.. that's why they have a range of holes. Or does the pushrod hit the slot where the servo arm emerges?
BTW.. you said earlier that it had a symmetrical airfoil.. Is that really the case? Seems like an unusual airfoil to choose for what's on the face of it a easy flying sports type model rather than an all out aerobatic type. The photos look like a 'semi-symmetrical'.
Anyway, it's a nice looking model, very nostalgic..
Yeah, it's symmetrical. It's purpose built to be aerobatic rather than just a sport flyer.
As for the control horn I prefer not to move in on the horn on the surface as you give up your physical leverage by doing that. That's why the advice is always given to connect as far out as you can on the control surface and as far in as you can on the servo horn. However, I guess you give up leverage by moving to a longer control horn on the servo so it's probably about the same as moving in on the control surface or close enough. Might do that as a quick fix for now in any case.
Got the motor in the mail finally. I'ts a Turnigy power-46 equivalent. In the past I've not been terribly impressed by Turnigy motors but this one seems quite decent. I chose it simply because it was the only other motor besides the E-flite that I knew would bolt on without modifications. Hope to get some more done this coming Thanksgiving weekend.
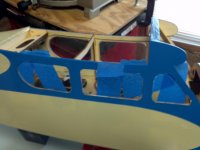
Making progress again. Got the windows glued in using zap canopy glue. Great stuff, easy to use. Used painters tape to secure while it dries:
Turning out to be more work than expected installing the power system. That's mainly because I've elected to add a safety feature with a power plug given that you have to load the batteries on this plane from the bottom and then close a hatch and turn the plane back over. Don't want to do that while the power system is armed so installing one of these babies in the side:
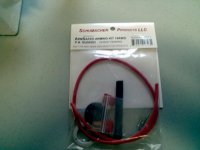

Turning out to be more work than expected installing the power system. That's mainly because I've elected to add a safety feature with a power plug given that you have to load the batteries on this plane from the bottom and then close a hatch and turn the plane back over. Don't want to do that while the power system is armed so installing one of these babies in the side:

Last edited by a moderator:
gyro
GSN Contributor
Making progress again. Got the windows glued in using zap canopy glue. Great stuff, easy to use. Used painters tape to secure while it dries:
View attachment 4347
Turning out to be more work than expected installing the power system. That's mainly because I've elected to add a safety feature with a power plug given that you have to load the batteries on this plane from the bottom and then close a hatch and turn the plane back over. Don't want to do that while the power system is armed so installing one of these babies in the side:
View attachment 4350
Didn't know they made a "canopy" glue... What is special about it?

