GSNadmin
Staff member
At full-scale and RC airshows alike, watching aerobatic aircraft equipped with smoke systems adds greatly to the appeal for both spectators and pilots. Experienced pilots will make the aircraft all but disappear within the smoke during torque rolls, tail slides, and so forth. Simply put, SMOKE is a pure attention-grabber! I recently decided to upgrade the smoke system in my Hangar 9 Composite QQ Yak 54 (hangar-9.com) so I thought it a good time to go over fundamentals for plumbing and mounting the fuel and smoke tank, the pump installation, as well as the radio programming required to regulate smoke fluid as it enters the muffler.
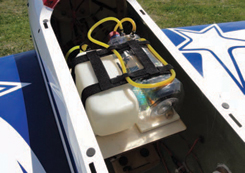
Always secure the smoke and fuel tank directly above the center of gravity for the best flight performance results.
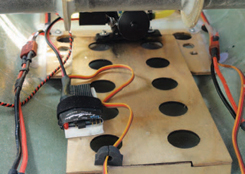
The TME SmartSmoker Pro controller can be powered either from the receiver port or by a separate battery pack.
TANK AND PUMP INSTALLATION
A smoke system includes the smoke pump, gasoline-grade and neoprene fuel line, a smoke oil tank, fuel fittings, and a smoke muffler. Depending on the pump used, a battery to supply power to the pump may be required. The TME SmartSmoker Pro (tmenet.com), can be powered by a spare receiver channel. Smoke pumps can draw as much as 1 amp of current and, on average, will use about 17mAh per minute. It is a good idea to use a larger than normal radio battery pack if you are going to use lots of smoke-on time. The first order of business is to mount the smoke tank. The original tank tray on the Composite QQ Yak 54 is designed for only the fuel tank and is mounted directly above the wing tube. So I made a 1/8-inch lite-ply floor and glued it over the existing tray using Zap 30-minute epoxy (zapglue.com). Slots in the new tray allow Velcro straps to secure both tanks.
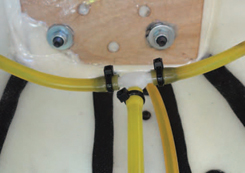
A triangle joint fitting divides the line going from the smoke pump to each of the mufflers on the DA-120 twin cylinder engine.
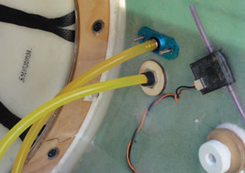
Shown from the inside of the composite fuselage are the fuel and smoke lines used to fill each tank.
It is important to center the tank on the aircraft’s center of gravity. I use a 32-ounce fuel tank and a 24-ounce smoke tank, for a total of 56 fluid ounces added to the aircraft ready for flight. Mounted directly over the center of gravity, no noticeable trim changes occur as the fluid is used up. If the tanks are forward or aft of the center of gravity, the balance of the airplane will change during the flight. For the smoke tank I used a Du-Bro (dubro.com) tank equipped with a gasoline stopper. I used three lines so one is dedicated to filling the tank, and I have two pickup lines with clunks, and one that vents out on the bottom of the model. I use Du-Bro 1/4-inch foam rubber to pad the tank and two Velcro straps to hold the two tanks in place.
The best location for the smoke pump is below and behind the smoke tank. When installing any electronic component, use rubber washers and/or foam padding to protect them from the engine vibration. In this case, two wood screws and rubber washers provide soft mounts for the pump. Connect the “pickup” line from the tank to the pump fitting marked “in” and a fuel line and a check valve on the pump fitting marked “out.” This line is connected with a T-fitting to each muffler of my Desert Aircraft DA120 twin-cylinder engine (desertaircraft.com). When using a twin-cylinder engine, some prefer to use two check valves placed about an inch from each muffler. Attach the check valves to the mufflers using high-temperature neoprene tubing.
Remember to keep all the lines as short as possible and position the smoke pump as close as possible to the smoke tank. This helps simplify the self-priming process. Install Sullivan clamps on all connections to ensure they don’t come undone. I also use Hangar 9 fuel fittings on the fill and vent lines. The TME pump has an electronic controller module that plugs directly into your receiver, saving the weight and complexity of a second battery pack. With all components installed and connected, the only step left is to program the pump on the hand controller and get out to the flying field!
PROGRAMMING
Once the pump installation is complete, it’s time to properly program your radio for operation. Connect the controller to a spare receiver channel for the pump (I use the gear switch channel). If too much smoke fluid enters the muffler while the throttle is at a low power setting, the engine may quit. To prevent this you have to adjust the flow rate of the pump. Use “Adjustable Travel Volume” (ATV) or “End Point Adjustment” (EPA) function values so that when the 2-position switch is activated, one position is on and the other is off. I have found that the ideal oil rate for my engine/mufflers combination is 14.8 ounces of smoke fluid per minute, so I adjusted the ATV values to obtain this rate.
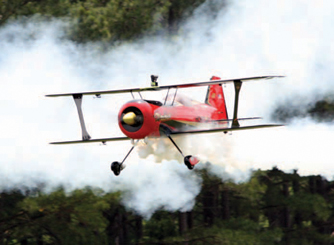
SMOKING WITH THE BEST!
Smoke systems should be used to add excitement to your overall flight performance. Don’t just leave the smoke on from start to finish as this will quickly use up all the oil in your smoke tank. Rather, turn it on at the start of your maneuver and then switch it off when the maneuver is complete. Also, using smoke during slow and low 3D maneuvers adds much to the drama. Assign your smoke function to whichever switch is most comfortable for you to find and use. You don’t want to be hunting for the switch while you should be concentrating on your plane!
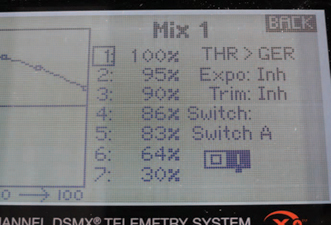
A “throttle-to-gear” mix is used to ensure that the proper amount of smoke enters the muffler to prevent an engine failure at low throttle settings.
It is also important to use a programmable mix curve that varies the smoke fluid rate at different throttle settings. Ensure that smoke oil isn’t pumped into the muffler when the engine is at low throttle settings as the engine may quit while performing a stall turn, spin, or similar maneuver. I prefer to have the smoke pump begin to work at around 35% throttle all the way up to 100%. I added five points in the program mix and adjusted the first two points so the pump is in the off position until the throttle stick nears 30%. From this point on, the rate gradually increases until the pump is at maximum rate when the throttle is at the 100% point. These values can be tweaked at the field during flight testing to fine-tune each of the points.
AT THE FIELD
I use Liquid Sky from Robart (robart.com). When the pump is turned on, it goes into “prime” mode to draw smoke fluid from the tank to the pump. After a few seconds, turn it back off. To start the engine, always have the smoke switch off. With my settings, the pump smoke comes on when the aircraft is almost at the cruise throttle setting. The smoke starts gradually at 30% power and increases to about 50%. The rate of smoke produced stays fairly constant from 50% to 100% throttle.
FINAL THOUGHTS
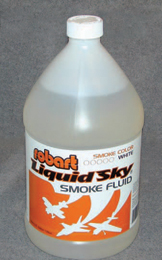
Sold in 1- and 5-gallon containers, Robart’s Liquid Sky Smoke Fluid works well and produces excellent results.
When properly installed and operated, your smoke system will work effortlessly all season long. When you get the percentages right, your smoke will be billowy with a long satisfying hang time.
Model Airplane News - The #1 resource for RC plane and helicopter enthusiasts featuring news, videos, product releases and tech tips.
Continue reading...

Always secure the smoke and fuel tank directly above the center of gravity for the best flight performance results.

The TME SmartSmoker Pro controller can be powered either from the receiver port or by a separate battery pack.
TANK AND PUMP INSTALLATION
A smoke system includes the smoke pump, gasoline-grade and neoprene fuel line, a smoke oil tank, fuel fittings, and a smoke muffler. Depending on the pump used, a battery to supply power to the pump may be required. The TME SmartSmoker Pro (tmenet.com), can be powered by a spare receiver channel. Smoke pumps can draw as much as 1 amp of current and, on average, will use about 17mAh per minute. It is a good idea to use a larger than normal radio battery pack if you are going to use lots of smoke-on time. The first order of business is to mount the smoke tank. The original tank tray on the Composite QQ Yak 54 is designed for only the fuel tank and is mounted directly above the wing tube. So I made a 1/8-inch lite-ply floor and glued it over the existing tray using Zap 30-minute epoxy (zapglue.com). Slots in the new tray allow Velcro straps to secure both tanks.

A triangle joint fitting divides the line going from the smoke pump to each of the mufflers on the DA-120 twin cylinder engine.

Shown from the inside of the composite fuselage are the fuel and smoke lines used to fill each tank.
It is important to center the tank on the aircraft’s center of gravity. I use a 32-ounce fuel tank and a 24-ounce smoke tank, for a total of 56 fluid ounces added to the aircraft ready for flight. Mounted directly over the center of gravity, no noticeable trim changes occur as the fluid is used up. If the tanks are forward or aft of the center of gravity, the balance of the airplane will change during the flight. For the smoke tank I used a Du-Bro (dubro.com) tank equipped with a gasoline stopper. I used three lines so one is dedicated to filling the tank, and I have two pickup lines with clunks, and one that vents out on the bottom of the model. I use Du-Bro 1/4-inch foam rubber to pad the tank and two Velcro straps to hold the two tanks in place.
The best location for the smoke pump is below and behind the smoke tank. When installing any electronic component, use rubber washers and/or foam padding to protect them from the engine vibration. In this case, two wood screws and rubber washers provide soft mounts for the pump. Connect the “pickup” line from the tank to the pump fitting marked “in” and a fuel line and a check valve on the pump fitting marked “out.” This line is connected with a T-fitting to each muffler of my Desert Aircraft DA120 twin-cylinder engine (desertaircraft.com). When using a twin-cylinder engine, some prefer to use two check valves placed about an inch from each muffler. Attach the check valves to the mufflers using high-temperature neoprene tubing.
Remember to keep all the lines as short as possible and position the smoke pump as close as possible to the smoke tank. This helps simplify the self-priming process. Install Sullivan clamps on all connections to ensure they don’t come undone. I also use Hangar 9 fuel fittings on the fill and vent lines. The TME pump has an electronic controller module that plugs directly into your receiver, saving the weight and complexity of a second battery pack. With all components installed and connected, the only step left is to program the pump on the hand controller and get out to the flying field!
PROGRAMMING
Once the pump installation is complete, it’s time to properly program your radio for operation. Connect the controller to a spare receiver channel for the pump (I use the gear switch channel). If too much smoke fluid enters the muffler while the throttle is at a low power setting, the engine may quit. To prevent this you have to adjust the flow rate of the pump. Use “Adjustable Travel Volume” (ATV) or “End Point Adjustment” (EPA) function values so that when the 2-position switch is activated, one position is on and the other is off. I have found that the ideal oil rate for my engine/mufflers combination is 14.8 ounces of smoke fluid per minute, so I adjusted the ATV values to obtain this rate.

SMOKING WITH THE BEST!
Smoke systems should be used to add excitement to your overall flight performance. Don’t just leave the smoke on from start to finish as this will quickly use up all the oil in your smoke tank. Rather, turn it on at the start of your maneuver and then switch it off when the maneuver is complete. Also, using smoke during slow and low 3D maneuvers adds much to the drama. Assign your smoke function to whichever switch is most comfortable for you to find and use. You don’t want to be hunting for the switch while you should be concentrating on your plane!

A “throttle-to-gear” mix is used to ensure that the proper amount of smoke enters the muffler to prevent an engine failure at low throttle settings.
It is also important to use a programmable mix curve that varies the smoke fluid rate at different throttle settings. Ensure that smoke oil isn’t pumped into the muffler when the engine is at low throttle settings as the engine may quit while performing a stall turn, spin, or similar maneuver. I prefer to have the smoke pump begin to work at around 35% throttle all the way up to 100%. I added five points in the program mix and adjusted the first two points so the pump is in the off position until the throttle stick nears 30%. From this point on, the rate gradually increases until the pump is at maximum rate when the throttle is at the 100% point. These values can be tweaked at the field during flight testing to fine-tune each of the points.
AT THE FIELD
I use Liquid Sky from Robart (robart.com). When the pump is turned on, it goes into “prime” mode to draw smoke fluid from the tank to the pump. After a few seconds, turn it back off. To start the engine, always have the smoke switch off. With my settings, the pump smoke comes on when the aircraft is almost at the cruise throttle setting. The smoke starts gradually at 30% power and increases to about 50%. The rate of smoke produced stays fairly constant from 50% to 100% throttle.
FINAL THOUGHTS

Sold in 1- and 5-gallon containers, Robart’s Liquid Sky Smoke Fluid works well and produces excellent results.
When properly installed and operated, your smoke system will work effortlessly all season long. When you get the percentages right, your smoke will be billowy with a long satisfying hang time.
Model Airplane News - The #1 resource for RC plane and helicopter enthusiasts featuring news, videos, product releases and tech tips.
Continue reading...


