GSNadmin
Staff member
Well, it has been a little while so I thought I would post an update for the Skyraider project. Up to now we have been going back and forth between sheeting the fuselage and installing the hardware that would be difficult to get to after the fuselage is all covered up. Well we have the tail wheel unit, the servos and the pushrods all in place and I spent the last week getting the sheeting completed.

Here’s the last piece of sheeting which I fitted into place the last time we posted. As a reminder, I use TiteBond yellow glue for most of the sheeting as it takes a little longer to setup and it really sands easily if any squeezes out between the seams, and it is water-based so you can clean up with a damp paper towel.

Using the plans as a guide, I then cut open the horizontal stabilizer saddle area as show above. This is easily cut away using an X-Acto knife, starting in the center area and working your way outward. Be sure to take measurements from the plans to get the placement correct. The bottom half is definded by a light-plywood doubler under the sheeting. Once I was happy with the shape of the opening and the fit of the sheeting piece, I applied some glue to the substructure and pinned the piece into place. I also used cloths pins to clamp the part to the lite-ply doubler.

Here’s the sheeting part glued into place.

Continue adding the various pieces of sheeting and use tape, cloths pins and pins to hold the pieces in place until the glue has dried. Notice that my T-pins are angled to hold the edges of the sheeting together at about the same level. While doing this, the edges sometimes float up or down and so I try to keep them relatively flush with each other to minimize sanding after the glue dies.
And talking about sheeting and glues, here’s what I use,
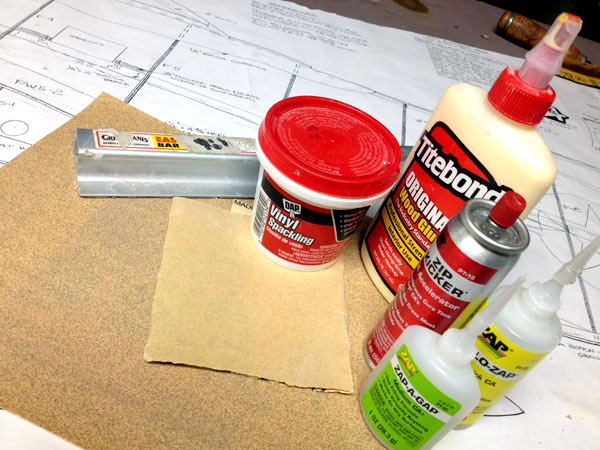
I find that the Titebond wood glue sands easily and dries quickly and I use it for most of my sheeting. I also use thick and medium Zap glue and Zip Kicker for fast application of sheeting in some areas. Also it is great for filling gaps under the sheeting. For sandpaper, I use cheap hardware store grade in 150, 220 and 320 grits. Also, I find Great Planes sanding bars very useful I have both 1 foot and 2 foot lengths and use 150 and 220 grits.

When using a sanding bar I sand it at an angle to the sheeting grain and edge directions. Being stiff and straight, the sanding bar knocks off the high points and produces a smooth wave-free surface. So before doing any filling of seams or dings, smooth all the surfaces with the sanding bar, then wipe the whole fuselage down to remove all the dust. I use an automotive tack cloth.
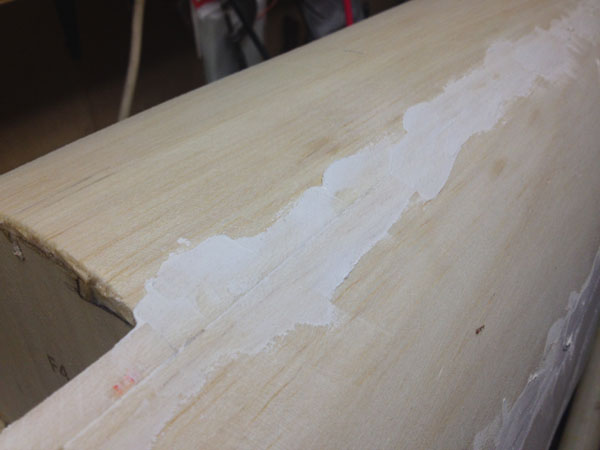
Before applying filler, I use a moist sponge to dampen the wood where I want to fill. I then use some scrap balsa sheeting to spread the DAP Vinyl spackling along all the seams between the sections of sheeting. I like to apply it at an angle to the seam and press it down so it flows into the recesses. Once a section is filled and repeat going down the length of the seam, and then I scrap the access off to minimize sanding after it dries. The spackling takes about an hour or so to dry.

Here you see the spackling applied and drying. It looks like a mess at first but after it dries and you hit it with a sanding bar or sanding block, almost all of the filler material with sand away leaving only the sub-surface recesses filled.
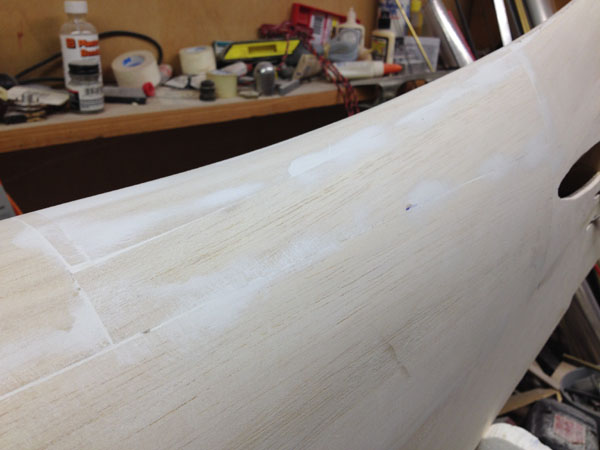
Here you see the first application of spackling sanded smooth. It usually takes two or three applications to get everything nice and smooth.
Once the fuselage has been sanded with the 150 grit, switch to the 220 grit paper and now, you can use sheets of sandpaper folded into thirds and sand the surface by hand. You will be able to feel if there is a sharp seam or bump which you can address again with the sanding bar.
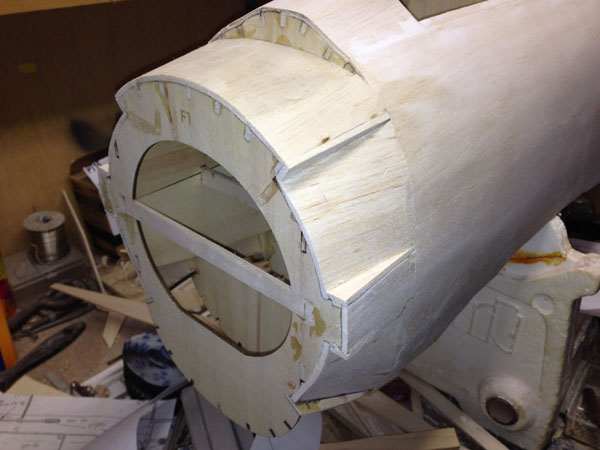
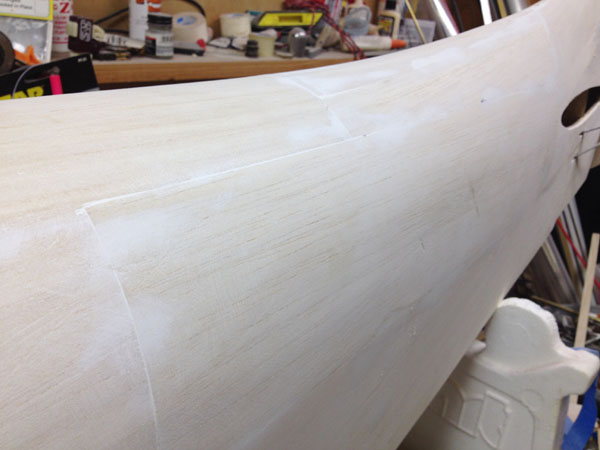
Here is the nose of the fuselage with the sheeting around former F-1. The firewall will eventually be glued against this former. Also note that the bottom chin section is left un-sheeted for now. This is so we can fit the wing into place and install the big alignment dowel through Former F-3 and into the leading edge of the wing.

Apply more spackling along any seams in this area, let dry and then use a long, narrow sanding block to dress out the corners. Don’t rush, take your time and apply as much filler as needed to end up with a blemish free fuselage. We’ll come back to the fuselage when we setup our engine installation and firewall details, but for now most of the sheeting is done.

Once you happy with the smoothness of the sheeting, wipe it down and set aside so you don’t add more dents that will need filling. I love my Robart Super Stand as it is made of foam and does a great job supporting your fuselage keeping it up off the workbench. Now, lets start on the wing!
Click here for the previous post.
Model Airplane News - The #1 resource for RC plane and helicopter enthusiasts featuring news, videos, product releases and tech tips.
Continue reading...
Here’s the last piece of sheeting which I fitted into place the last time we posted. As a reminder, I use TiteBond yellow glue for most of the sheeting as it takes a little longer to setup and it really sands easily if any squeezes out between the seams, and it is water-based so you can clean up with a damp paper towel.
Using the plans as a guide, I then cut open the horizontal stabilizer saddle area as show above. This is easily cut away using an X-Acto knife, starting in the center area and working your way outward. Be sure to take measurements from the plans to get the placement correct. The bottom half is definded by a light-plywood doubler under the sheeting. Once I was happy with the shape of the opening and the fit of the sheeting piece, I applied some glue to the substructure and pinned the piece into place. I also used cloths pins to clamp the part to the lite-ply doubler.
Here’s the sheeting part glued into place.
Continue adding the various pieces of sheeting and use tape, cloths pins and pins to hold the pieces in place until the glue has dried. Notice that my T-pins are angled to hold the edges of the sheeting together at about the same level. While doing this, the edges sometimes float up or down and so I try to keep them relatively flush with each other to minimize sanding after the glue dies.
And talking about sheeting and glues, here’s what I use,
I find that the Titebond wood glue sands easily and dries quickly and I use it for most of my sheeting. I also use thick and medium Zap glue and Zip Kicker for fast application of sheeting in some areas. Also it is great for filling gaps under the sheeting. For sandpaper, I use cheap hardware store grade in 150, 220 and 320 grits. Also, I find Great Planes sanding bars very useful I have both 1 foot and 2 foot lengths and use 150 and 220 grits.
When using a sanding bar I sand it at an angle to the sheeting grain and edge directions. Being stiff and straight, the sanding bar knocks off the high points and produces a smooth wave-free surface. So before doing any filling of seams or dings, smooth all the surfaces with the sanding bar, then wipe the whole fuselage down to remove all the dust. I use an automotive tack cloth.
Before applying filler, I use a moist sponge to dampen the wood where I want to fill. I then use some scrap balsa sheeting to spread the DAP Vinyl spackling along all the seams between the sections of sheeting. I like to apply it at an angle to the seam and press it down so it flows into the recesses. Once a section is filled and repeat going down the length of the seam, and then I scrap the access off to minimize sanding after it dries. The spackling takes about an hour or so to dry.
Here you see the spackling applied and drying. It looks like a mess at first but after it dries and you hit it with a sanding bar or sanding block, almost all of the filler material with sand away leaving only the sub-surface recesses filled.
Here you see the first application of spackling sanded smooth. It usually takes two or three applications to get everything nice and smooth.
Once the fuselage has been sanded with the 150 grit, switch to the 220 grit paper and now, you can use sheets of sandpaper folded into thirds and sand the surface by hand. You will be able to feel if there is a sharp seam or bump which you can address again with the sanding bar.
Here is the nose of the fuselage with the sheeting around former F-1. The firewall will eventually be glued against this former. Also note that the bottom chin section is left un-sheeted for now. This is so we can fit the wing into place and install the big alignment dowel through Former F-3 and into the leading edge of the wing.
Apply more spackling along any seams in this area, let dry and then use a long, narrow sanding block to dress out the corners. Don’t rush, take your time and apply as much filler as needed to end up with a blemish free fuselage. We’ll come back to the fuselage when we setup our engine installation and firewall details, but for now most of the sheeting is done.
Once you happy with the smoothness of the sheeting, wipe it down and set aside so you don’t add more dents that will need filling. I love my Robart Super Stand as it is made of foam and does a great job supporting your fuselage keeping it up off the workbench. Now, lets start on the wing!
Click here for the previous post.
Model Airplane News - The #1 resource for RC plane and helicopter enthusiasts featuring news, videos, product releases and tech tips.
Continue reading...