• If you are new to GiantScaleNews.com, please register, introduce yourself, and make yourself at home.

    We're 1st in Giant Scale RC because we've got the best membership on the internet! Take a look around and don't forget to register to get all of the benefits of GSN membership!

    Welcome!

3D Viper-ST 100-120cc scratch build......it continues!

ericb

Team WTFO
GSN Contributor
This...."THIS" my friend is freaking gorgeous! I used to really enjoy building, but my favorite of all builds was when it was narrowing down to the final stages and I could sit back and "envision" the scheme and the colors and the clear blue sky all around it. Then pulling the covering iron, heat gun, trim tool and all the rolls of that precious colored film out and going to work. I would LOVE LOVE LOVE to be doing a covering job on this beauty. Not many I would say that about, but this would be so fun.:way_to_go::way_to_go::way_to_go::way_to_go::way_to_go:
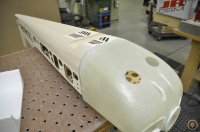
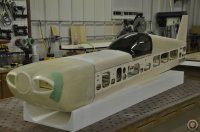
You can come and cover my wings if you want.
 

tylerzx9r

100cc
Man would I love to have one of these, but I cant even get servos mounted in a plane that Ive had fixed for a month now! I hope you ate still kitting stuff out in a few years when my kids are older and I have some time on my hands again terry!
What I recommend, is that you order the kit (while they are on sale!!!) and cubby whole that thing away for a bit.... Then when your ready, there is no question on what to build! Besides you never know what may happen, you could need a plane to put some gear into sooner than a couple years! However if you must wait, I Think you will still be able to get one of you ask Fibertech in a nice manor:epic:
 

tylerzx9r

100cc
Alright! Ready for some more tips of the hobby! Man I just can't wait!!!!!! Looking more forward to my build with every post!
 

Terryscustom

640cc Uber Pimp
Got my work done and had a couple hours to work on my plane today. Got some work done on the canopy. I knew going in with this that the canopy deck would need some work. Rick has re-worked the foam so that the kits going out will match and I'm getting another one soon that my unknowing candidate Tyler is going to try out:D

I first mounted the cowl and blended in the bottom in with a sanding block. Sides were not an issue but I hit them with a block as well and then checked the top. An easy way to see if you have dips is to mark the top with a pencil (I went a little heavy to show up for the pics) then block over and the sandpaper will only take off the high spots. I made a little masking tape dam to build up the leading edge and applied some body filler. I used glaze since I'm only building up a little less than 1/16".

While that dried I trimmed the bottom edge of the canopy shell and masked off the leading edge. I sanded the leading edge of the shell to thin it down. I hit it with 100 grit paper and it takes a bit of work but looks nice if you have not recessed the front of the shell. I sand it back about 1/2" and so the LE of the shell is down to about 1/32" or slightly less. Always mask to protect that you don't want to sand and if you wear the masking tape down, add another layer. I ended up with four layers of tape to keep from scratching the glassed canopy deck.

I sanded and re-filled the front and then filled the area in front of the canopy shell. This basically yields a nice smooth bump where the canopy shell starts instead of an abrupt edge. Once painted, this transition blends in and is barely visible from a few feet away yet is easy to do and I have yet to have one crack.
 

Attachments

  • _DSC0856.JPG
    _DSC0856.JPG
    82.1 KB · Views: 330
  • _DSC0857.JPG
    _DSC0857.JPG
    69.4 KB · Views: 328
  • _DSC0858.JPG
    _DSC0858.JPG
    54.8 KB · Views: 375
  • _DSC0859.JPG
    _DSC0859.JPG
    45.8 KB · Views: 335
  • _DSC0860.JPG
    _DSC0860.JPG
    62.1 KB · Views: 346
  • _DSC0861.JPG
    _DSC0861.JPG
    49.4 KB · Views: 365
  • _DSC0862.JPG
    _DSC0862.JPG
    51 KB · Views: 365
  • _DSC0863.JPG
    _DSC0863.JPG
    77 KB · Views: 361
  • _DSC0864.JPG
    _DSC0864.JPG
    72 KB · Views: 328
  • _DSC0865.JPG
    _DSC0865.JPG
    34.6 KB · Views: 337
  • _DSC0866.JPG
    _DSC0866.JPG
    57.9 KB · Views: 363
  • _DSC0867.JPG
    _DSC0867.JPG
    46.1 KB · Views: 401
  • _DSC0868.JPG
    _DSC0868.JPG
    62 KB · Views: 345
  • _DSC0869.JPG
    _DSC0869.JPG
    65.9 KB · Views: 361
  • _DSC0870.JPG
    _DSC0870.JPG
    65.1 KB · Views: 334
  • _DSC0871.JPG
    _DSC0871.JPG
    47.3 KB · Views: 380
  • _DSC0872.JPG
    _DSC0872.JPG
    52.8 KB · Views: 375
  • _DSC0873.JPG
    _DSC0873.JPG
    34.3 KB · Views: 316
  • _DSC0874.JPG
    _DSC0874.JPG
    59.2 KB · Views: 353
  • _DSC0875.JPG
    _DSC0875.JPG
    52.5 KB · Views: 346
  • _DSC0876.JPG
    _DSC0876.JPG
    33.6 KB · Views: 312

Terryscustom

640cc Uber Pimp
After a little more sanding the canopy was done and ready to a base coat of primer that may or may not show more areas that I need to work on. I decided to put some fine-line masking on the canopy where I am proposing the canopy shell be painted up to. I like to do this and look at it a few times to make sure I'm happy before I commit.

Then I started the hinging. For tonight I just got started and had to leave for the day but will pick it up this weekend. For hinges I bought a robart hinge pin jig and modified it with a piece of plywood. You can do this with a simple square but I had to get fancy with the laser. Basically you just need a hole in the middle that the insert threads into and then two holes equally spaced from the center with dowels of some sort.

I like to double hinge the ends with the first hinge about 3/4" from the end and then 1" space to the second hinge. Then equally space the hinges as you see fit on the rest. I mark the location with a sharpy and then use a hobby knife to cut a small V just the width of the marker. This will allow your drill bit to center on the mark that you made. Drill the holes, insert a hinge and work it back and forth to give it some clearance. Then test fit the control surface. On the rudder the lower hinges need to have blocks installed on the inside of the fuse for the hinges to glue into.
_DSC0887.JPG
 

Attachments

  • _DSC0877.JPG
    _DSC0877.JPG
    96.3 KB · Views: 308
  • _DSC0878.JPG
    _DSC0878.JPG
    83.1 KB · Views: 329
  • _DSC0879.JPG
    _DSC0879.JPG
    67.4 KB · Views: 366
  • _DSC0880.JPG
    _DSC0880.JPG
    67 KB · Views: 358
  • _DSC0881.JPG
    _DSC0881.JPG
    57.8 KB · Views: 345
  • _DSC0882.JPG
    _DSC0882.JPG
    63.5 KB · Views: 332
  • _DSC0883.JPG
    _DSC0883.JPG
    33.8 KB · Views: 356
  • _DSC0884.JPG
    _DSC0884.JPG
    54.7 KB · Views: 329
  • _DSC0885.JPG
    _DSC0885.JPG
    42.3 KB · Views: 323
  • _DSC0886.JPG
    _DSC0886.JPG
    56.6 KB · Views: 343
  • _DSC0888.JPG
    _DSC0888.JPG
    73.6 KB · Views: 325
Last edited:
Top