Jetpainter
640cc Uber Pimp
We used to make our own candy colors years ago the same way. You can make tint coats like that in all kinds of colors for different effects.
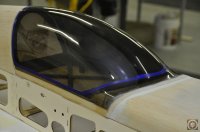
I also like to do the inside , I have used Pactra canopy tint before with good results too- Your's looks awesome Terry!!!I also love the look of a tinted canopy. I usually tint the inside surface though. It's a bit harder to do that way,but the same process that Terry does his. I will second Terry's comment on not applying too much tint. Remember that when looking into the plane it will appear twice as dark because you are looking through two tinted surfaces.
I also like to do the inside , I have used Pactra canopy tint before with good results too- Your's looks awesome Terry!!!


Nice workOver the last two weeks I have done a series of test panels to see what I could do to get the lightest, yet still stable surface for painting using glass cloth and epoxy resin. I tried several different ways of glassing, filling and priming. My results may differ from others, but I wanted to settle on the way I'm going to prep the airplane I'm scratch building.
Glassing
I used Z-Poxy finishing resin because I've been using it for years and have had good results. I made up some 4” x 6” balsa test panels, this series were covered with .5oz glass cloth from Hangar9. (I weighed the cloth before hand and it actually weighed .7oz per square yard). The bare wood was sanded to 220 grit and weighed.
I then applied the glass cloth and the first coat of Z-Poxy finishing resin. The resin is mixed 1:1. I laid out the cloth letting it hang over the edges and poured on a small amount of resin and spread it with a squeegee. The idea here is to let the resin soak through the cloth and have the cloth lay down tight to the wood. After all the cloth was transparent from the resin I carefully squeegeed as much of the resin back off as I could wiping the edge of the squeegee on the edge of the mixing cup to clean it. If your surface is glossy after the first coat your leaving too much on.
After letting the resin cure overnight, I trimmed the cloth by sanding the edges with a block and 120 grit paper. That technique works great on a sharp edge. After trimming the cloth I sanded the panels with 120 grit lightly them switched to 220 grit and sanded them as smooth as I could without getting into the cloth. I then weighed them again.
I then put on another coat of resin. This coat takes very little resin and from all my tests adds almost no weight. It also fills nearly all the weave in the cloth. I've always used two coats of resin, but I know some people use just one so earlier in the testing I made up some panels with only one coat, and found that they actually turned out heavier than two coats because of the primer and filler needed to fill the weave. If your glassing a complex structure you will have areas of cloth overlap. If your using two coats the sanding of the first coat gets rid of and roughness in the overlap and makes it nice and smooth after the second coat.
When doing the second coat of resin I pour a small amount of resin on the surface and spread it with a squeegee. I go over it in several directions and again remove as much as possible. This time it will end up glossy, but make sure you don't have any puddles. I then sanded the panels with 120 then 220 until they were smooth as a babies butt.
Priming
I primed 3 of the panels with Nason 421-19 2K Urethane primer mixed 4:1 with 483-87 activator and reduced 10% with 441-21 reducer. I primed the other three of them with Nason 491-16 Epoxy primer mixed 1:1 with 483-19 catalyst. After letting them cure overnight I sanded the primer with 320 dry then 400 dry then 600 wet.
Painting
I painted all the panels with DuPont Chromabase colors reduced 1:1 with 7160 Basemaker. The clear was 2 coats of Nason 496-00 mixed 4:1 with 483-79 activator then reduced 10% with 441-21 reducer.
You will see in the chart I'll attach that the weight varied a lot depending on the color I used. The white was the heaviest because it took more coats to cover.
Results
If I average all of my results together, I come up with a weight of .133 grams or .00469 ounces per square inch from bare balsa to painted. Basically 4.69 ounce per 1000sq” I'll let a better mathematician than me figure out how many square inches of surface area there is on a given airplane.
I still need to weigh some Ultracote and see how it compares. I also started on some panels using Minwax Polycrylic. Many people have said this is lighter than resin, but it's not showing that in my tests. To get it to the priming stage it took 4 coats of Polycrylic at a weight gain of about 2 grams. The resin panels averaged about 1.6 grams weight gain. The resin also gives a much harder surface.
The PDF file at the bottom has all the results of this set.
View attachment 7003 View attachment 7004 View attachment 7005 View attachment 7007 View attachment 7008 View attachment 7009 View attachment 7010 View attachment 7011 View attachment 7012