• If you are new to GiantScaleNews.com, please register, introduce yourself, and make yourself at home.

    We're 1st in Giant Scale RC because we've got the best membership on the internet! Take a look around and don't forget to register to get all of the benefits of GSN membership!

    Welcome!

Scale 1/3 Scale Extra 330L Build.

Well got all the small changes done so had a chance to stand the 2 sides up and see how it looks. Now just have to make sure it all goes together straight.
View attachment 109641 View attachment 109642 View attachment 109643

@Snoopy1 good fix. The tray is very important to the strength of the fuselage at the rear. From memory the stab tube also is supposed to sit flush against a former in that area which helps to tie everything together around the rear end adding strength and rigidity.

Getting it straight at this stage is quite easy if you have a flat building board. The trick is keeping it straight as you add the outer shell. Take your time and you will be well rewarded with a straight and relatively light structure that is surprisingly strong, even more so once you add the sheeting.

I wish I had of devoted time to fixing the little things when I built mine. I am happy with the outcome (it was my first large model), but looking back there were things that if I was building it now I would change. I look forward to seeing how yours turns out and the AUW when you are done.
 

Snoopy1

640cc Uber Pimp
Up to now it is all straight. Stopped depending on the drawings. Installed the wing tube sleeve and everything will be built from the wing tube for straightness. And yes there is not a lot of support for the stabilizer tube in the back looking at that right now. Not sure how it is going to be changed but hopefully tomorrow I can find a solution.
 

Snoopy1

640cc Uber Pimp
@Snoopy1 good fix. The tray is very important to the strength of the fuselage at the rear. From memory the stab tube also is supposed to sit flush against a former in that area which helps to tie everything together around the rear end adding strength and rigidity.

Getting it straight at this stage is quite easy if you have a flat building board. The trick is keeping it straight as you add the outer shell. Take your time and you will be well rewarded with a straight and relatively light structure that is surprisingly strong, even more so once you add the sheeting.

I wish I had of devoted time to fixing the little things when I built mine. I am happy with the outcome (it was my first large model), but looking back there were things that if I was building it now I would change. I look forward to seeing how yours turns out and the AUW when you are done.
If you know of any thing on fuselage that you would like change today please let me know and why. Thanks
 

Snoopy1

640cc Uber Pimp
CE6C7A32-DD5E-456D-9E90-FB74FEEBBE4B.jpeg
8581AC54-A6E7-4E53-B53F-DA669A7067A9.jpeg
0C65B239-69AB-4107-AB34-12C094146615.jpeg
Well got all the stick bracing done without changing the shape at all. Made a small block for the tail wheel wire so that it will be ready For the J&J tail wheel. Also glued in the landing gear plywood plate and the 1 by 1 by 1/16 aluminum angle stiffeners, now all that needs to be done is the plywood stiffeners have to be added to the sides of the fuselage.
 

Snoopy1

640cc Uber Pimp
@Snoopy1 good fix. The tray is very important to the strength of the fuselage at the rear. From memory the stab tube also is supposed to sit flush against a former in that area which helps to tie everything together around the rear end adding strength and rigidity.

Getting it straight at this stage is quite easy if you have a flat building board. The trick is keeping it straight as you add the outer shell. Take your time and you will be well rewarded with a straight and relatively light structure that is surprisingly strong, even more so once you add the sheeting.

I wish I had of devoted time to fixing the little things when I built mine. I am happy with the outcome (it was my first large model), but looking back there were things that if I was building it now I would change. I look forward to seeing how yours turns out and the AUW when you are done.

Looking at the tray in the fuselage does not look like it does the job to well. Still looking at it and have not made up my mind what to do. But lucky you mentioned it because I laid it in place and then realize I could not get to the wing bolts that I have added to the inside of the fuselage. So will have to sort that out first and when that is done I will have to figure out how to do the tray it looks like I will,have to do a front and rear tray so that I can get my hands into the fuselage to do up the wing bolts.
 
Looking at the tray in the fuselage does not look like it does the job to well. Still looking at it and have not made up my mind what to do. But lucky you mentioned it because I laid it in place and then realize I could not get to the wing bolts that I have added to the inside of the fuselage. So will have to sort that out first and when that is done I will have to figure out how to do the tray it looks like I will,have to do a front and rear tray so that I can get my hands into the fuselage to do up the wing bolts.

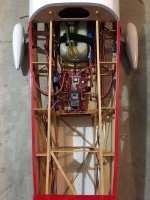
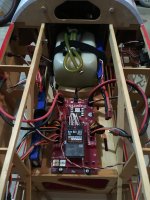
@Snoopy1 since I used the original bolt through the tube method, that was not an issue I had. Like you say you could make a front and rear tray to clear your bolt positions. I would just be concerned about moving things too far back as you may run into balance issues. I managed to need no weights at all (always a goal of mine) and utilised receiver and ignition batteries to achieve the balanced outcome. I have attached some photos of the area for you to see what I did. The tray does add some stability to the structure, but a split tray will also achieve the outcome.

A couple of other points while I think of them:
1. The stab tube in the fuselage should butt up against the former that is just in front of it. Make sure you get a good glue joint there. If I were to make mine again, I would likely add a small sub former behind the stab tube to help distribute load from the tube to the fuselage sides. Any chance you can post a close up photo of the tail area showing where the stab tube mounts?
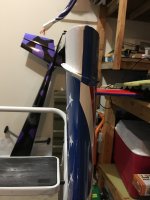
2. When you cut the holes in the fuselage sheeting for the wings to fit in, you will end up with a bit of a gap due to the taper of the wing. I did not like this as I was concerned that the air pressure might bend the skin leading to possible failure. As a result I put some triangle stock on the wing to cover the gap (see photo). It is a little tricky due to the non 90 degree angles, but well worth the time in my opinion.

When you add the outer shell formers, it is best to have the fuselage upside down on a flat surface and weighted down to hold it true. Then add the shell formers and while it is still weighted down add the longerons in pairs (one each side) to help keep it straight. Do not move it until you have all the longerons on that you can and everything is well and truly set. This should give you a very straight and strong fuselage.

I also change the canopy a bit by adding additional front, side and rear bracing to give the canopy something more to glue to. When you get close to that let me know and I will send some photos of what I did.
 

Attachments

  • Radio Bay 1.jpg
    Radio Bay 1.jpg
    1.7 MB · Views: 225
  • Radio Bay 2.jpg
    Radio Bay 2.jpg
    1.9 MB · Views: 207
  • Wing Fillet.jpg
    Wing Fillet.jpg
    1.6 MB · Views: 316

Snoopy1

640cc Uber Pimp
Thank you for all that it is all helpful and hopefully I end up with a better plane. The wing gap bothers me and yes it sure will not look good and not easy to fix.
 
Top