• If you are new to GiantScaleNews.com, please register, introduce yourself, and make yourself at home.

    We're 1st in Giant Scale RC because we've got the best membership on the internet! Take a look around and don't forget to register to get all of the benefits of GSN membership!

    Welcome!

Scale 25% Krier Kraft build, a tribute to grampa.

Snoopy1

640cc Uber Pimp
Tonight, I crossed finishing the cowl mounting off of the list. Dad and I got the nut plates riveted to the back side of the mounting arms and I drilled and counter sunk the holes in the cowl for the warshers and screws.

View attachment 94818

The nut plates in place, these are what are called hot nuts. They lock because the bottom of the hole is actually egg shaped. I think they call them hot nuts because the screws get hot as h*ll when you put them in and take them out lol.

View attachment 94819

The nut plates are flush riveted to the mounts so they sit against the cowl with no problem.

View attachment 94820

The #8 machine screws and 100 degree flush washers that hold the cowl on.

View attachment 94821

The screws and washers sit nice and flush with the cowl, I mean there is already enough drag on a biplane, no need for the cowl screws to cause more! :D
Really like the special washers you are using on the cowl. Can please elaborate on them and show some details.
 

stangflyer

I like 'em "BIG"!
Tonight, I crossed finishing the cowl mounting off of the list. Dad and I got the nut plates riveted to the back side of the mounting arms and I drilled and counter sunk the holes in the cowl for the warshers and screws.

View attachment 94818

The nut plates in place, these are what are called hot nuts. They lock because the bottom of the hole is actually egg shaped. I think they call them hot nuts because the screws get hot as h*ll when you put them in and take them out lol.

View attachment 94819

The nut plates are flush riveted to the mounts so they sit against the cowl with no problem.

View attachment 94820

The #8 machine screws and 100 degree flush washers that hold the cowl on.

View attachment 94821

The screws and washers sit nice and flush with the cowl, I mean there is already enough drag on a biplane, no need for the cowl screws to cause more! :D
Nicely done. I like what you did with that.

Now that's fancy right there. Nice job bro.:way_to_go:
Indeed...nice job for sure.
 

WMcNabb

150cc
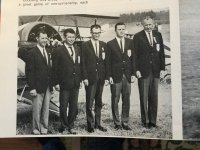
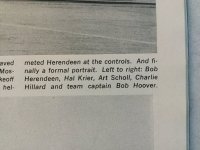
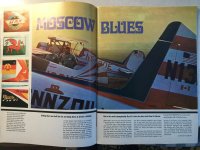
A very good friend of mine gave me a cool magazine this afternoon.
January 1967 issue of Flying magazine.
Couldn't resist sharing an article it contained on this most excellent thread.

image.jpeg


image.jpeg


image.jpeg image.jpeg
 
Last edited:

Bipeguy03

150cc
Really like the special washers you are using on the cowl. Can please elaborate on them and show some details.

They are called Tinnerman 100 degree flush washers. You use them with a flush machine screw. Full scale airplanes use them all over the place on things like cowlings, inspection plates, fiberglass wingtips and tail cones, ect. ect.

We get them from Aircraft Spruce, and they have 6, 8, and 10 sizes. I'm using 8s on the Krier.

WP_20170401_003.jpg


WP_20170401_004.jpg


The washer is depressed and fits down into an oversized or countersunk hole.

WP_20170401_005.jpg


Flush machine screw.

WP_20170401_006.jpg


Put it all together and you have a screw and washer that sits nice and flush
 

Bipeguy03

150cc
Well, I'm coming down the back stretch now! I have the cowl cut, the tail brace wire bottom bracket made, throttle push cable in, and I have spent god knows how many hours trying to come up with more things to do before covering and there just isn't much.

So with just some sanding and small details to finish, the Koverall should be here by the end of the week. It's time this girl gets a nice new dress :) I already have a quart of Butyrate, and a Pint of Nitrate and I have another pint of Nitrate and a pint of sanding sealer on the way from Sig with the Koverall. I'll be getting the colors (with the exception of the black I got from Sig) from Randolph because they had more shades to choose from, plus they have matching enamels for the cowl and wheel pants.


439.jpg


The cowl opening in the bottom, I had to cut it all the way back to make it easier to get the cowl on and off over the mounts. With the big bottom cut out and a 1 inch gap all the way around the firewall for cooling air, this thing should run cold!! lol

440.jpg


Bottom tail brace wire mounting bracket made out of .025" steel, I'll make the other 12 out of the same stuff after covering.

441.jpg


442.jpg


I used a Sig flex cable for the throttle, and the engine came with a B&B linkage. The cable was a bit of a pain to get rigged but once I got it it works slick as snot, best thing is it is all the way over to the side of the fuse and then curves back to the throttle at the end. This gives me PLENTY of room for the fuel tank and lines.

The servos are just for rigging purposes, when it's done it's getting Savox through out. I was going to get Pro Modeler, but I changed my mind lol.

443.jpg


The Randolph Color Chart :) time to start thinking about covering! Also, just missing the aileron servos, battery and fuel tank I weighed the Krier the other day. 10 pounds!!!!!! That leaves me with 7 pounds to get it covered and finished to hit my target weight, I think I can do that lol

444.jpg


I matched the white to grampa's Skybolt and it is Randolph white. He literally had a 55 gallon drum of white dope so everything he built was the same shade. Therefore, my Krier will be Randolph white :)

445.jpg


After studying all of our pictures dad and I came to the conclusion that Madrid Red was the closest to what papaw had on his Krier Kraft. The other shades were to dark or had too much orange. Got a quart of each on the way!

It will be a week or two before I get to covering the Krier, after I finish up the last couple of details I'm going to bang out a Sig Kougar for my dad (it's already been started). Then he is going to cover it with Sig silkspan and it will then be the test/practice platform for masking and spraying the color dope. This way if there is a problem, I learn it on the Kougar and not on the Krier ;) I'll probably post pictures of both during the covering process.

Finally, for :dancing-poop: and giggles I got to adding up what I have spent on this thing and was pretty shocked. Now granted, it's not everyday that you get a new in box Q35 for $90 (although we have 2 and dad just got a Q50 for the Skybolt for just over $100, THANKS EBAY!) but so far I have only spent $650, and with just servos and a battery to go, this thing will be flight ready for less than 1K......... I LOVE SCATCH BUILDING! :)
 

Snoopy1

640cc Uber Pimp
Well, I'm coming down the back stretch now! I have the cowl cut, the tail brace wire bottom bracket made, throttle push cable in, and I have spent god knows how many hours trying to come up with more things to do before covering and there just isn't much.

So with just some sanding and small details to finish, the Koverall should be here by the end of the week. It's time this girl gets a nice new dress :) I already have a quart of Butyrate, and a Pint of Nitrate and I have another pint of Nitrate and a pint of sanding sealer on the way from Sig with the Koverall. I'll be getting the colors (with the exception of the black I got from Sig) from Randolph because they had more shades to choose from, plus they have matching enamels for the cowl and wheel pants.


View attachment 94902

The cowl opening in the bottom, I had to cut it all the way back to make it easier to get the cowl on and off over the mounts. With the big bottom cut out and a 1 inch gap all the way around the firewall for cooling air, this thing should run cold!! lol

View attachment 94903

Bottom tail brace wire mounting bracket made out of .025" steel, I'll make the other 12 out of the same stuff after covering.

View attachment 94904

View attachment 94905

I used a Sig flex cable for the throttle, and the engine came with a B&B linkage. The cable was a bit of a pain to get rigged but once I got it it works slick as snot, best thing is it is all the way over to the side of the fuse and then curves back to the throttle at the end. This gives me PLENTY of room for the fuel tank and lines.

The servos are just for rigging purposes, when it's done it's getting Savox through out. I was going to get Pro Modeler, but I changed my mind lol.

View attachment 94906

The Randolph Color Chart :) time to start thinking about covering! Also, just missing the aileron servos, battery and fuel tank I weighed the Krier the other day. 10 pounds!!!!!! That leaves me with 7 pounds to get it covered and finished to hit my target weight, I think I can do that lol

View attachment 94907

I matched the white to grampa's Skybolt and it is Randolph white. He literally had a 55 gallon drum of white dope so everything he built was the same shade. Therefore, my Krier will be Randolph white :)

View attachment 94908

After studying all of our pictures dad and I came to the conclusion that Madrid Red was the closest to what papaw had on his Krier Kraft. The other shades were to dark or had too much orange. Got a quart of each on the way!

It will be a week or two before I get to covering the Krier, after I finish up the last couple of details I'm going to bang out a Sig Kougar for my dad (it's already been started). Then he is going to cover it with Sig silkspan and it will then be the test/practice platform for masking and spraying the color dope. This way if there is a problem, I learn it on the Kougar and not on the Krier ;) I'll probably post pictures of both during the covering process.

Finally, for :dancing-poop: and giggles I got to adding up what I have spent on this thing and was pretty shocked. Now granted, it's not everyday that you get a new in box Q35 for $90 (although we have 2 and dad just got a Q50 for the Skybolt for just over $100, THANKS EBAY!) but so far I have only spent $650, and with just servos and a battery to go, this thing will be flight ready for less than 1K......... I LOVE SCATCH BUILDING! :)
Can you tell me why you did not go for Pro Modler.
If I may suggest the picture of the tail wheel you have two spares ending sand a good soft radius on the ends it will look better in stead that hard 90.
 

Bipeguy03

150cc
Can you tell me why you did not go for Pro Modler.
If I may suggest the picture of the tail wheel you have two spares ending sand a good soft radius on the ends it will look better in stead that hard 90.

I found a High Voltage Savox that has more than enough torque for less money. I'm on a tight budget, so every penny counts :) The Pro Modelers are great but even the smaller servos were over kill for the Krier.
 
Top