• If you are new to GiantScaleNews.com, please register, introduce yourself, and make yourself at home.

    We're 1st in Giant Scale RC because we've got the best membership on the internet! Take a look around and don't forget to register to get all of the benefits of GSN membership!

    Welcome!

Assembly: Aeroworks QB 150cc Yak 55M

Joe Hunt

150cc
Joe, great video. It is pretty much how I set up my multi servo surfaces. I may have missed it but when I set up my servos my end points in the radio are all exact. Say 120% for this discussion. I leave that end point there and do not adjust it. I will then use the turn buckle and change sub trim for "new center" till I get equal travel on full up and full down. Once I get that I zero sub trim and will use multiple different arms to try and get my sub trim as close to 0 as possible. I now use airwild unihubs to get that tuning even better. So now I will have my end points equal in the radio with slightly different subtrim values. By tuning for closer to 0 sub trim is usually good for a few extra degree's in surface deflection. I usually don't take the arm off but for checking for binding I will remove one of the surface control horn bolts and "eye up the hole" where the bolt should go to see if there is any change in balance. If there is then I will use the servo balance to fix it. With my JR brushless servos I found this to be the best because an amp meter does not work very well for checking binding.
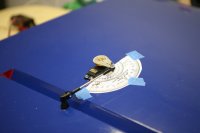
My brother from a different mother! haha I'll tell ya' about two tests I did. 1) I did a servo linearity "out of the box" shootout. I took highend (at the time) JR, Futaba, Hitec, and Airtronics servos and checked the travel each way off of center with the radio subtrim set to zero, end points set to 100/100. A couple of servo brands saw the servo moving 60 degrees one way and 40 degrees the other! :O Airtronics were reasonably close to linear and Futaba was the most accurate. 2) I tried to unihub synchronize 8711s around 2007, setting all their subtrims to "0" and then drilling all the servo arms to the right position into the unihub.

aw_260-122inch_025.jpg

Bunch of effort, but not the desired outcome because of reason #1 above. However, it is still better than standard servos arms because at the very least you have all the servos at a zero sub trim. How has it gone for you after you custom drill the arms to the unihubs for zero sub trim at your determined center/neutral? At that point are you able to keep your radio end points the same numbers (say 120/120) and have the protractor show you that it has traveled the same number of degrees each way off of the TBD center? In my experience it will be off and you will still want to adjust your servo endpoints. How's your experience been?

I totally agree on your testing method.
 
Last edited:

Joe Hunt

150cc
Thank you Joe! I use the protractor to set my predetermined center but never thought of using it to set my control Horn height. I just measured to center and got close. In a short version I was only getting half way there to perfect servo geometry. It all makes sense now.

That little piece of paper with a protractor printed on it can help us a lot. haha
 

Joe Hunt

150cc
Oh, and not a nice trick with the video cover pic!!!!

Geometry is like Kale, it's good for you but for most it does not taste pleasant. haha Have to try to bottle it in a more attractive way. lol Besides I change the thumbnail images on youtube out of respect to this site. By default they pickup a frame from the video with my blog address. So, I change the thumbnail picture for that reason. That is my story as to how the hot chick got there. haha
 

Joe Hunt

150cc
I was there! You made some killer flights with that plane!! It was a lot of fun to watch. Remember when it lost a wheel in the air and you hovered it while Kurt and someone else caught it so it wouldn't get torn up?

Kurt says that was Kevin Miller that hovered it over to him! :) So, I'm in the clear on that one. haha
 
Joe, I tried a protractor once and found that method of using it painful. So I bought an incidence meter that can be used for checking throws. Full up and full down with anything in the middle. So I measure full up and full down and use the turn buckle to get even throws at the same end point travel. Using the post style control horns really help dial that in also. I measure to the 10th of a degree. I have had to change my end point 1 or 2% before but that is not common. Being an IMAC guy I measure for equal travel on all surfaces like aileron and elevator to make sure travel is almost exact. It usually is within a few 10th throughout the range of travel. I should do a video on how I do it. I'm always up for learning.
 

Joe Hunt

150cc
Joe, I tried a protractor once and found that method of using it painful. So I bought an incidence meter that can be used for checking throws. Full up and full down with anything in the middle. So I measure full up and full down and use the turn buckle to get even throws at the same end point travel. Using the post style control horns really help dial that in also. I measure to the 10th of a degree. I have had to change my end point 1 or 2% before but that is not common. Being an IMAC guy I measure for equal travel on all surfaces like aileron and elevator to make sure travel is almost exact. It usually is within a few 10th throughout the range of travel. I should do a video on how I do it. I'm always up for learning.

Sounds like you're doing a great job with your setup. I would enjoy seeing a video of your method, as well. Would love to have you check it when your done with a protractor, too. :) I like learning as well... I try to keep my mind open so that I keep learning everyday. And, my friends will tell you that I'm always willing to toss out established ideas when a new better idea comes along. Possibly my all time favorite saying is, "a word to the wise is sufficient." :)
 
Top