• If you are new to GiantScaleNews.com, please register, introduce yourself, and make yourself at home.

    We're 1st in Giant Scale RC because we've got the best membership on the internet! Take a look around and don't forget to register to get all of the benefits of GSN membership!

    Welcome!
  • Unless you are a paid advertiser NO more posting advertisement in the individual vendor forums. You may post in the Manufacturer's Announcements section only but only ONCE a month unless your a paid advertiser.

NEW Twisted Hobbys 39" Crack Yak WOW

Thanks for the warm greetings, guys. Actually, no, I'm not talking about Brig in this case. It seems that Nate has managed to acquire more than one friend in this hobby...LOL!! :) Tom, I often go to Bennett on Sundays as well, so hopefully we can catch up out there soon. And thanks for the offer for help on the Crack Yak build--you may live to regret that offer. :cool:

Anyway, I made some additional modest progress tonight:

--Installed landing gear mount (and pre-tapped the holes in the gear)
--Attached horizontal stab (w/ spar) to horizontal fuse
--Sunk long carbon strips into sides of horizontal fuse
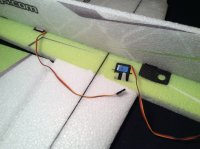
--Setup electronics, centered servo arms, programmed ESC
--Installed aileron and elevator servos (w/o glue for now)
--Attached lower vertical fuse

That's about all I have energy for tonight. I guess slow and steady wins the race. Here are a few pics of the results of tonight's efforts.

Barry

image.jpg


image.jpg


image.jpg
 

Attachments

  • image.jpg
    image.jpg
    96.3 KB · Views: 338

AKfreak

150cc
Looks fantastic, great job on the build so far.

Your going to love this plane. I want you to be honest as you can be and keep track of the actual hours you spend building this plane. It takes me a long time to build one, I am curious how long it actually takes you to build it and be 100% ready to fly it.
 
Thanks, Tom. Yes, it is definitely time-consuming, but I have to say I really like it. Nice change of pace after so many heli builds. Maybe it's all that glue I've been sniffing. :cool:

Let's see. I started on Monday night, so I've gotten three good evenings of building under my belt. I'd say about 13-14 hours total so far. I'll probably have 20+ in it by the time it takes its first flight.

I made pretty good progress last night:

--Laid in aileron control horns
--Attached upper vertical fuse and canopy
--Installed aluminum motor mount...bling! ;)
--Attached remaining 45-degree brace and routed wires underneath
--Laid in rudder hinges and attached rudder
--Installed landing gear, wheels, wheel pants, and tail skid

Don't look now, but it's starting to resemble an airplane. Will work on linkages tonight and finalizing the airframe (cantilever, SFG's, etc.). Should maiden on Saturday. Here are some pics of current build progress:

image.jpg


image.jpg


image.jpg


image.jpg


image.jpg


image.jpg
 
Last edited by a moderator:
Well, it looks like my build has suffered a setback--I'm missing some parts for the control linkages, specifically (i) two of the tiny little clevis pins are missing (only six were included in my kit, but it looks like you need a total of eight) and (ii) two of the threaded rods are missing (only two were included in my kit, but it looks like you need a total of four).

EDIT: The two threaded rods I'm missing are the larger ones that fit onto the end of the short, stubby aileron control rods.

Very disappointing setback, as I had been working hard in order to fly it this weekend, but alas, it was not meant to be. Given how small these parts are, of course it's possible that I could have inadvertently and unknowingly dropped them somehow at some point during the build, but I don't think so. I mean, I could see accidentally losing one of those tiny little parts, but not four. I don't think they were included in my kit from the factory. I could probably find a make-shift solution for the clevis pins (e.g., the small wire out of a twist tie for a loaf of bread), but the threaded rod is something that I'm not going to be able to solve on short notice.

I'm heading over to the TH site now to see if I can order some spares. Major bummer.... :thumbsdown:
 
Last edited by a moderator:
Nate, you're too kind, but I would be way too nervous to fly yours since I've never flown one before. No worries, I will just take out my frustration on a couple of my nitro helis this weekend. Nothing like a jolt of nitro to release some aggression. :cool:
 
One idea that could preserve the possibility of flying it this weekend is to (i) CA both ends of the carbon rod directly into the clevis and bypass the use of the threaded rod altogether, (ii) use the wire from the inside of a twist tie from a loaf of bread in place of the two clevis pins that I'm missing, and (iii) in the meantime, order a replacement linkage kit from TH that will arrive sometime next week. Obviously, this would be a sub-optimal make-shift solution, but it might just be good enough to get this thing airborne until the replacement kit arrives. I might give this plan a shot, but it will have to wait for tomorrow night, as I don't have the energy to try it tonight.

On the bright side, now that the all the glue from last night's building session has fully cured, I'm amazed at how stiff and tight the airframe is. This thing is gonna be fun once I get these last few kinks worked out.
 
Well, I guess I'm a glutton for punishment because I tinkered around with my idea tonight instead of going to bed like I should have done. But it was time well spent because I was able to rig up a makeshift aileron linkage without using the threaded rods. Like I was thinking in my previous post, I just epoxied the carbon rod directly into the clevis on both ends (I used JB Quik). The downside, of course, is there is no ability to adjust the length of the linkage. But the good side is that I'm back on track for a Saturday maiden. :cool:

This makeshift solution also required me to find a suitable replacement for the clevis pins, as my kit was missing two of these as well. I ended up using a small ball link from a helicopter simply because the thread on the ball was just the right size to thread into the clevis and servo arm, and nothing else that I could find in my parts bin would work. Not the most elegant solution, but I think this will get me in the air this weekend.

image.jpg
 
Top