• If you are new to GiantScaleNews.com, please register, introduce yourself, and make yourself at home.

    We're 1st in Giant Scale RC because we've got the best membership on the internet! Take a look around and don't forget to register to get all of the benefits of GSN membership!

    Welcome!

Scale The Red Eagle rebooted

acerc

640cc Uber Pimp
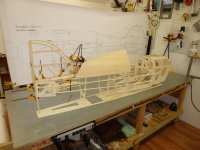
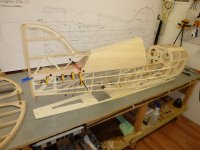
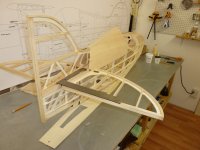
Not much today, been doing housework and errand running. The fin is on and that completes the majority, need to flip it over and add the bottom corner stringers and bottom stringers along with tail hatch and that will do it for now. The engine box and wing saddle's will come later.
 

Attachments

  • 19.JPG
    19.JPG
    389.1 KB · Views: 332

WMcNabb

150cc
That would be true but I am designing this one so both wing halves (top and bottom) come off together. That will leave the outer strut and Slave strut attached along with the outer flying wire connections. At least that is the plan and as you know those change as we go along. Not quite sure about the link yet, have any ideas?

I’m anxious to see your design for the flying and landing wire connections. I’ve looked at a couple of solutions from Aero Scale Products.
Also I assume the wires are integral to the structure of this design, and not cosmetic.
 

acerc

640cc Uber Pimp
I’m anxious to see your design for the flying and landing wire connections. I’ve looked at a couple of solutions from Aero Scale Products.
Also I assume the wires are integral to the structure of this design, and not cosmetic.
My way may not be of help to others as where mine disconnects at the cabane is covered with the cabane cover. There are currently pins and carter keys, I want to switch it to one bolt through both. But I won't know for sure how I am going to do it until I get closer. Before then I have to decide if I can live with the joint of a two piece wing or not. And yes, the wires are required for this airframe as it is currently designed.
 
Last edited:

TonyHallo

150cc
So I assume you will make some sort of spacer to keep the wing spacing while removed, that's a great plan.
Will you use airfoil shaped rods or round rods?
The links below came to mind, I'm thinking the threaded end from the 1/4 scale turnbuckle drilled for a short piece of brass tubing and a 2-56 button head screw would be neat.
https://www.mcmaster.com/60645k61-60645K611
http://sullivanproducts.com/product/s591/
https://www.dubro.com/collections/control-horns/products/hd-adjustable-control-horn
https://www.dubro.com/products/1-4-scale-turnbuckles
 

acerc

640cc Uber Pimp
So I assume you will make some sort of spacer to keep the wing spacing while removed, that's a great plan.
Will you use airfoil shaped rods or round rods?
The links below came to mind, I'm thinking the threaded end from the 1/4 scale turnbuckle drilled for a short piece of brass tubing and a 2-56 button head screw would be neat.
https://www.mcmaster.com/60645k61-60645K611
http://sullivanproducts.com/product/s591/
https://www.dubro.com/collections/control-horns/products/hd-adjustable-control-horn
https://www.dubro.com/products/1-4-scale-turnbuckles
Yes indeed a wing spacer not only to hold the wings but also the inner flying wires. Those aforementioned products are fine items, the McMaster is exactly what I have in mind. I have two sizes (2mm & 3mm) coming from Central Hobbies and will utilize their carbon tubes as well. A 400oz servo is 25lbs and I don't think those rods would flex at that but it may need a rod inside the tube. I'll do some test to be sure though.
 

Attachments

  • untitled.png
    untitled.png
    29.3 KB · Views: 300

acerc

640cc Uber Pimp
Progress is being made albeit slowly. All bracing is in, tail servos are in, and stabilizer mount tubes in but not epoxied just yet. Those tubes took some time to get a perfectly square mount. I want all the rest seen in the pic to be cured and cleared before epoxying the tubes with the stabilizer in place.
 

Attachments

  • 20.JPG
    20.JPG
    401.9 KB · Views: 290

acerc

640cc Uber Pimp
Does anyone know a good vinyl guy? I was going to use B&E but they say they can't do the small stuff, I don't like Callie for this kind of detail, and I have not been able to get hold of Decal Dennis to find out if he can do it.
 
Last edited:

acerc

640cc Uber Pimp
And the tubes glued with stab on.
Also noteworthy is this time around I have not added anything extra for servo placement, the last one I built different with a conglomerate of shelving for them. Also notice the ply doubling strips on the fins leading edge as well as some hardwood on the ribs instead of balsa. The fin is a weak point for covering with cloth and will bow. This added less than a half ounce, I think it was .42oz, and should be plenty strong. All the epoxies on right now will need until morning to cure so that's it for now.
 

Attachments

  • 21.JPG
    21.JPG
    385.4 KB · Views: 326
Last edited:

acerc

640cc Uber Pimp
After everything that is wet right now cures there will only be two bottom stringers and the tail ply plate left. Might finish it up today.
The wing saddle and associated balsa pieces will go on after the wing is done, need to put the wing on to get the best alignment of those pieces.
 

Attachments

  • P1090501.JPG
    P1090501.JPG
    377.9 KB · Views: 329
Top