• If you are new to GiantScaleNews.com, please register, introduce yourself, and make yourself at home.

    We're 1st in Giant Scale RC because we've got the best membership on the internet! Take a look around and don't forget to register to get all of the benefits of GSN membership!

    Welcome!

3D Viper-ST 100-120cc scratch build......it continues!

Terryscustom

640cc Uber Pimp
OK, works done now I get to play for the rest of the day.

I did some samples with this method of installing these blocks with a little dye in the glue and it showed that by getting a nice coat of glue in the bottom of the hole and pressing the block in like this you get about 3/4" penetration of the glue into the foam. So if you pull these blocks out......you probably hit the ground would be my guess.
_DSC0535.JPG
 

Attachments

  • _DSC0533.JPG
    _DSC0533.JPG
    49.7 KB · Views: 277
  • _DSC0534.JPG
    _DSC0534.JPG
    37 KB · Views: 286

Terryscustom

640cc Uber Pimp
Time to put some caps on. I use a sanding block to ensure the hard points are flush, but if you pulled the tape strong enough they should be. Clean off any excess foaming glue.

As with gluing anything to foam, make sure to spread the glue thinly and evenly across the entire surface and the balsa sheeting. There should be very little that squeezes out. The root ribs for the stabs and wings are just slightly over-sized so align them carefully and secure with a couple of pcs. of tape. This will keep in place while using blocks as cauls with longer pieces of tape to hold them flat.

Typically I use 1/16" medium density balsa everywhere except the root ribs but I'm trying 3/8" light balsa on the stab caps and 1/8" light balsa on the wing caps for a little extra strength and durability. This will also let me ease the edges slightly, and I want to test the finished weight with these items on vs. medium density thin balsa.
 

Attachments

  • _DSC0536.JPG
    _DSC0536.JPG
    46.8 KB · Views: 305
  • _DSC0537.JPG
    _DSC0537.JPG
    50.4 KB · Views: 310
  • _DSC0538.JPG
    _DSC0538.JPG
    82.9 KB · Views: 323
  • _DSC0539.JPG
    _DSC0539.JPG
    86 KB · Views: 321
  • _DSC0540.JPG
    _DSC0540.JPG
    78.1 KB · Views: 330
  • _DSC0541.JPG
    _DSC0541.JPG
    64.7 KB · Views: 317
  • _DSC0542.JPG
    _DSC0542.JPG
    48.1 KB · Views: 317

Terryscustom

640cc Uber Pimp
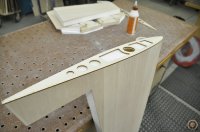
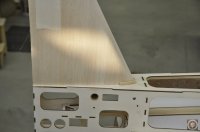
Next, lets cut the turtle deck. My first 100cc plane was a scratch build......and I worried about this part for weeks before it was time. I've modified and played with different techniques and I feel that this is the easiest most foolproof method as long as you take your time, cut and sand carefully.

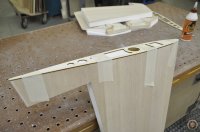
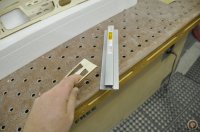
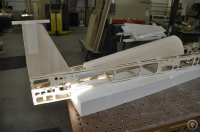
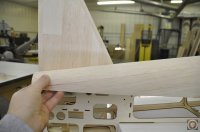
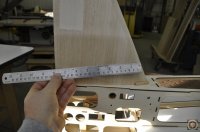
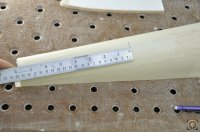
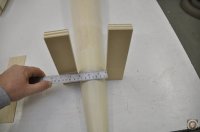
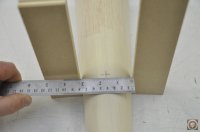
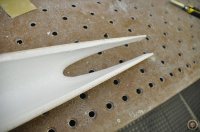
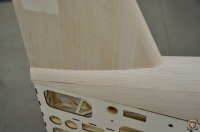
First I hold the turtle deck along the stab, eyeball and mark the approximate place where the stab meets the top of the TD. Now use a ruler and measure the distance from there to where the back of the TD will end. Put tape on top of the TD so you can draw on it with a pencil. Mark a line about 3/16-1/4" less than the distance measured on the plane so you have some wiggle room to sneak up to a good fit. Now mark the center of the TD, a neat trick is to simply put two blocks on each side of it, measure the distance between and divide that in half.

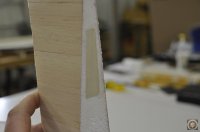
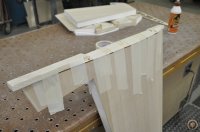
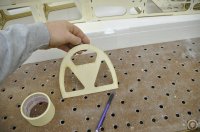
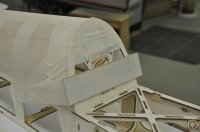
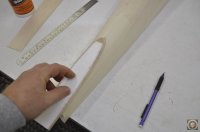
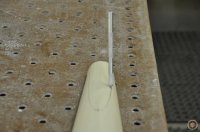
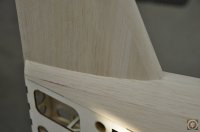
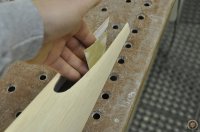
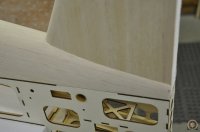
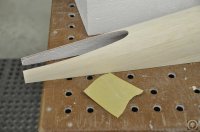
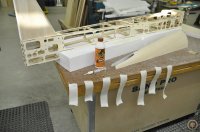
With the TD marked now grab the slice that we took off the lower part of the rudder scrap. Place that on and center it front and back. Begin tracing and rotate the template as you draw the outline on the sides. Now use a sharp hobby knife and score on that line a couple of times very lightly. Keep the knife perpendicular to the table and cut small amounts until you are through the sheeting cutting carefully on the line. Once through the sheeting cut all the way through and remove. It will not fit yet, first you need to take a long knife and shave off the sides a bit more and angle the foam at the front since the stab angles down inside the TD.

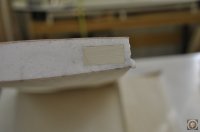
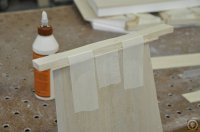
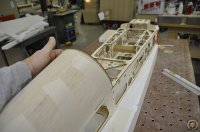
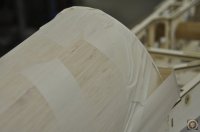
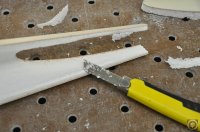
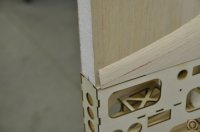
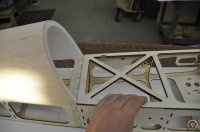
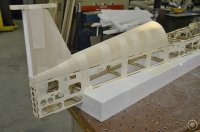
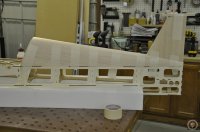
Now you can test fit and trim excess as needed. You should be just shy of the back, however the canopy deck bottom is about 1/8" or so too long to give you a little bit of wiggle room on the TD. Sand, trim and fit until you get a perfect fit. I like to do a little final sanding on the very back part of the TD and the sides of the stab before gluing on because it is very hard to sand afterwards. Sand with a little 400 grit paper. Use wood glue and tape to carefully install the TD and keep flush with the fuse sides or perhaps just a hair over the sides. Double check after all tape is in place to make sure that it is aligned with the fuse sides.
 

Attachments

  • _DSC0543.JPG
    _DSC0543.JPG
    91.5 KB · Views: 321
  • _DSC0544.JPG
    _DSC0544.JPG
    73.7 KB · Views: 318
  • _DSC0545.JPG
    _DSC0545.JPG
    76.8 KB · Views: 337
  • _DSC0546.JPG
    _DSC0546.JPG
    112.4 KB · Views: 296
  • _DSC0547.JPG
    _DSC0547.JPG
    56.3 KB · Views: 327
  • _DSC0548.JPG
    _DSC0548.JPG
    54.2 KB · Views: 307
  • _DSC0549.JPG
    _DSC0549.JPG
    60.4 KB · Views: 403
  • _DSC0550.JPG
    _DSC0550.JPG
    56.5 KB · Views: 338
  • _DSC0551.JPG
    _DSC0551.JPG
    54.8 KB · Views: 313
  • _DSC0552.JPG
    _DSC0552.JPG
    86.4 KB · Views: 300
  • _DSC0553.JPG
    _DSC0553.JPG
    100.7 KB · Views: 301
  • _DSC0554.JPG
    _DSC0554.JPG
    108.5 KB · Views: 339
  • _DSC0555.JPG
    _DSC0555.JPG
    94.4 KB · Views: 316
  • _DSC0556.JPG
    _DSC0556.JPG
    57.1 KB · Views: 306
  • _DSC0557.JPG
    _DSC0557.JPG
    54.6 KB · Views: 375
  • _DSC0558.JPG
    _DSC0558.JPG
    82 KB · Views: 348
  • _DSC0559.JPG
    _DSC0559.JPG
    51.4 KB · Views: 313
  • _DSC0560.JPG
    _DSC0560.JPG
    59.3 KB · Views: 280
  • _DSC0561.JPG
    _DSC0561.JPG
    67.2 KB · Views: 303
  • _DSC0562.JPG
    _DSC0562.JPG
    84.4 KB · Views: 329
  • _DSC0563.JPG
    _DSC0563.JPG
    55.5 KB · Views: 300
  • _DSC0564.JPG
    _DSC0564.JPG
    96 KB · Views: 341
  • _DSC0565.JPG
    _DSC0565.JPG
    88.4 KB · Views: 296
  • _DSC0566.JPG
    _DSC0566.JPG
    83.1 KB · Views: 298

Terryscustom

640cc Uber Pimp
While that's drying I typically install the front plate of the TD. This part is about .9" oversided. It also needs to be angled slightly at the bottom to fit the top of the fuse. Start by laying it face down and use a sanding block to sand the angle and test fit. Now it can be glued in place, or you can trim some of the excess off of the plate first. Hold the plate in position and mark along the TD on the back of the plate. DO NOT sand all the way to this line, this font plate is angled to match the TD, so at this time stay away from your pencil line by at least 1/32".

Glue the plate in position making sure that the bottom is in contact with the top of the fuse. Only apply wood glue to the area where foam will be in contact. Use thin foam safe CA glue where the plate meets the fuse top. You can also put some medium foam safe CA on the inside with some micro balloons and hit with some foam safe kicker.
 

Attachments

  • _DSC0567.JPG
    _DSC0567.JPG
    75.7 KB · Views: 308
  • _DSC0568.JPG
    _DSC0568.JPG
    87.6 KB · Views: 309
  • _DSC0569.JPG
    _DSC0569.JPG
    83.3 KB · Views: 327
  • _DSC0570.JPG
    _DSC0570.JPG
    113.6 KB · Views: 284
  • _DSC0571.JPG
    _DSC0571.JPG
    60.9 KB · Views: 285
  • _DSC0572.JPG
    _DSC0572.JPG
    50.3 KB · Views: 283
  • _DSC0573.JPG
    _DSC0573.JPG
    48 KB · Views: 311

Wacobipe

100cc
***Now, the measure of a true craftsman is their ability to hide their mistakes. I learned this when learning to build furniture, but it completely follows through to airplane building.

:I_agree:

Lookin' Good as Always Terry!


Terryscustom

640cc Uber Pimp
That would be cool Paul, she is a killer pilot. She flew her old Edge at the Sioux Falls airshow about 6 years ago and it was absolutely the best I've seen in person. That scheme would be killer Paul!
 
Top