You are using an out of date browser. It may not display this or other websites correctly.
You should upgrade or use an alternative browser.
You should upgrade or use an alternative browser.
3D Viper-ST 100-120cc scratch build......it continues!
- Thread starter Terryscustom
- Start date

Terryscustom
640cc Uber Pimp
Is there a secrete to keeping the dowls on the front of the canopy hatch from wearing out and getting loose were it goes through the firewall?
I don't use dowels in my designs, but if you have a plane that has them the best you can do is harden them with thin CA and let the glue cure slowly (no kicker. Then also harden the hole that it goes through. They will still wear, that's why I don't use them and I put two canopy bolts towards the front. instead.
Terryscustom
640cc Uber Pimp
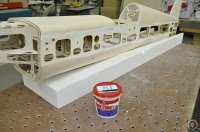
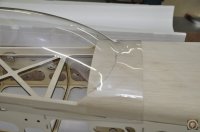
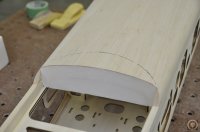
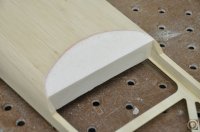
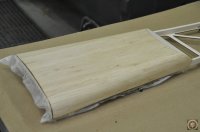
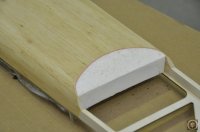
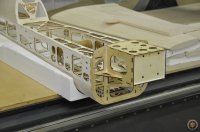
I put some lightweight filler in any gaps and I like to also put some where all the tabs stick through just to make sure they are flush. Then I sanded with 100 and 180 on a block. Once everything was flush I decided to glass the hatch. I like to angle the front dash area a little and this also removes a little weight since it's sheeted foam. I put the canopy shell on and draw an outline of where I want it to taper. Then block it off with some 80 grit followed with some 180 to smooth. Glass with the hatch so it can be painted later without the paint eating the foam.
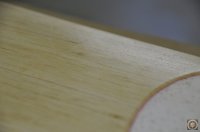
I glassed the hatch with resin thinned 50:50 with denatured alcohol. Cut the .5 oz cloth slightly over sized and with a dry brush, brush over it to lay it down flat. Start with a strip of resin down the middle and work out towards the sides. It should be smooth and look dry when done. If it is shiny you used too much. I had some thinned resin left so I painted my engine box area as well.
And just like I knew I would......I forgot to spray the canopy with hairspray before glassing. This will save a little material since the resin won't soak in as easily.
Attachments
-
 _DSC0748.JPG110 KB · Views: 501
 -
 _DSC0749.JPG57.3 KB · Views: 467
 -
 _DSC0750.JPG64.1 KB · Views: 475
 -
 _DSC0751.JPG111.3 KB · Views: 494
 -
 _DSC0752.JPG78.9 KB · Views: 496
 -
 _DSC0753.JPG67.6 KB · Views: 488
 -
 _DSC0754.JPG66 KB · Views: 493
 -
 _DSC0755.JPG45.5 KB · Views: 498
 -
 _DSC0756.JPG87.5 KB · Views: 480
cardenflyer
70cc twin V2
I still remember talking about the first scratch build. Was that 4 or 5 years ago now. Just do an awesome job. Wish I could build like you.

Terryscustom
640cc Uber Pimp
I normally surface mount, then ease the edge during sanding. Flush mout is nice, lots more work and can crack over time so I normally don't do that. Also its my thought that unless the transission is flawless it looks worse than overlapped edge because it is painted with glossy car paint. Overlap also gives the option of covering the canopy and just painting the edges on the shell I glassing is not your cup of tea. Pros and cons both ways.
Terryscustom
640cc Uber Pimp
Terry... really impressive work, hard to tell in the picture, where did the glass terminate at or around the angled dash ?
Enjoying following this!
Thanks for following. I started the glass at the bottom of the bevel and the rest of the foam I just pained with two coats of resin so I could paint it today.
At some point this weekend I'll prep and tint the canopy she'll so I can install that. I have a couple of ARF canopies to tint also so I will do them all in one shot.