• If you are new to GiantScaleNews.com, please register, introduce yourself, and make yourself at home.

    We're 1st in Giant Scale RC because we've got the best membership on the internet! Take a look around and don't forget to register to get all of the benefits of GSN membership!

    Welcome!
  • Unless you are a paid advertiser NO more posting advertisement in the individual vendor forums. You may post in the Manufacturer's Announcements section only but only ONCE a month unless your a paid advertiser.

WrongWayRc 50-60cc GBR (GeeBeeRacer) Build thead

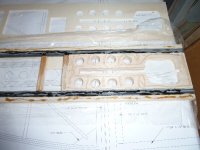
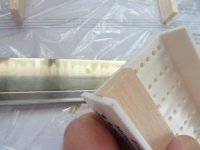
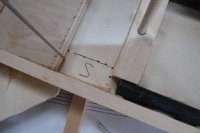
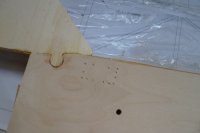
The servo location is traced out and I run my little drill through the lines so I can turn the piece over and use my dremel and knife to open up the square hole for the servo.

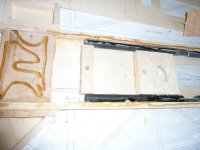
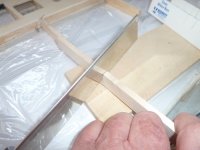
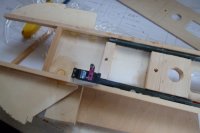
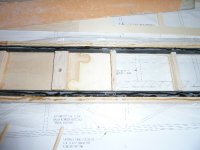
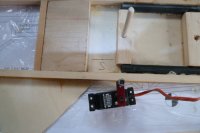
So now the 3/8 x 1/2 firewall hardwood back piece and the landing gear block are epoxied in place.

A little note about epoxy... I had left a little fillet from gluing the top and bottom hardwood rails yesterday and then the nicely square landing gear block would not seat fully... In hind though I would have kept the excess epoxy clear so this piece would set right in. The fix was easy, I just sanded an angle on the firewall back piece and the landing gear block so it would not make the wood raise up when set down...

Not shown in picture those two pieces are now epoxied in.
 

Attachments

  • P1010450(1).JPG
    P1010450(1).JPG
    134.5 KB · Views: 242
  • P1010452(1).JPG
    P1010452(1).JPG
    142.7 KB · Views: 266
  • P1010453(1).JPG
    P1010453(1).JPG
    118.8 KB · Views: 261
  • P1010454(1).JPG
    P1010454(1).JPG
    136.9 KB · Views: 223
Last edited by a moderator:
Tomorrow I glue the top half of the fuse center section in.

In preparation for that I take my block sander and knock off the top of the fuse tubes. I want the top half to lay flat on the bottom so the glue will attach well and make the I Beam construction final.

When done the center section serves as a lightweight I Beam structure keeping the fuse in check. It is resilient and will bend when needed but keeps the wing centered and tail straight.

I take a straight edge and go all along the center section checking for high spots... Any high spots in tube or wood is sanded flat and the top half will be dry fitted first to insure proper fit.

I let a buddy of mine fly my 50cc at Joe Nall two years ago and it was early morning and I guess he did not have his first Mountain Dew shot of caffeine. Long story short, on a high alpha KE pass he let the wing touch... The entire plane did a one and a half cartwheel before stopping.... If we were to have a video camera on it we would have seen that the fuse had probably flexed about 6 inches at the tail but the box construction held...

All that was suffered was a broken prop, a wing rib root pulled and re-CA'd and a broken stainless capture end on the rudder... Not bad for a 17 pound plane cartwheeled from knife edge flight...

The last picture for tonight is me checking flatness of the tubes for tomorrow's gluing.
 
one final check for flatness. I put a couple small drill holes (to mark it)where the top tube ends up front to cut it later. I will route my ignition power here.

Today is pretty cold.. I wanted time to work with gluing the halves together so I used Gorilla Glue. The white foams less and dries faster so I put it on the inside portitions and uses regular gorilla glue on the fuse tubes and hard wood rails all the way up front to the landing gear block. I really want the extra foaming to make a good joint of the tubes to the second side.
 

Attachments

  • P1010460(1).JPG
    P1010460(1).JPG
    160.1 KB · Views: 229
  • P1010461(1).JPG
    P1010461(1).JPG
    164.1 KB · Views: 250
  • P1010462(1).JPG
    P1010462(1).JPG
    172.9 KB · Views: 233
  • P1010463(1).JPG
    P1010463(1).JPG
    181.2 KB · Views: 253
Last edited by a moderator:
Important here to use the anti rotation pins to line up your holes exactly. I kept the glue slightly away from these holes so my pins will come out. I used weight and clamps to hole it in place. After about 10 minutes I went around and looked to see if all areas are flat. If not, I wicked some medium CA in the crack, clamped it closed and kicked it... THis way as the gorilla glue expands it will fill all of the spaces around the tubes.

Tomorrow I hope to finish the fuse outline and then move on to another area. So far I might have about 2 hours in the project (except the typing)and it should start going quickly.
 
Good work Rich!

I love how this is going together!!!

The fuselage tubes are ingenious! Doubling
as serious strengtheners and servo wire tunnels... :cool:
 
I cleaned up excess glue from the fuse center section and then laid it flat again on the clear plastic for outline gluing.

First I epoxied the second half of the nose pieces on.
 

Attachments

  • P1010466(1).JPG
    P1010466(1).JPG
    20.8 KB · Views: 284
Last edited by a moderator:
Next cut the sticks to length and glue short ones to center section. Gluing wood flat to a piece gives better strength than if it has any gaps in it so I make sure that the side on the center section is square by sanding the piece in my little miter box. I eyeball the angle for the outside and mark it with a sharp razor blade then cut it with the saw... slightly long so I can sand it for a clean and perfect fit.
 

Attachments

  • P1010468(1).JPG
    P1010468(1).JPG
    123.2 KB · Views: 240
  • P1010471(1).JPG
    P1010471(1).JPG
    122 KB · Views: 247
  • P1010474(1).JPG
    P1010474(1).JPG
    101.3 KB · Views: 249
Last edited by a moderator:
Top