• If you are new to GiantScaleNews.com, please register, introduce yourself, and make yourself at home.

    We're 1st in Giant Scale RC because we've got the best membership on the internet! Take a look around and don't forget to register to get all of the benefits of GSN membership!

    Welcome!

Scale 112” - Taylorcraft by HeyLuc & Snoopy.

Snoopy1

640cc Uber Pimp
Will the plane is all back together with a tail. Covered and ready for the radio and engine. Will have to do the CG all over again. Not sure if I am going stop at this point and start a new plane build for the 150cc 3 cylinder. Or finish of the Taylor Craft ready to fly, will have buy some radio equipment because I stole most of it for another plane.
IMG_0271.jpeg


just for reference this how the looked with the original tail section.
IMG_3420.jpeg
 
Last edited:

Snoopy1

640cc Uber Pimp
Well making progress slowly not in a rush anymore just plotting along and taking my time putting it back together again. The engine, canisters and throttle servo is installed.
Also the postman dropped off 9 new JR servos for the plane All XBus.

IMG_0274.jpeg
 
Last edited:

Snoopy1

640cc Uber Pimp
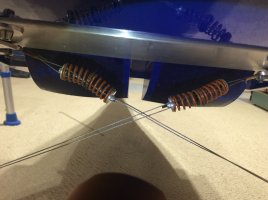
Also decided to add a little more support to the landing gear. Made a cable cross brace with compression springs Setup. It took a little doing and some lathe work for the parts but it worked out well. It add about an extra 35 lbs of load capability to each wheel. I just do not like or believe tension springs should be used on landing gear.
 

Snoopy1

640cc Uber Pimp
Managed to get the CG to work with out having to add weight. Batteries move close to motor bulkhead and the rudder servo moved up to the wing area and will changed to pull/pull for the rudder that will get the CG of 27% that will be a good starting point.
The changes were required because the plane ended up being 3 inches longer.
So a lot of work to get all this setup and installed properly trays and battery supports and sturdy tray for the rudder servo. Will take pictures as it comes along.
 

Snoopy1

640cc Uber Pimp
7C5905EC-599A-442C-99D6-BBB4BFBB294D.jpeg


This is the a picture of the spring setup to help support the plane and add a little more support to the gear.
There are 2 sets of cables on each setup, one runs from the wheel through the inside of the spring and attaches to the top of the spring. The second cable also runs down from the bottom of the fuselage through the spring and attaches to bottom of the spring. So when you pull on the 2 cables it compresses the spring.
 

Attachments

  • 6E98377B-F654-4C25-85A1-BDBF61FD14AA.jpeg
    6E98377B-F654-4C25-85A1-BDBF61FD14AA.jpeg
    1.1 MB · Views: 22

Snoopy1

640cc Uber Pimp
IMG_0275.jpeg


Got the pull/pull system installed. Took the hole day, as expected as I ran the cables up to the servo two sets of cross braces had to be reworked so that the cables could feed through the fuselage properly and nothing was rubbing.
next to be installed is the receive.
 

Snoopy1

640cc Uber Pimp
Got the tail wheel worked out had to make 2 G10 plates to get the configuration to work made one to fit the tail wheel and one for the bottom of the rudder. As shown one the picture. This should do the job and give linear steering.
IMG_0276.jpeg
 

Snoopy1

640cc Uber Pimp
Well gone are the days that the only thing I had to feed through the plane was one silicon line from the tank to the engine.
now I have three fuel lines and 7 wires from the engine area back to the receiver. Just have to make sure that it all is supported properly and cannot touch the 2 canisters.
IMG_0277.jpeg
 
Top