• If you are new to GiantScaleNews.com, please register, introduce yourself, and make yourself at home.

    We're 1st in Giant Scale RC because we've got the best membership on the internet! Take a look around and don't forget to register to get all of the benefits of GSN membership!

    Welcome!

Sport Beautifying the Beast

Major Setback!
numbness.png
stupid.png
:

I had just finished painting the two elevators and had them drying when we had a small furnace explosion. Fortunately no one was hurt (but I do have a very scared wife).

Unfortunately it shook the basement so badly that a million pieces of dust, dirt and soot landed on top of the elevators.

I'm not sure if I can sand them smooth or I might have to recover both of them.

Posting will be a bit delayed.
 

Pistolera

HEY!..GET OUTTA MY TREE!
Wow....don't need that, eh!!!! Hope things get back to normal quickly.

The screws look great by the way :applause:
 

pawnshopmike

Staff member
Bummer. Sounds like that could be an expensive repair. Does homeowners insurance cover furnace explosions?

At least no one was hurt.:way_to_go:
 
WHEEL PANT UPGRADE

From past experience I wanted to make two improvements on the wheel pants used on 100cc airplanes.

The first is the ground clearance between the wheel and the wheel pant. Often the bumpy grass fields that I visit are not adequate to give a proper ride causing the wheel to drag.

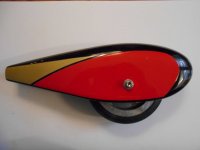
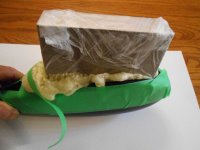
The second improvement was to make the wheel pant "Stronger" so it would not crack as so many do. I stole this idea from a post on FG but made a modification to make the job easier. It's a simple idea of adding expanding foam to fill the void in the front and back of the wheel pant.

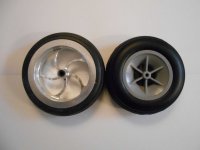
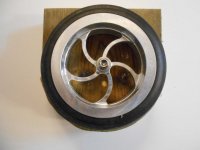
I used some White Rose wheels ( BLING) that I salvaged from my CARF Extra 330SC crash. They are a 1/2 inch in diameter larger, but because of this extra width, I was forced to open the bottom of the wheel pant for the necessary clearance. A Dremel tool with a fine sanding drum does the job easily. I mask off the edges that I want to sand too and I have a perfect line to aim for.

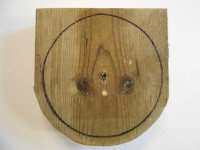
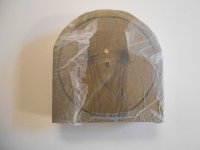
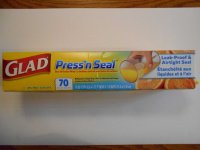
To control the expanding foam ( I used a 2 part system) I added to the wheel pant for additional strength, I made myself a wooden block that is a 1/4 inch thicker and wider than the wheel. This gives me just enough clearance for the wheel to spin freely inside the wheel pant. To stop the foam from adhering to the wood I covered it with my wife's Press & Seal. I find that this works better than the traditional "Cling" type wraps.

It takes a little bit of force to pull the block out of the wheel pant, but the shape was "PERFECT" with no voids and a smooth finish. I applied a primer coat to the interior so any exhaust residue would not harm the foam.

I like to use 1/4-20 Allen Head Cap screws as axles. They are super tough, cheap and the unthreaded section acts as a great bearing when used with a sintered bronze sleeve inside the wheel. I also use sintered bronze sleeves on each side of the wheel pant for that extra support.

BEFORE & AFTER CUTOUT.JPG OLD & NEW WHEELS.JPG WHEEL GRASS CLEARANCE.JPG WOODEN INSERT.JPG WHEEL CLEARANCE.JPG COVERED WITH PRESS & SEAL.JPG PRESS & SEAL.JPG FOAM FORMING.JPG FINISHED PRODUCT.JPG
 

pawnshopmike

Staff member
WHEEL PANT UPGRADE

From past experience I wanted to make two improvements on the wheel pants used on 100cc airplanes.

The first is the ground clearance between the wheel and the wheel pant. Often the bumpy grass fields that I visit are not adequate to give a proper ride causing the wheel to drag.

The second improvement was to make the wheel pant "Stronger" so it would not crack as so many do. I stole this idea from a post on FG but made a modification to make the job easier. It's a simple idea of adding expanding foam to fill the void in the front and back of the wheel pant.

I used some White Rose wheels ( BLING) that I salvaged from my CARF Extra 330SC crash. They are a 1/2 inch in diameter larger, but because of this extra width, I was forced to open the bottom of the wheel pant for the necessary clearance. A Dremel tool with a fine sanding drum does the job easily. I mask off the edges that I want to sand too and I have a perfect line to aim for.

To control the expanding foam ( I used a 2 part system) I added to the wheel pant for additional strength, I made myself a wooden block that is a 1/4 inch thicker and wider than the wheel. This gives me just enough clearance for the wheel to spin freely inside the wheel pant. To stop the foam from adhering to the wood I covered it with my wife's Press & Seal. I find that this works better than the traditional "Cling" type wraps.

It takes a little bit of force to pull the block out of the wheel pant, but the shape was "PERFECT" with no voids and a smooth finish. I applied a primer coat to the interior so any exhaust residue would not harm the foam.

I like to use 1/4-20 Allen Head Cap screws as axles. They are super tough, cheap and the unthreaded section acts as a great bearing when used with a sintered bronze sleeve inside the wheel. I also use sintered bronze sleeves on each side of the wheel pant for that extra support.

View attachment 45124 View attachment 45125 View attachment 45126 View attachment 45127 View attachment 45128 View attachment 45129 View attachment 45130 View attachment 45131 View attachment 45132
Very cool idea! Thanks for sharing.:way_to_go:
 
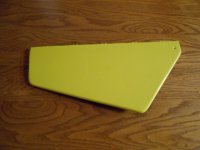
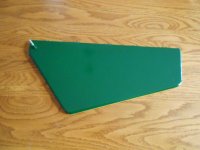
ELEVATOR SKY CONTRAST

This post is for Steve (itizme) who wondered why the YELLOW MOOSEHEAD decals. My decals finally arrived from B & E (stuck at Canada Customs for 8 days) and I was anxious to see how they looked!

As Moosehead Beer is the theme of the paint job with Yellow mainly on the top and Green on the bottom, I wanted to do something different to make the bottom of the Elevators stand out.

So instead of a Yellow stripe over the green I went with a "Yellow Moosehead". The bottom of the lower wing will have the same concept with the Yellow Moosehead theme, slightly different and much bigger.

TOP.JPG BOTTOM.JPG MOOSEHEAD.JPG
 
Top