You are using an out of date browser. It may not display this or other websites correctly.
You should upgrade or use an alternative browser.
You should upgrade or use an alternative browser.
Scale Curtiss XP-55 Ascender
- Thread starter Larry B
- Start date
Larry B
70cc twin V2
This was a test of the Kindle to see if we could post photos on this site. My wife figured it out and we used the Ascender project as a test subject. While we are at the NAT's I'll see if I can keep you guys up to date with photos and text of what is going on with the Kindle.
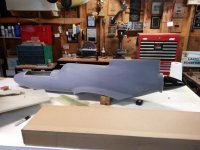
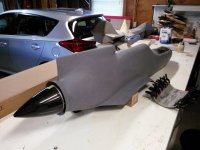
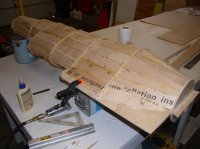
I have the electric motor mount all done, the fuse is all sanded and primed which is all I'm going to do until the test flight. I have cut the nose hatch and am currently making a lip that the hatch will slip into when it's installed. Being a pusher everything has to be good and secure so it wont come off and go thru the prop.
Larry B
Attachments
Last edited:
acerc
640cc Uber Pimp
Very cool. When you do things like making the molds, laying up the glass, etc. a little more detail on the process would be nice. You apparently know quite well what you are doing and guys like me would like to learn how. I have, on occasion, wished I knew how so as to make (for example) a cowl or wheel pants.
WMcNabb
150cc
This was a test of the Kindle to see if we could post photos on this site. My wife figured it out and we used the Ascender project as a test subject. While we are at the NAT's I'll see if I can keep you guys up to date with photos and text of what is going on with the Kindle.
I have the electric motor mount all done, the fuse is all sanded and primed which is all I'm going to do until the test flight. I have cut the nose hatch and am currently making a lip that the hatch will slip into when it's installed. Being a pusher everything has to be good and secure so it wont come off and go thru the prop.
Larry B
Excellent test subject!
Jetpainter
640cc Uber Pimp
Very cool!
And yes some how to's on fiberglass layup techniques would be great some time. When I was home sick for a few days a few years ago I watched a lot of videos on the subject from a guy building scratch built jets. Very interesting.
Some day I would love to build a good sized glass version of an airplane I designed a few years ago, and it would be great get more how to ideas.
Larry B
70cc twin V2
Ok guys, I will start a "how to" do a fiberglass part for you. Now please be aware that there are a bunch of different ways of getting to the same finished product and I am by no means an expert! I have taken all the input from the guys who really are experts doing the glass work for Ziroli, Meister, and other company's then found out what works for me.
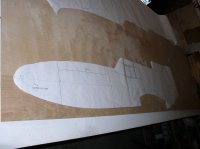
I'll start at the very beginning, making the plug; The plug is what you want your final part to be, any defects, wrong dimensions, or other problems will be transferred directly to your molds and as such your final glass parts. Taking time to get your plug right will pay off in the long run and give you the ability to make a good accurate mold, what ever the part may be from a set of wheel pants to a full glass fuse.
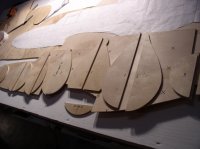
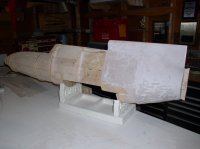
The first step is to get the profile of the part drawn out, I will use the Ascender as an example. I took a set of 3-views from a 1945 Model Airplane News and had them blown up so I could take more accurate measurements. once I have the profile all drawn out this is then transferred to a sheet of plywood (picture #1). Then cut out the profile and this will become the center of your plug (picture #2). Now you need a good 3-view that has as many cross sections as you can get. Next step is to draw out all the cross sections and cut them out of the same sheet of wood(picture #3).
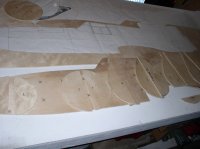
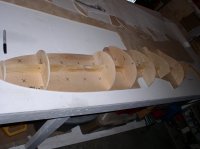
I have found that using a 1/4" thick sheet of plywood requires the profile to be stiffened up using some 2"X 3/4", it really dosent matter what size wood you use to stiffen it up as long as it's strong enough to keep the profile straight, then start adding the cross sections to the profile until you have both sides all built up(picture#4 & 5).
I'll start at the very beginning, making the plug; The plug is what you want your final part to be, any defects, wrong dimensions, or other problems will be transferred directly to your molds and as such your final glass parts. Taking time to get your plug right will pay off in the long run and give you the ability to make a good accurate mold, what ever the part may be from a set of wheel pants to a full glass fuse.
The first step is to get the profile of the part drawn out, I will use the Ascender as an example. I took a set of 3-views from a 1945 Model Airplane News and had them blown up so I could take more accurate measurements. once I have the profile all drawn out this is then transferred to a sheet of plywood (picture #1). Then cut out the profile and this will become the center of your plug (picture #2). Now you need a good 3-view that has as many cross sections as you can get. Next step is to draw out all the cross sections and cut them out of the same sheet of wood(picture #3).
I have found that using a 1/4" thick sheet of plywood requires the profile to be stiffened up using some 2"X 3/4", it really dosent matter what size wood you use to stiffen it up as long as it's strong enough to keep the profile straight, then start adding the cross sections to the profile until you have both sides all built up(picture#4 & 5).
Attachments
Larry B
70cc twin V2
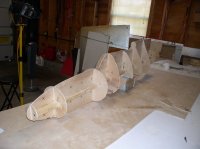
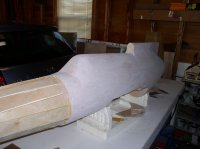
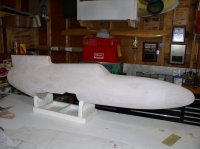
The next step seems to take forever but it saves a ton of weight and expense of buying Bondo. I will strip plank in-between all of the cross sections using the same wood sheet. I use plain old Tite Bond wood glue, nothing fancy. You want your strip panking to be about a 1/4" below the "mold line" of the fuse. This will allow you to fill in the area with Bondo and sand the plug to it's final shape. It does not have to be pretty, all it has to do is give you a solid base to spread the Bondo over and then sand the thing to it's final shape.
Attachments
Larry B
70cc twin V2
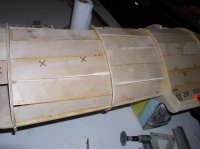
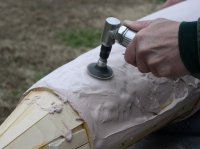
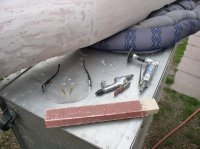
Next step is to start spreading in the Bondo, I like to kinda sand as I go. This allows you to see & double check the final shape and see what your final part is going to look like. For some areas I have used blue foam to give me the shape I want because the strip planking won't make the shape. Again, just make the blue foam about a 1/4" below the final mold line so you can get a good layer of Bondo to sand. I use all kinds of tools to sand, anything to help speed along the process is a big help. The key to a good plug is to use a long block for the final sanding, this will keep you from getting any waves along the length of the part.
The next installment will be on how to do the wing fillets, I'll post the next series tomorrow,
Larry B
The next installment will be on how to do the wing fillets, I'll post the next series tomorrow,
Larry B
Attachments
")
Jetpainter
640cc Uber Pimp
Larry, does the filler eat the blue foam at all?