Bartman
Defender of the Noob!
Hi folks,
Swap Shop season is coming up and if you're looking to do Giant Scale on a budget it'll pay to know how to make a crusty looking firewall secure and safe again. So what if that good looking 50cc Extra had a few different engines bolted to it? Who cares if you drilled a few holes in the wrong places! The photos below will show it's easy to get that slab at the front of your slab back in shape, looking good, and ready to fly.
The plane I have has a reinforced firewall so it's almost twice as thick as it was from the factory. It's an ARF and it's probably 12 years old. There was a time not too long ago when ARF's meant you still had to do some work to make them safe for the long haul so the original owner probably thought doubling up the firewall was a good idea.
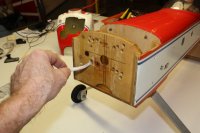
So here's what I started with

and I have to admit, I had a long day, I was tired, and I was rushing to do something before heading up to bed. So I thought I'd drill some holes real quick and throw the engine up there to see progress before bed. I made progress alright, two more sets of holes, all in the wrong spots! Four holes to fill in each corner, I took it from bad to worse!
The holes from the old engines might be nice and clean and round and if that's the case you can just cut some hardwood dowel and epoxy the pieces into place. If the holes are out-of-round or greasy though you should drill them out to the next larger diameter dowel available. You can see in the photo there's one hole that's bigger than the others and that's because the two holes were so close to each other I decided to just join them with a larger piece of dowel filler.
Here's another view

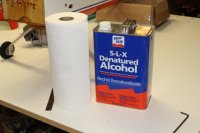
Getting ready to fill the holes, epoxy, latex glove so i can be as messy as i need to be, mixing sticks, pipe cleaner to really coat the insides of the holes with epoxy, and denatured alcohol with rags to clean up any messes I'll make.

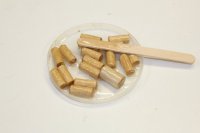
And a pic of the dowels in place while the epoxy is drying. For best results when using epoxy, both surfaces should be coated before being mated together (according to the T-88 epoxy instructions).
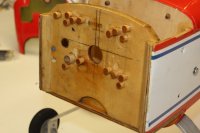
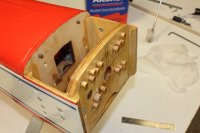
I let the epoxy dry overnight so I wouldn't risk moving the dowels around when i flush cut them using my japanese style pull-saw.
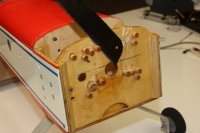
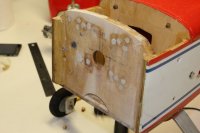
Now, this is where it can get tricky. With all of those filler pieces in the firewall it can be hard to accurately drill new holes (you know, in the spots where they are actually supposed to go...doh!). To do it right takes some planning and a good drilling jig.
This photo was taken after the new holes were drilled but it shows the layout lines you should draw. Some ARFs will have these lines already drawn on them. The center vertical line is the firewall centerline. The horizontal line is the thrust line and the prop shaft should be centered on that line. The vertical line just off the center line is the reference line around which you'll center the mounting of the engine.

Engines are typically mounted with a degree to maybe three degrees of right offset. This is to help lessen the effect of the engine's torque on the airplane. But, you want to still mount the engine so that the center of the prop will fall on the centerline of the fuselage. Mounting the engine on an angle but offset from the fuselage centerline ensures that the prop/spinner will land on the centerline and line up well with the front of the cowl.
Whether the firewall is mounted square to the front of the fuselage and needs offset built into the engine mount or if the offset is already built into the way the firewall is mounted to the fuselage, you will need to know what these lines are so everything can be lined up and attached correctly.
I stood the plane up on its firewall to see if the firewall was mounted square or offset. It's standing up straight so I know the firewall is square and I'll have to add the offset when I mount the engine.

DRILLING NEW HOLES
To drill new holes into a firewall that has been repaired like this one you'll need to make a drill guide or jig. You just can't expect the drill bit to drill accurately where it's half on the filler piece and half on the plywood of the firewall. Hardwoods make good drill guides so find a piece of maple or oak and cut it to size.
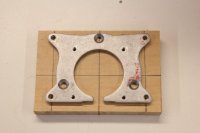
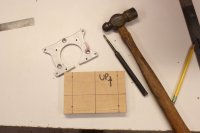
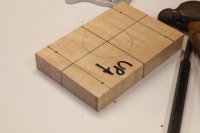
The layout lines are continued over the side so that they can be lined up accurately with the lines on the firewall.

Notice the top reference line on the block is lined up with the offset reference line on the firewall. That is the key to making sure the front/center of the engine falls in the right spot when it's bolted into place.
Once the layout of the engine mounting holes are laid out on the guide block it's preferable to use a drill press to drill the holes to they'll be perfectly vertical. If you can't do this then just be careful and drill the holes as perfectly vertical as you can get them.
If you don't have a drill press, drill into the front of the block but then put that front surface against the firewall. The holes in the front will be more accurate than the back and so you want those accurate locations to be up against the firewall so the can be accurately transferred when you drill the holes.

Double check your work by seeing how the engine mount holes line up with the holes you've drilled.

Now clamp the block into place and triple check the position. After you triple check it, triple check it again. Like I said before, make sure the reference lines on the block line up with the correct lines on the firewall.
When it's all good, drill away!


After you drill one hole, put a bolt in it to make sure the block won't move when you drill the other holes.
Even with the holes being where the fillers are, they still went in straight and accurately!

All that's left is to seal the firewall and the insides of all of the holes with epoxy and whatever color top coat you'd like. I hung the fuselage from the firewall so the epoxy coating would flow nice and flat. It's not perfect but this ain't no beauty pageant!

Don't forget when you're wandering the aisles of your favorite swap meet this winter, just because it's ugly doesn't mean it has to stay ugly. It's not unusual to find 50cc or larger airframes with some zits for $100! There's A LOT of fun left in an airframe like that if you can just get it flying again!
Bartman.
Swap Shop season is coming up and if you're looking to do Giant Scale on a budget it'll pay to know how to make a crusty looking firewall secure and safe again. So what if that good looking 50cc Extra had a few different engines bolted to it? Who cares if you drilled a few holes in the wrong places! The photos below will show it's easy to get that slab at the front of your slab back in shape, looking good, and ready to fly.
The plane I have has a reinforced firewall so it's almost twice as thick as it was from the factory. It's an ARF and it's probably 12 years old. There was a time not too long ago when ARF's meant you still had to do some work to make them safe for the long haul so the original owner probably thought doubling up the firewall was a good idea.
So here's what I started with
and I have to admit, I had a long day, I was tired, and I was rushing to do something before heading up to bed. So I thought I'd drill some holes real quick and throw the engine up there to see progress before bed. I made progress alright, two more sets of holes, all in the wrong spots! Four holes to fill in each corner, I took it from bad to worse!
The holes from the old engines might be nice and clean and round and if that's the case you can just cut some hardwood dowel and epoxy the pieces into place. If the holes are out-of-round or greasy though you should drill them out to the next larger diameter dowel available. You can see in the photo there's one hole that's bigger than the others and that's because the two holes were so close to each other I decided to just join them with a larger piece of dowel filler.
Here's another view
Getting ready to fill the holes, epoxy, latex glove so i can be as messy as i need to be, mixing sticks, pipe cleaner to really coat the insides of the holes with epoxy, and denatured alcohol with rags to clean up any messes I'll make.


And a pic of the dowels in place while the epoxy is drying. For best results when using epoxy, both surfaces should be coated before being mated together (according to the T-88 epoxy instructions).


I let the epoxy dry overnight so I wouldn't risk moving the dowels around when i flush cut them using my japanese style pull-saw.


Now, this is where it can get tricky. With all of those filler pieces in the firewall it can be hard to accurately drill new holes (you know, in the spots where they are actually supposed to go...doh!). To do it right takes some planning and a good drilling jig.
This photo was taken after the new holes were drilled but it shows the layout lines you should draw. Some ARFs will have these lines already drawn on them. The center vertical line is the firewall centerline. The horizontal line is the thrust line and the prop shaft should be centered on that line. The vertical line just off the center line is the reference line around which you'll center the mounting of the engine.
Engines are typically mounted with a degree to maybe three degrees of right offset. This is to help lessen the effect of the engine's torque on the airplane. But, you want to still mount the engine so that the center of the prop will fall on the centerline of the fuselage. Mounting the engine on an angle but offset from the fuselage centerline ensures that the prop/spinner will land on the centerline and line up well with the front of the cowl.
Whether the firewall is mounted square to the front of the fuselage and needs offset built into the engine mount or if the offset is already built into the way the firewall is mounted to the fuselage, you will need to know what these lines are so everything can be lined up and attached correctly.
I stood the plane up on its firewall to see if the firewall was mounted square or offset. It's standing up straight so I know the firewall is square and I'll have to add the offset when I mount the engine.
DRILLING NEW HOLES
To drill new holes into a firewall that has been repaired like this one you'll need to make a drill guide or jig. You just can't expect the drill bit to drill accurately where it's half on the filler piece and half on the plywood of the firewall. Hardwoods make good drill guides so find a piece of maple or oak and cut it to size.


The layout lines are continued over the side so that they can be lined up accurately with the lines on the firewall.
Notice the top reference line on the block is lined up with the offset reference line on the firewall. That is the key to making sure the front/center of the engine falls in the right spot when it's bolted into place.
Once the layout of the engine mounting holes are laid out on the guide block it's preferable to use a drill press to drill the holes to they'll be perfectly vertical. If you can't do this then just be careful and drill the holes as perfectly vertical as you can get them.
If you don't have a drill press, drill into the front of the block but then put that front surface against the firewall. The holes in the front will be more accurate than the back and so you want those accurate locations to be up against the firewall so the can be accurately transferred when you drill the holes.
Double check your work by seeing how the engine mount holes line up with the holes you've drilled.
Now clamp the block into place and triple check the position. After you triple check it, triple check it again. Like I said before, make sure the reference lines on the block line up with the correct lines on the firewall.
When it's all good, drill away!
After you drill one hole, put a bolt in it to make sure the block won't move when you drill the other holes.
Even with the holes being where the fillers are, they still went in straight and accurately!
All that's left is to seal the firewall and the insides of all of the holes with epoxy and whatever color top coat you'd like. I hung the fuselage from the firewall so the epoxy coating would flow nice and flat. It's not perfect but this ain't no beauty pageant!
Don't forget when you're wandering the aisles of your favorite swap meet this winter, just because it's ugly doesn't mean it has to stay ugly. It's not unusual to find 50cc or larger airframes with some zits for $100! There's A LOT of fun left in an airframe like that if you can just get it flying again!
Bartman.
