• If you are new to GiantScaleNews.com, please register, introduce yourself, and make yourself at home.

    We're 1st in Giant Scale RC because we've got the best membership on the internet! Take a look around and don't forget to register to get all of the benefits of GSN membership!

    Welcome!

Hostetler Cessna 336 Skymaster

Patto

70cc twin V2
Very cool. What running gear are you guys going to use in the Guillows?

Hey Mike, we bought some tiny little motor from HK, not sure the size. Honestly, my kiddo could probably tell you more about it than I can. The servos we chose are a little big but will do. I'll see if I can figure out what everything is.
 

pawnshopmike

Staff member
Hey Mike, we bought some tiny little motor from HK, not sure the size. Honestly, my kiddo could probably tell you more about it than I can. The servos we chose are a little big but will do. I'll see if I can figure out what everything is.
Cool. Post up some pics. My daughter has built several rubber powered Guillows kits. I've thought a few times that it might be fun to set one up for R/C.
 

Patto

70cc twin V2
I've been slow to post, but I have been making some progress! The second wing half, aileron, and flap are complete.

I ran into a bit of a dilemma when shaping the aileron. I made the first one according to the plans and did a standard bevel for the leading edge. However, this is not scale, and despite the fact that so many things about this project won't be completely scale, I just could not stomach the idea of having the ailerons look like that.

I ended up sanding the leading edge at a continuous slant, and I had to add wood to it and re-sand to get it right. It does not have a constant chord, so getting it straight was a challenge, but I got it done.
 

Attachments

  • IMG_20161230_211951227.jpg
    IMG_20161230_211951227.jpg
    215.2 KB · Views: 314

Patto

70cc twin V2
The previous picture was the flap, actually.

I decided it was time to get the horizontal stab attached to the booms so I could begin getting the sheeting done, moving from the back forward. It is now permanently installed. I used 30 min epoxy and blue masking tape to help keep things aligned while the glue dried.

I've been working hard on getting the vertical stabs covered and filling in some of the gaps with balsa and filler. I also finally figured out the route for the wires for the four servos in the stab and the single beacon on the fin.

The advice I previously received was to use the purple/pink foam to help shape the booms. I hate sanding that stuff, but I'm going to take the advice. However, rather than glass over it twice, I'm going to use 1/16" balsa sheeting over it and then glass it once. The foam will give good support to the sheeting. I also plan on drilling out some lightening holes in the booms, but I don't want to weaken them, so we'll see.

Some pics of the progress...
 

Attachments

  • IMG_20170128_121603130.jpg
    IMG_20170128_121603130.jpg
    200.5 KB · Views: 301
  • IMG_20170128_121610778.jpg
    IMG_20170128_121610778.jpg
    202.6 KB · Views: 322
  • IMG_20170128_144814017.jpg
    IMG_20170128_144814017.jpg
    179.6 KB · Views: 279
  • IMG_20170128_144821949.jpg
    IMG_20170128_144821949.jpg
    192.1 KB · Views: 305
  • IMG_20170128_144834423.jpg
    IMG_20170128_144834423.jpg
    160.2 KB · Views: 290

Patto

70cc twin V2
Right now, I'm following advice I was given previously to use insulation foam board to fill in the area between the formers and then sand it to the right shape. I am wishing I had just used balsa longerons and thin sheeting instead. The foam is very difficult to work with.
 

Patto

70cc twin V2
Right now, I'm following advice I was given previously to use insulation foam board to fill in the area between the formers and then sand it to the right shape. I am wishing I had just used balsa longerons and thin sheeting instead. The foam is very difficult to work with.
And, in the spirit of doing it the way that I want to do it.... I went ahead and removed all of the purple foam board from the tail booms in favor of using stringers and balsa sheeting. Not sure if there is a significant difference in weight. But, I can tell you that I started and finished the left boom today. It is now sheeted and in need of only some sanding. I spent months not wanting to work with that foam before. No more foam!
 

Patto

70cc twin V2
Despite how it may seem, I've been making some progress lately.

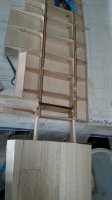
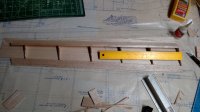
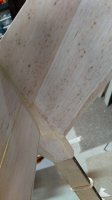
I ran balsa stringers along the tail booms and sheeted them using 1/16" balsa. This seemed like a better option than the plans' recommendation to use balsa block. My method required much less sanding. I just hated the pink/purple foam that everyone else seems to be able to shape into pieces of art. When I tried, it compressed and it just did not move very quickly. Then, I'd have to glass it twice. I know, it works for other folks. For me, I just went with what I knew.

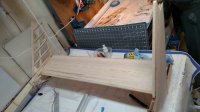
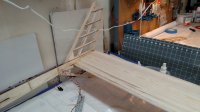
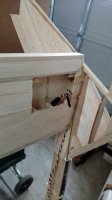
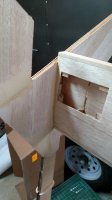
So, I sheeted the booms and then started sheeting the top of the wing center section. Then, I realized I had forgotten something on the plans: Hostetler recommends wrapping fiberglass around the ends of the spar boxes. So, I had to cut a hole in the sheeting in one side to accomplish this, but it's done. I did the outer two "sections" between the ribs. I think it will hold...

One thing I did not really have a plan for was where the booms met the wings. I think it turned out pretty okay considering my skill level.

There is a LOT of sanding that needs to be done. Like really. A lot.

I'm hoping to have this bird flying this summer. We'll see... IMG_20170226_143137426.jpg IMG_20170226_143156273.jpg IMG_20170226_145014982.jpg IMG_20170226_145023866.jpg IMG_20170226_152246058.jpg
 

Patto

70cc twin V2
Ran into a problem. My son told me that the wing halves looked really small. This led me to prove to him that it was indeed a big airplane, so while I had the center section upside-down on the bench, I tried to put one of the wing halves on. I then discovered that it would not easily slide into place. I thought maybe the hardwood spar inserts were just flared out a little bit. It turns out the spars were about 3mm too far apart at the root compared to the spar boxes in the wing center section. http://www.GiantScaleNews.com/forums/images/smilies/205.gifhttp://www.GiantScaleNews.com/forums/images/smilies/205.gifhttp://www.GiantScaleNews.com/forums/images/smilies/205.gif

At first, I thought this was a bigger deal than it actually was. In hindsight, I wish I had started to build the wing by inserting the spars in the center section before gluing the first rib (W1) into place. Just that one rib glued in place off the plan, then I could take it out and put it on the plans.

The picture is before I made the fix, which involved cutting off the sheeting on the top and bottom of the wing over the rear spar, then cutting the spar free from the first few ribs, then inserting in the center section and re-gluing.

What a PITA, but a good learning experience.
 

Attachments

  • IMG_20170305_115939193.jpg
    IMG_20170305_115939193.jpg
    211.3 KB · Views: 276
Top