• If you are new to GiantScaleNews.com, please register, introduce yourself, and make yourself at home.

    We're 1st in Giant Scale RC because we've got the best membership on the internet! Take a look around and don't forget to register to get all of the benefits of GSN membership!

    Welcome!

Scale Pitts S1-T, S1-S, and a Challenger.

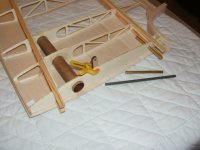
Ran into a slight problem before starting the upper wings on the Pitts 3.04.
The building rails are warped (twisted) to the point I do not feel comfortable using them to build the upper wings. The rails appear to made from a dark wood (possibly walnut). It takes more force then a nail can provide to keep them flat on the building table. I was able to salvage 2 of the rails for the shorter lower wings.
Because the upper wings are longer, the full length of the rails is needed. If the rails are nailed flat on one end – the twisting or warping of the rail prevents the other end from laying flat on the table.
Picture attached. Hard to document with photo.

One solution may be to cut out the good center sections and use 2 good sections of the rails end to end to make 1 full length rail????

Jaketab

So by rails, are you talking the wing spar? If you build the warped pieces so the curve of each is opposite to each other, it will usually end up straight. That's nice a kit though, I may just get a couple new sticks to use to be sure.
 
Last edited:

Jaketab

50cc
Robert,

Do you have any photos of the (inside) top wing pins and tube. I'm looking for some direction before I sheet and close the underside of the top wing on the Pitts. Included with the kit were 2 - 7mm brass tubes and a 6mm steel rod.
I gather these are to be used for the rear mounting anti rotation pins on the top wing?
In what order, and how does this assembly come together? Help appreciated.

Thanks - Jaketab
 

Attachments

  • DSCF4105.JPG
    DSCF4105.JPG
    73.1 KB · Views: 244

acerc

640cc Uber Pimp
Sorry, I do not have any pics of that. I could not figure out how they did it with the supplied components and did not like what was available. So I improvised, I used a composite arrow tube and the piece of kit supplied steel shaft, had to grind the shaft to fit. I put the tubes in each half and slid it together with the shaft and epoxied the composite tubes in.
 

Jaketab

50cc
Thanks Robert,
In the pic I supplied, the 7mm brass tube in the rear hole will extend to the 2nd rib - however there is no anchor or mounting hole in the 2nd rib.
The only idea I have is to make a mounting hole out of lite ply and attach it to the 2nd rib. I can then complete the sheeting except for a small section that covers the rear pin. After both wings are finished to that point, would you suggest that I join and align them on a flat table with the wing tube and pins in place and then epoxy (Hysol 9462) the brass pins at the anchor point on the 1st and 2nd ribs ?????

Would you also recommend to build tabs on the underside of the root rib to pull the wings together for additional mounting security ????

Thanks
 

acerc

640cc Uber Pimp
Yes, I would join the wings then epoxy the tube, about the only way to ensure alignment. If tabs are your preferred method I am not one to argue, I would not rest on the flying wires to do it that is for certain. I like making the Merlyn locks, but they are a bit of work and over kill.
 
Last edited:

acerc

640cc Uber Pimp
I have maybe up to a half day tomorrow and my room should be set-up and ready to start the Challenger. I don't recall, and I'm not page searching, if I mentioned I am not doing the Challenger in scale. I want a big airframe that is light and agile to bash around and this kit is perfect for such. And what a better subject than the Bulldog to be bashing around with. Yes, I am still doing the Bulldog, it will be covered more than likely with Ultracote and have the absolute minimal of components. I think I can copy the paint scheme with layered Ultracote but vinyl will have to be used for the lettering and logo's. Should be posting the contents of the box tomorrow night, stay tuned.
 

Attachments

  • P1080308.JPG
    P1080308.JPG
    70.3 KB · Views: 227

acerc

640cc Uber Pimp
The cat is out of the bag, lol. The Pitts has been put on the table, albeit I am not totally done with the room but just could not wait to get the bird on the table. This will not be a quick build by any measure for it will be my resting place during actual work activities of which there are plenty still. I will post many pics of the process and welcome chat about what is going on.
 

Attachments

  • P1080310.JPG
    P1080310.JPG
    67.4 KB · Views: 229
Top