You are using an out of date browser. It may not display this or other websites correctly.
You should upgrade or use an alternative browser.
You should upgrade or use an alternative browser.
Redwing 30cc Yak55 Buid Log
- Thread starter GravitySux
- Start date
-
- Tags
- build thread dle35ra redwing savox yak55
GravitySux
30cc
I was using the Rcexl opto kill, may reconsider it now....
Snowdog,
I didn't flip the carb. Its the same as my other DLE35.
Snowdog,
I didn't flip the carb. Its the same as my other DLE35.
Last edited by a moderator:
gyro
GSN Contributor
I was using the Rcexl opto kill, may reconsider it now....
Snowdog,
I didn't flip the carb. Its the same as my other DLE35.
My preference is the TechAero IBEF.
As [MENTION=4]3dNater[/MENTION] said above, pluging an OPTO kill ignition power plug into a battery also used by your rx will provide only the interference reduction the actual battery can buffer.
[MENTION=109]NJSwede[/MENTION] wrote an awesome article about it here:
http://www.3drcforums.com/content.php?210-IBEF-versus-Opto-Kill
GravitySux
30cc
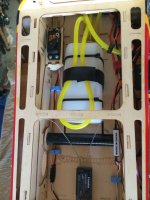
After installing the engine I decided to install the fuel tank. I went ahead and used the provided tank so I could give an honest opinion of all hardware provided. Upon opening the hardware package for the tank I immediately replaced the small piece of tubing for the pick up. It was WAY too stiff and would not allow the clunk to move freely. I replaced it with a piece of yellow tygon and safety wired all the lines. The fuse has notches cut into the floor to attach the tank using Velcro or zip ties. I use both and zip tie the tank to the floor and use the Velcro to hold the vent line in place.
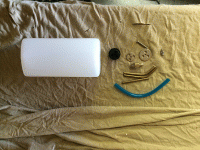
After assembling the tank I installed it into the plane just in front of the wing tube. You can also see that I have installed the throttle servo as well. The wooden mount is included and can be placed wherever you like to accommodate the best linkage for your engine.
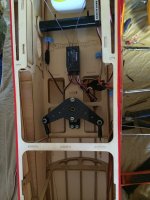
I installed the receiver in front of the rudder servo and all that was left was to neaten up the wiring and power everything up!

After assembling the tank I installed it into the plane just in front of the wing tube. You can also see that I have installed the throttle servo as well. The wooden mount is included and can be placed wherever you like to accommodate the best linkage for your engine.

I installed the receiver in front of the rudder servo and all that was left was to neaten up the wiring and power everything up!

GravitySux
30cc
3dNater
3DRCF Regional Ambassador
Nice! Great looking plane! My dle 35 takes about 20 flips to prime and then five more to start. I can get it to fire a little sooner if I rock the prop against the compression a few times. I did have to adjust the needles a bit on mine for the initial start. Good luck and report back soon!
GravitySux
30cc
The DLE 35 started up quickly once fuel reached the carb, however, It was immediately apparent that the opto kill was going to have to come out! It immediately stated to misfire and a short was evident by the flickering led on the side of the fuse. After eliminating the opto kill I fired the DLE back up and she purred like a kitten. I let her run for about 5 min at about 1/4 throttle and shut it down to let it cool. I kept this up for a bout one tank the filled it back up and went to full power. She pulled strong and transition was good so I decided to leave the needles alone until after the first few flights.
After running the engine, I put her back on the table and installed the hatch on top of the motor box. Be sure to put a little thin CA in the mounting holes and around the mounting tabs for the cover. It is noted that at this time, I have mounted the battery inside the motor box just behind the fire wall. This puts the CG right at 6 inches from the leading edge at the root.
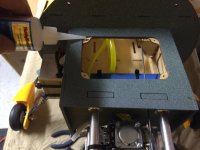
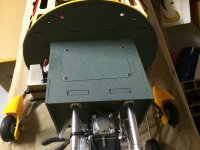
After running the engine, I put her back on the table and installed the hatch on top of the motor box. Be sure to put a little thin CA in the mounting holes and around the mounting tabs for the cover. It is noted that at this time, I have mounted the battery inside the motor box just behind the fire wall. This puts the CG right at 6 inches from the leading edge at the root.


Last edited by a moderator:
GravitySux
30cc
The big round cowl is easy to mark for the cutouts for the muffler and spark plug.
The top 2.5m Allen bolts are easy to get to when installing the cowl, however, the bottom are a little more difficult! I took a 2.5m allen wrench and cut the short end off and found a piece of carbon rod that it would fit into. I glued it in place with a little CA and made an extension to reach the bottom screws perfectly. Be sure and use Loctite on the bolts...they will vibrate loose!
At this point I will go over all the linkages and take a look at setting everything up with the correct amount of throws (D/R, expo etc.). I will also take a look at getting all the linkages as close to 90deg as possible by moving in the rods one hole on the servo arm and maxing out the throws in the transmitter. Stay tuned!....

The top 2.5m Allen bolts are easy to get to when installing the cowl, however, the bottom are a little more difficult! I took a 2.5m allen wrench and cut the short end off and found a piece of carbon rod that it would fit into. I glued it in place with a little CA and made an extension to reach the bottom screws perfectly. Be sure and use Loctite on the bolts...they will vibrate loose!

At this point I will go over all the linkages and take a look at setting everything up with the correct amount of throws (D/R, expo etc.). I will also take a look at getting all the linkages as close to 90deg as possible by moving in the rods one hole on the servo arm and maxing out the throws in the transmitter. Stay tuned!....
Last edited by a moderator:
cardenflyer
70cc twin V2
I like how you took the time to paint the motor box. My 40% Carden has the inside painted like that. It looks awesome!

