• If you are new to GiantScaleNews.com, please register, introduce yourself, and make yourself at home.

    We're 1st in Giant Scale RC because we've got the best membership on the internet! Take a look around and don't forget to register to get all of the benefits of GSN membership!

    Welcome!

3D Viper ST build continued part 2

tylerzx9r

100cc
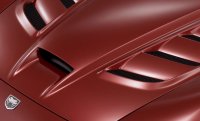
Here it is... I had an amazing opportunity to go to the Custom shop with Terry, and "the LAW" and start a Viper-ST, we worked hard! Terry had me in an almost ready to cover state with my Viper before I came home! I would hope he could post our time laps vids on here so you can see how we got started. We did the build to this state in basically 2.5 long days! There are a few things I must do before covering, like finish the hatch/ and cowl surfacing for the glass to be done on the hatch. Here are a couple pics. image.jpgimage.jpg
 

tylerzx9r

100cc
I will continue to keep you all up to date as I finish my build, with pictures. Looking forward to the continued build and flying an amazing looking plane!
 

tylerzx9r

100cc
Sorry all, been plagued with a bunch of vehicle break downs, then a Refrigerator going bad........ I will be getting the knife out Saturday on the canopy and hatch! Pictures soon!
 

Terryscustom

640cc Uber Pimp
Why did one cowl I saw have what looked like louvres on the top? I liked that look!

That was one of the original prototype ST and I was just playing. I had an old Edge cowl for an out-of-date edge and I lasered some balsa to look like vents, then carved, sanded and grafted them onto the cowl. When I carved the foam and made the plug for the new cowl it was evident that making the vents would 1 - add quite a bit of weight (filler) and 2 - be a bastard to remove the part from the mold.

I am planning to make molds for a couple variations of the vents for next building season so that they can be made lighter and simply attached to any cowl before the paint prep stage.
 
Top