You are using an out of date browser. It may not display this or other websites correctly.
You should upgrade or use an alternative browser.
You should upgrade or use an alternative browser.
Brand New PAU........Viper-ST Announced!!!!!!!!
- Thread starter Terryscustom
- Start date
Dan767
70cc twin V2
Damn....now I gotta find a 120 size engine or maybe a 3W110?
Sam,
3W-110 would be a close fit on this frame, but would work. 3W-110 is 7.22" long.
Bunky.F.Knuckle
150cc
Half of them are mine.wow! almost 2100 views in under 24 hours!
Terryscustom
640cc Uber Pimp
Probably try to get my first DA (a 120) if I found a good price on a gently used one.
Never regret it honestly, the sheer power is addictive

Terryscustom
640cc Uber Pimp
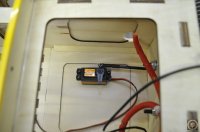
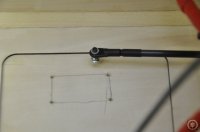
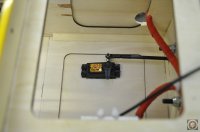
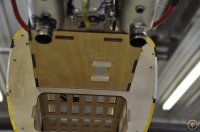
This is not the throttle servo (or arm) that I am using but I needed a test dummy. I decided to run my throttle push-rod through the firewall and mount the servo upright inside the engine box. To do this since I had a pre-existing throttle I'm I'm going to work with that. I pushed the throttle an the carb to where I want it with when the servo arm is 90 degrees out. Simply held the servo in location and traced around it. I drilled small holes in all four corners and used a sharp hobby knife to score the bottom until the piece was loose. After a quick test fit I installed some blocks on the bottom side of the engine box for the servo screws to go through.
Attachments

Terryscustom
640cc Uber Pimp
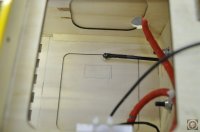
Now that I'm done drilling and cutting up front I want to pin the firewall. There is a whole lot going on up on the business end of your airplane while doing pop tops, crankshafts, blenders etc. The gyroscopic forces are mind blowing, therefore it is cheap insurance to pin your firewall so if something were to come loose over time at least your will not discover it as your engine is departing the airplane!
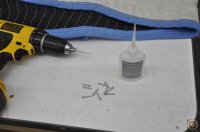
There are several ways to do this. You can use carbon dowels but then you need to use epoxy for best strength and that can be a pain. Wood dowels are easy (but I did not have any on hand). I have also used servo screws depending on the structure. Looking at this one I decided to go with #4 x 3/4" screws.
I drilled pilot holes and hardened them with thin CA. Then when installing the screws I put a little bit of medium CA on the threads and screwed them in tight.
Attachments
Terryscustom
640cc Uber Pimp
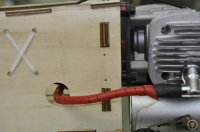
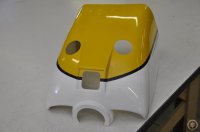
I need to get to my real job for a few hours but I did start cutting the cowl to verify muffler exits. As mentioned previously this was a quick prototype cowl and they missed the typical PAU low pressure lip on the bottom of the cowl. I am going to lay one up by just laying up a portion of the lower half of a cowl plug that I made for an upcoming project. When it cures, tomorrow I can cut out the bottom of this cowl and graft in the new part!
Attachments
sweetpea
100cc
This is not the throttle servo (or arm) that I am using but I needed a test dummy. I decided to run my throttle push-rod through the firewall and mount the servo upright inside the engine box. To do this since I had a pre-existing throttle I'm I'm going to work with that. I pushed the throttle an the carb to where I want it with when the servo arm is 90 degrees out. Simply held the servo in location and traced around it. I drilled small holes in all four corners and used a sharp hobby knife to score the bottom until the piece was loose. After a quick test fit I installed some blocks on the bottom side of the engine box for the servo screws to go through.
This is where I love the Seacraft servo holders! No need to cut into the motorbox and they make lining up a 1-1 linkage easy!
Terryscustom
640cc Uber Pimp
This is where I love the Seacraft servo holders! No need to cut into the motorbox and they make lining up a 1-1 linkage easy!
Yea, I'm cheap though and trying to keep the weight to a minimum. Those would be perfect for an installation like this though!