You are using an out of date browser. It may not display this or other websites correctly.
You should upgrade or use an alternative browser.
You should upgrade or use an alternative browser.
3D Demystifying Vacuum Bagging of foam wings!!
- Thread starter Terryscustom
- Start date
Fibertech
70cc twin V2
I'm glad Terry is going into detail on vacuum bagging and were to and what systems to use. Most all the kits that will be offered by Fibertech N More will have foam sheeted surfaces. Just a couple key points on whatever system you use. Have a system that pulls 4-7”hg and a pressure switch (adjustable) to keep correct Hg. One other thing if you want to bag more than one part at a time is to have a manifold with several shut offs and check valves. I’m sure Terry will go into this but wanted to mention it anyway.
IMAC FANATIC
40% happier than most folks.
Will do, wonder why pm wouldnt work?Tried to send you a PM but could not (need to turn them on HERE). You could always just go there and save the pics and re-post them here, that would be cool!
You need to enable your PM's before someone can send you one.Will do, wonder why pm wouldnt work?
http://giantscalenews.com/threads/sending-pms-conversations.1239/
IMAC FANATIC
40% happier than most folks.
I clicked it and saved it again but ive had plenty of pms recieved over last couple weeks.
Just checked again and we are able to start a conversation with you now.I clicked it and saved it again but ive had plenty of pms recieved over last couple weeks.
Terryscustom
640cc Uber Pimp
Got a few things in the bags this AM and took quite a few pics so I'll go over a few things that I do.
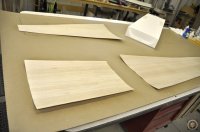
First I learned that if you don't seal the balsa, the resin will soak in and add needless weight. The resin is already getting a nice smooth even coat of resin so bond there is not an issue. What you want is an even coat and just enough resin on the surface so the vacuum pulls it down 3-4 beads deep on the sheeted parts. On this build I am not doing any coring before or after sheeting as a test for final weight with this foam. If you are coring before sheeting it's your call on sealing the balsa or not. Coring after sheeting may requite some other things like carbon tow or laminates, but resin quantity would be the same as I'm doing here.
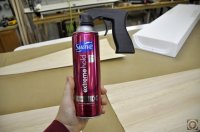
So, once the balsa has been taped and cut to just a little oversize and test fit, I hose it down with a liberal coat of cheap n nasty hairspray. Get the cheapest and nastiest can of spray you can from Walmart, works fine. The balsa will bow up since you are introducing a liquid to one face, but it will lay back down after it dries.
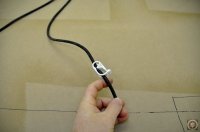
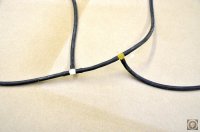
As Rick mentioned you will want some sort of manifold system if you are going to bag multiple items. I typically do four at a time so here is my system:
1 - Main Line (first bag hooked up / no pinch valve needed)
2 - Additional feed lines with pinch valves
3 - Joiner line (only needed since I'm using dual pumps)
- You could also use joiner lines to isolate certain parts of the system. For instance if you are using poly glue and doing a whole plane at one time you could open parts that are set and un-bag them while the other parts remain vacuumed.

First I learned that if you don't seal the balsa, the resin will soak in and add needless weight. The resin is already getting a nice smooth even coat of resin so bond there is not an issue. What you want is an even coat and just enough resin on the surface so the vacuum pulls it down 3-4 beads deep on the sheeted parts. On this build I am not doing any coring before or after sheeting as a test for final weight with this foam. If you are coring before sheeting it's your call on sealing the balsa or not. Coring after sheeting may requite some other things like carbon tow or laminates, but resin quantity would be the same as I'm doing here.
So, once the balsa has been taped and cut to just a little oversize and test fit, I hose it down with a liberal coat of cheap n nasty hairspray. Get the cheapest and nastiest can of spray you can from Walmart, works fine. The balsa will bow up since you are introducing a liquid to one face, but it will lay back down after it dries.
As Rick mentioned you will want some sort of manifold system if you are going to bag multiple items. I typically do four at a time so here is my system:
1 - Main Line (first bag hooked up / no pinch valve needed)
2 - Additional feed lines with pinch valves
3 - Joiner line (only needed since I'm using dual pumps)
- You could also use joiner lines to isolate certain parts of the system. For instance if you are using poly glue and doing a whole plane at one time you could open parts that are set and un-bag them while the other parts remain vacuumed.
Attachments
Fibertech
70cc twin V2
Terry, and Rick, Does this also include the canopy on your aircraft? Do you vacuum form these parts? Will they be available in a Tinted version?
Sorry if I miss understood the question. The canopies are vacuum formed. Similar in a sense but a much different process. When vacuum forming I need a lot heaver duty system to pull as much as 10-15hg and a very large vacuum chamber.
I wish I could offer tinted canopies but as of to date I have not been able to find any tinted material or should I say affordable.
Terryscustom
640cc Uber Pimp
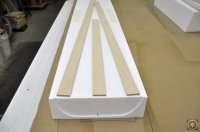
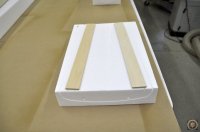
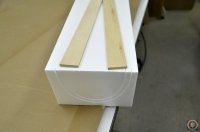
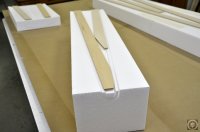
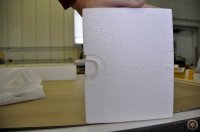
I've had a couple of questions about cauls (blocks to distribute pressure). I've done some testing and am getting away from using them on wings, stabs and rudders now that I'm doing vacuum bagging. Since the pressure is distributed evenly around every square inch of the part and shuck I have yet to have one not come out straight.
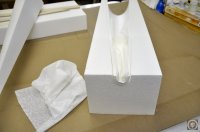
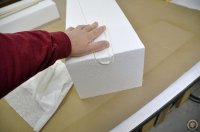
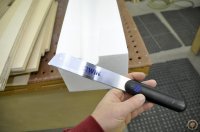
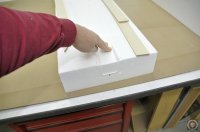
However, you will need to do some type of cauls on the funky parts like canopy deck, turtle deck and belly pan. Instead of making a single pc. that is custom made I like the K.I.S.S. method of using some 1.5-2" sticks about 1/4" thick. If anything to keep pressure on the outside edges to make sure we get good adhesion of the resin along the edges.
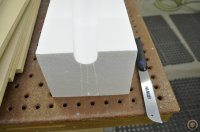
Another thing you will notice or already know about if you've sheeted foam before is that the trailing edge of the turtle deck and belly pan typically have a fair amount of material melted away. It is typical to have about 1/4" gap back there since the hot wire has to move so slow compared to the front of the profile. What I have been doing in these areas is simply fold some shop towels and put them between the cor and the inside of the part to fill the gap. On my rudder I still had a small gap so I used a coarse razor saw and cut a couple of slits in the back of the shuck. This allows the vacuum to pull tight against the part and get good adhesion.
However, you will need to do some type of cauls on the funky parts like canopy deck, turtle deck and belly pan. Instead of making a single pc. that is custom made I like the K.I.S.S. method of using some 1.5-2" sticks about 1/4" thick. If anything to keep pressure on the outside edges to make sure we get good adhesion of the resin along the edges.
Another thing you will notice or already know about if you've sheeted foam before is that the trailing edge of the turtle deck and belly pan typically have a fair amount of material melted away. It is typical to have about 1/4" gap back there since the hot wire has to move so slow compared to the front of the profile. What I have been doing in these areas is simply fold some shop towels and put them between the cor and the inside of the part to fill the gap. On my rudder I still had a small gap so I used a coarse razor saw and cut a couple of slits in the back of the shuck. This allows the vacuum to pull tight against the part and get good adhesion.
Attachments
-
 _DSC0333.JPG71.6 KB · Views: 818
 -
 _DSC0334.JPG67.4 KB · Views: 781
 -
 _DSC0335.JPG60.7 KB · Views: 781
 -
 _DSC0336.JPG53 KB · Views: 739
 -
 _DSC0337.JPG62.5 KB · Views: 807
 -
 _DSC0338.JPG70.3 KB · Views: 799
 -
 _DSC0339.JPG65.4 KB · Views: 836
 -
 _DSC0340.JPG66.5 KB · Views: 794
 -
 _DSC0341.JPG79.6 KB · Views: 775
 -
 _DSC0342.JPG61.1 KB · Views: 810
 -
 _DSC0343.JPG66 KB · Views: 782