You are using an out of date browser. It may not display this or other websites correctly.
You should upgrade or use an alternative browser.
You should upgrade or use an alternative browser.
Glassing and Painting techniques
- Thread starter Terryscustom
- Start date

Jetpainter
640cc Uber Pimp
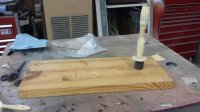
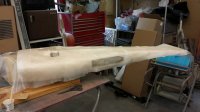
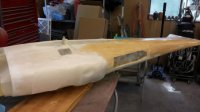
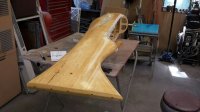
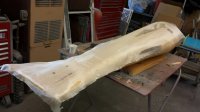
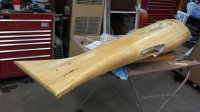
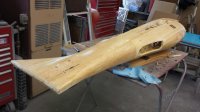
Yesterday I started the glassing process on the fuselage of my scratch build project. I began by making a stand that holds the fuse in the wing tube hole that holds it up off the table and makes it so I can turn the fuse. I can also just grab the engine box and tube socket and flip the fuse over to get to the other side.
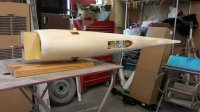
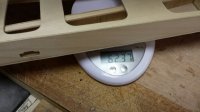
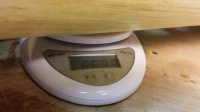
I cut a piece of .5 ounce glass cloth the length of the fuse, then laid it on and very roughly trimmed around it. I then took a soft brush and brushed out the wrinkles. I mixed up some Z-Poxy Finishing Resin at the normal 1 to 1 mix and starting at the center I squeegeed it on trying to get it as thin as possible but still covered. I mix small amounts of resin because it will thicken up a bit as you work and it makes it harder to spread thinly and can try to tug at the cloth. Mixing on a scale speeds the process up a bit. I mixed my batches from between 14 to 22 grams total mixed weight, that's about a 1/2 ounce to 3/4 ounces by volume. I varied the amount depending how complicated the area I was about to do was. If I had a big easy to do area I mixed a bigger batch.
As I worked my way around I also trimmed the cloth a little closer to the edges as I worked. I needed to make a few relief cuts in some of the areas where it bent around sharp corners in the overlap areas at the front and back of the fin.
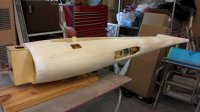
I decided because of my schedule this weekend that I would do both sides at once. If you've never done glassing before I would recommend you do one side, wait till it's set then do the other. The way I did it, I had to lay the glass cloth on the second side overlapping the first at the top and bottom while the first side was still wet. It's really easy to screw up doing it that way.
When your doing something as curvy as this it's hard to get it covered as even as I would like. It's hard not to end up with a few shinny spots, but it turned out pretty good.
Today I trimmed the edges of the cloth with a razor blade then a piece of sandpaper. Some time this week I will sand this coat and apply the second. I did weigh the fuse before I started, so I will be able to report the weight gain.
If you see a flat jaw vise grip hanging off the firewall, that's ballast to make the fuse balance at the wing tube so the stand works better.
I cut a piece of .5 ounce glass cloth the length of the fuse, then laid it on and very roughly trimmed around it. I then took a soft brush and brushed out the wrinkles. I mixed up some Z-Poxy Finishing Resin at the normal 1 to 1 mix and starting at the center I squeegeed it on trying to get it as thin as possible but still covered. I mix small amounts of resin because it will thicken up a bit as you work and it makes it harder to spread thinly and can try to tug at the cloth. Mixing on a scale speeds the process up a bit. I mixed my batches from between 14 to 22 grams total mixed weight, that's about a 1/2 ounce to 3/4 ounces by volume. I varied the amount depending how complicated the area I was about to do was. If I had a big easy to do area I mixed a bigger batch.
As I worked my way around I also trimmed the cloth a little closer to the edges as I worked. I needed to make a few relief cuts in some of the areas where it bent around sharp corners in the overlap areas at the front and back of the fin.
I decided because of my schedule this weekend that I would do both sides at once. If you've never done glassing before I would recommend you do one side, wait till it's set then do the other. The way I did it, I had to lay the glass cloth on the second side overlapping the first at the top and bottom while the first side was still wet. It's really easy to screw up doing it that way.
When your doing something as curvy as this it's hard to get it covered as even as I would like. It's hard not to end up with a few shinny spots, but it turned out pretty good.
Today I trimmed the edges of the cloth with a razor blade then a piece of sandpaper. Some time this week I will sand this coat and apply the second. I did weigh the fuse before I started, so I will be able to report the weight gain.
If you see a flat jaw vise grip hanging off the firewall, that's ballast to make the fuse balance at the wing tube so the stand works better.
Attachments
-
 20150607_150545_resized.jpg99.1 KB · Views: 527
 -
 20150606_103135_resized.jpg106.1 KB · Views: 462
 -
 20150606_103105_resized.jpg87.8 KB · Views: 456
 -
 20150606_103048_resized.jpg74.7 KB · Views: 446
 -
 20150606_142828_resized.jpg91.7 KB · Views: 491
 -
 20150606_143015_resized.jpg65.6 KB · Views: 475
 -
 20150606_151809_resized.jpg72.8 KB · Views: 498
 -
 20150606_154110_resized.jpg85.1 KB · Views: 502
 -
 20150606_154133_resized.jpg97.8 KB · Views: 517
 -
 20150606_155052_resized.jpg84.4 KB · Views: 520
 -
 20150606_163318_resized.jpg86.8 KB · Views: 481
 -
 20150607_133814_resized.jpg84.2 KB · Views: 456
 -
 20150607_133806_resized.jpg99.5 KB · Views: 550
Terryscustom
640cc Uber Pimp
Agree. I went to a funfly this AM talking warbirds and one guy said he would rather glass a plane than ultracote any day. Going to have to give it a go some day!
ProfilePilot
50cc
Lots of great info in this thread!
Jetpainter
640cc Uber Pimp
Snoopy1
640cc Uber Pimp
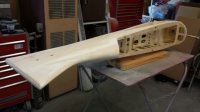
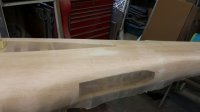
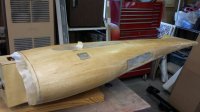
Jet painter done a few my self actually most of my planes are glassed. If I may suggest it is going to take some work to hide the seam on the one side of the fuse. Or did you do it with one piece. If not if I may suggest next time glass the bottom first.
Then when dry cut off the extra cloth and sand the edges smooth. Then lay one piece of cloth over the top down both sides and one lap the bottom cloth. The seam will be hidden. Less work. You said previously that you like bright smooth shinny surface. But it looks good and you are really keeping the weight down. We do the same mixing small amounts so that it will spread well.
Then when dry cut off the extra cloth and sand the edges smooth. Then lay one piece of cloth over the top down both sides and one lap the bottom cloth. The seam will be hidden. Less work. You said previously that you like bright smooth shinny surface. But it looks good and you are really keeping the weight down. We do the same mixing small amounts so that it will spread well.
Jetpainter
640cc Uber Pimp
Snoopy, Last night I did start some sanding on the fuse and the seam is coming out great. I've finished the seam on the top from the back of the hatch rearward. I've also done about 1/2 of the bottom. Nice and smooth.
Kevin-Young
70cc twin V2
Planking is a time consuming process but if you going to do a really curvy surface with wood it works awesome.
It will be awhile, but I will be showing all my painting steps in this thread. The primer will be Nason 421-19. The paint will be DuPont Chromabase with Nason 496 clear. The wings, elevators and rudder, will get Solartex covering with the same paint system.
View attachment 24449
That is just a cool ass airplane!