• If you are new to GiantScaleNews.com, please register, introduce yourself, and make yourself at home.

    We're 1st in Giant Scale RC because we've got the best membership on the internet! Take a look around and don't forget to register to get all of the benefits of GSN membership!

    Welcome!

3D Viper-ST 100-120cc scratch build......it continues!

Terryscustom

640cc Uber Pimp
Hmmm, i've never really had one come our with twist in it. I assume all of the tabs etc. are engaged and there are no gaps.

Truth is there it not a lot that can be done once the fuse is glued up and it does not look like a lot. If it were me I would leave the tail phenolic out of the fuse and check it again after the foam belly and TD are installed which can also put force on the fuse. Then check it and level the tubes with a slight sanding to make the tail tube align with the main tube and install. Looks very minute of a twist so as long as your tubes still line up you should be good to go.
 

ericrs

70cc twin V2
Thanks for the thoughts! I'll see if I can get that little bit of twist out with the belly pan and turtle deck.
 

Spats

100cc
@Terryscustom I was working on putting the wing tubes in and I run into a bit of a problem. I haven't glued anything in yet. I have got them level with the top of the fuse, but when you sight down between the main wing and the stab they are off. I must have a slight twist in the fuselage. When its setting on a table the one corner is raised up just a bit, and when I bring it down to the table than the tubes line up. I tried to get some pics of the problem. Any thoughts on what should be done?

Doesn't look to bad. I've seen ARF's that are way worse. In fact there is one un-named ARF brand that I see way worse than that all the time. Maybe you could pin the fuse down to the bench so when you glue the foam on it will keep it straight. If that makes sense, I can never explain this stuff typing it out:oblong:
 

Snoopy1

640cc Uber Pimp
@ericrs thanks for posting that out I an about two joints behind you, have the front done and have just finished gluing the sides. The fuse has very small twist in and I was under the assumption that when I glue the top plate all will be flat and square. Thanks for the heads up will in stall the tubes make sure they are parallel and square and glue in the top plate thanks again Ericrs.
 

Terryscustom

640cc Uber Pimp
The key is to work from one end to the other and use LOTS of clamps. I also went to glueing after clamping together so you have the option to move it around and look at it before gluing. That was part of the reason I went to the titebond CA is that it can be glued after assembly.
 

Snoopy1

640cc Uber Pimp
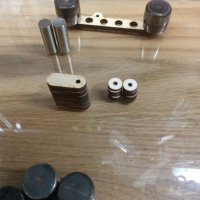
@Terryscustom hi Terry need a little help please. Attached a photo of some parts can you tell me where they fit. I believe the small round ones are for the cowl to glue 4-40 T nuts into to connect the two halls. The elongated ones with a hole at one end is the parts that I do not where they fit.
Second question while you where fitting cowl you stated that you show later the bolting of the two halves together. Read through the hole site and did not find it can you help pleas.
 

Attachments

  • image.jpeg
    image.jpeg
    60.8 KB · Views: 321

Terryscustom

640cc Uber Pimp
@Terryscustom hi Terry need a little help please. Attached a photo of some parts can you tell me where they fit. I believe the small round ones are for the cowl to glue 4-40 T nuts into to connect the two halls. The elongated ones with a hole at one end is the parts that I do not where they fit.
Second question while you where fitting cowl you stated that you show later the bolting of the two halves together. Read through the hole site and did not find it can you help pleas.

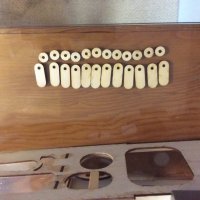
Cowl mounting tabs and long ones go behind F1 on sides. The ovals and circle ones go together.

T.
 

Snoopy1

640cc Uber Pimp
@Terryscustom thanks for the prompt reply. See attached photo. I know they all fit in the cowl but how. Would you be kind enough to take photo to show how this all fit on the inside of the cowl.(picture is worth a thousand words).
 

Attachments

  • image.jpeg
    image.jpeg
    64.5 KB · Views: 308
Top