• If you are new to GiantScaleNews.com, please register, introduce yourself, and make yourself at home.

    We're 1st in Giant Scale RC because we've got the best membership on the internet! Take a look around and don't forget to register to get all of the benefits of GSN membership!

    Welcome!
  • Unless you are a paid advertiser NO more posting advertisement in the individual vendor forums. You may post in the Manufacturer's Announcements section only but only ONCE a month unless your a paid advertiser.

Aerobeez 26% 74" Slick540 Build, Maiden Log!

3dNater

3DRCF Regional Ambassador
Well I got mine out there for 3 flights yesterday. Moving the battery back was a good improvement on cg and the additional elevator throw helps a lot.

I got some new 1.75" servo arms on the ailerons and maxed out the aileron throws to around 47 degrees. Roll rate is much better. I think my high rate before was around 30 degrees with the stock servo arms.

On the third flight I got up the nerve to try some inverted harrier. I pulled out of a hover slowly into an inverted harrier and flew a few circuits about a foot high. I am happy to report that this plane is very stable in inverted harrier :) my reservations about trying it were engine related so I was happy when my motor stayed lit. I think my high idle is just about right for trouble free operation.

I gave @3Scotty a few pulls on the plane as well since I know he is working on his build of the black and yellow scheme. I thought I'd give him a taste of what is to come :)
 

3dNater

3DRCF Regional Ambassador
My slick no longer has removable stabs.

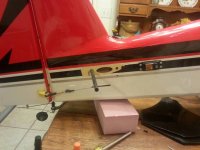
I was changing out elevator servos the other day when I noticed one of the tabs that holds the right stab on appeared broken. I took off the stab and confirmed that it was indeed broken off. I dont know what caused it... could have been the dirt nap...

Rather than try to glue the piece back on I decided to just permanently affix the horizontal stabs.

uploadfromtaptalk1398749732706.jpg
I started by removing the covering on the fuse where the stab makes contact. I just used a razor to score it, then peeled it away.

Next I mixed up some 15 min epoxy. I pulled the stab tube out a few inches so I could apply epoxy to it to glue it into the fuse receiver tube. I applied epoxy to all surfaces being careful to make sure I got plenty on the anti rotation pin.

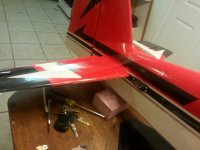
I put the stab on and attached the bolt that was still good. Then I used aome packing tape to support the stab so it wouldnt sag at all. This really made a difference on how it turned out!

uploadfromtaptalk1398750058157.jpg

Tonight I finished up by doing the same steps to the other stab. They feel really rigid now! If I get another Aerobeez plane this size I will just do this with the initial build.
 

3dNater

3DRCF Regional Ambassador
Fellas I just spent some time tweaking my setup on this plane. It is sooo much more awesome now than it was :D

My club President and friend gave me a few tips on my setup. Basically he explained some things to me that I had heard before and somewhat discounted. I have to admit I have been a little complacent and lazy on setups... in the past they have worked out pretty well but on this plane I was having some trouble.

The insight came in the form of aileron differential, checking thrust line issues, lateral balance, and sealed hinge lines. I decided to take his advice...

The hinge lines come sealed from the factory but in my case I had to re-hinge the elevators to get sufficient throws. I had not re-sealed them. I did incidentally build new elevators for this plane to get more authority. I got more authority but it didn't give me as much as I had hoped. Dan told me I was probably losing 30% of the authority through my hinge lines.

We found that the plane was pretty far out of lateral balance. I added some play-dough to the lighter wing-tip till it would balance laterally with me holding the prop hub and my buddy Brigg holding the tip of the rudder. I taped over the clay with some blue painters tape... checked balance one more time and it looked good.

With these changes in place I flew the plane.

What a difference!

The problems I had were an in-ordinate amount of right rudder required in up-lines, plenty of wing-rock in harriers without the SFG's on, pitch authority on elevator (wouldn't do a wall and really had to nurse it into a hover), aileron rolls not axial.

The changes I made fixed all of the issues with pitch authority, stable harrier, and uplines.

Guys this only took maybe a half hour! I am closer to getting the aileron differential dialed in... I'll report back when it is finished. I am really happy about how this plane is flying now :D

The lesson I learned is that being lazy makes for a bad experience and may often make the vendor unfairly take the fall (in your eyes... which translates into forum posts etc.) when the plane doesn't fly as well as you had hoped. Take the time to set up the plane correctly before passing judgment.

No matter what anybody says about setups... lateral balance matters... A LOT! Having it fixed made this slick super stable in harrier without the sfg's. I will probably never put them back on now. lets keep in mind that there are a lot of inconsistencies weight-wise that can happen when building two wings. Balsa and plywood vary in density and weight. One wing could get more glue than the other... it all adds up. I have not weighed the clay and tape yet to finish my lateral balance mod yet, but it is not that much weight. Differences in material density and glue could easily account for it.

Sealing the hinge line sealed on the elevator gave me the pitch authority I have been craving basically since day one. It does better pop tops, better KE spins, and better walls. All without making the plane tail-heavy.

I have just become anal about setting up airplanes properly before offering opinions on their flight characteristics. As a hobbyist... it is your job to make it as good as if a pro set it up before calling out the vendor for "bad characteristics."

I am loving this plane right now :D
 

3dNater

3DRCF Regional Ambassador
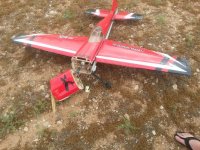
So... this happened a couple of weeks ago.
uploadfromtaptalk1406246119289.jpg

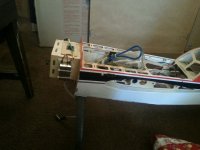
I did a hard tumble and the throttle servo broke loose and killed the engine.

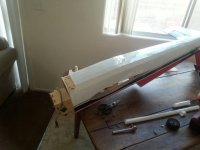
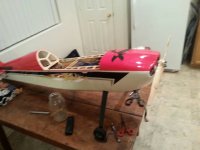
I spent last evening putting the nose back on and fixing broken stringers and formers on the bottom. All that is left is to cover the bottom. uploadfromtaptalk1406246396932.jpg
 

3dNater

3DRCF Regional Ambassador
I forgot to mention... I ordered landing gear yesterday and they arrived today. Smokin fast shipping!
 

amstd7

70cc twin V2
We recently purchased the 50cc Slick 540 from Aerobeez, I also intend to reinforce the tabs on the horizontal stabs with some carbon fiber, hope this will work according to plan, also will seal all hinge lines. The servo mount for the throttle was both glued and screwed, hope that will hold.
Sorry for your mishap, hope all goes well after your fix.
 

3dNater

3DRCF Regional Ambassador
We recently purchased the 50cc Slick 540 from Aerobeez, I also intend to reinforce the tabs on the horizontal stabs with some carbon fiber, hope this will work according to plan, also will seal all hinge lines. The servo mount for the throttle was both glued and screwed, hope that will hold.
Sorry for your mishap, hope all goes well after your fix.
Im sure you are going to love the plane. Just go over everything carefully. Especially around the lg block. There have been a few that have failed with very little stress on them. A little epoxy might be in order. I havent seen any complaints about how it flies. My 30cc has been awesome once I got everything dialed in.
 
Top