You are using an out of date browser. It may not display this or other websites correctly.
You should upgrade or use an alternative browser.
You should upgrade or use an alternative browser.
Sport Beautifying the Beast
- Thread starter Krazy Kanuk
- Start date
Krazy Kanuk
50cc
Pistolera
HEY!..GET OUTTA MY TREE!
Oh NOOOOO....you just jinxed it! Just kidding of course....may it have an expiration date looooooong into the future!BUT will it NEVER CRASH???
Krazy Kanuk
50cc
FUSELAGE PAINTING JIG
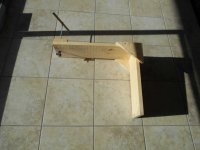
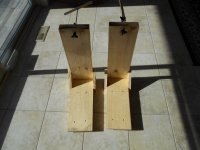
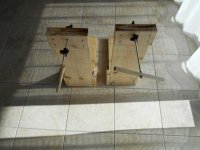
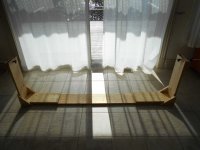
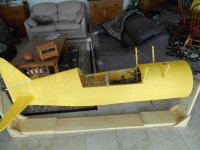
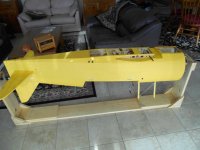
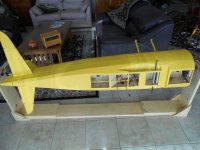
I am getting close to start the painting of the fuselage so I decided to build a jig that would allow me to rotate the fuselage during the painting operation.
I built the jig out of some left over 1" by 8" pine. I made it in 3 pieces so I can store it easily.
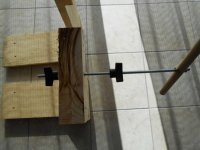
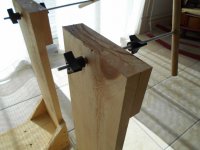
At each end I installed 1/4" sintered bronze bushings to allow the 1/4-20 threaded rod to rotate easily. On each end I put Jam Nuts so that I can lock in the correct length of the rod holding the fuselage in place.
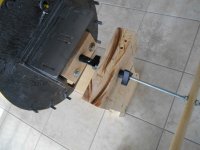
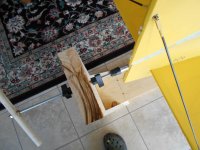
Each airplane will have its own unique clamping mechanism; on this one I made a simple wooden bracket to attach to the firewall. I used another Jam Nut to clamp to the firewall wooden bracket. THIS IS WHAT KEEPS THE FUSE FROM ROTATING.
At the other end I installed a small aluminum 8-32 threaded insert into the fin. I made up a small fixture that allows the 1/4-20 threaded rod to screw into the rudder retaining device and that it will stay in the proper orientation.
Now I can start painting the fuselage and I won't have to worry that part of it is touching an object during the spray painting operation.


Jetpainter
640cc Uber Pimp
That should work very well. Not having to fight to get things at the right angle makes a successful paint job all that much easier.FUSELAGE PAINTING JIG
I am getting close to start the painting of the fuselage so I decided to build a jig that would allow me to rotate the fuselage during the painting operation.
I built the jig out of some left over 1" by 8" pine. I made it in 3 pieces so I can store it easily.
At each end I installed 1/4" sintered bronze bushings to allow the 1/4-20 threaded rod to rotate easily. On each end I put Jam Nuts so that I can lock in the correct length of the rod holding the fuselage in place.
Each airplane will have its own unique clamping mechanism; on this one I made a simple wooden bracket to attach to the firewall. I used another Jam Nut to clamp to the firewall wooden bracket. THIS IS WHAT KEEPS THE FUSE FROM ROTATING.
At the other end I installed a small aluminum 8-32 threaded insert into the fin. I made up a small fixture that allows the 1/4-20 threaded rod to screw into the rudder retaining device and that it will stay in the proper orientation.
Now I can start painting the fuselage and I won't have to worry that part of it is touching an object during the spray painting operation.
View attachment 43435 View attachment 43436 View attachment 43437 View attachment 43438 View attachment 43439 View attachment 43440 View attachment 43441 View attachment 43442 View attachment 43443 View attachment 43444 View attachment 43445
pawnshopmike
Staff member
FUSELAGE PAINTING JIG
I am getting close to start the painting of the fuselage so I decided to build a jig that would allow me to rotate the fuselage during the painting operation.
I built the jig out of some left over 1" by 8" pine. I made it in 3 pieces so I can store it easily.
At each end I installed 1/4" sintered bronze bushings to allow the 1/4-20 threaded rod to rotate easily. On each end I put Jam Nuts so that I can lock in the correct length of the rod holding the fuselage in place.
Each airplane will have its own unique clamping mechanism; on this one I made a simple wooden bracket to attach to the firewall. I used another Jam Nut to clamp to the firewall wooden bracket. THIS IS WHAT KEEPS THE FUSE FROM ROTATING.
At the other end I installed a small aluminum 8-32 threaded insert into the fin. I made up a small fixture that allows the 1/4-20 threaded rod to screw into the rudder retaining device and that it will stay in the proper orientation.
Now I can start painting the fuselage and I won't have to worry that part of it is touching an object during the spray painting operation.
View attachment 43435 View attachment 43436 View attachment 43437 View attachment 43438 View attachment 43439 View attachment 43440 View attachment 43441 View attachment 43442 View attachment 43443 View attachment 43444 View attachment 43445
Nice! Mikey like.
Krazy Kanuk
50cc
PLUS....you can practice your slow rolls!!!
Better yet; I can now fly upside down at a VERY low altitude! Never had the guts to be 3 inches off the ground at full speed.
Last night I did the first yellow coat of spray paint on the Right Elevator. I'm using this small item to learn how the paint goes on the fabric and how many coats it will take. If I screw up, it's not a lot of work to recover it. So far so good!
Last edited:

