You are using an out of date browser. It may not display this or other websites correctly.
You should upgrade or use an alternative browser.
You should upgrade or use an alternative browser.
IMAC Delro 2.5M Raven Build
- Thread starter Wacobipe
- Start date
Terryscustom
640cc Uber Pimp
Nice hatch!!
Wacobipe
100cc
That is what I'll end up doing I think...too much work just to make it look worse to go the other way!I remember going thru that decision process....ending up going ahead and Hysol'ing them in place. Figured I'd carfully mask off the pins and stuff some tissue into the opening when painting.

Wacobipe
100cc
Back on January 27th I made the claim I'd be doing this step the next day...but since life seems to get in my way at every turn recently...I'm doin' it on the 16th of February instead 
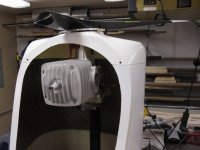
ANYWAY...Got some time to get back to the Raven and work on drilling the engine mount holes into the firewall. Earlier I showed how I located the engine based on the front of the fuse as it has both the diameter to match the spinner as well as the thrust angle built into it. that sets the spinner backplate location perfectly and gives me thrust angle.
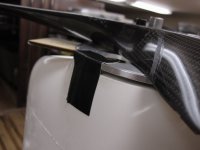
I determined that the best engine mount position was cylinder exactly down, so I cut clearance in the engine bay hatch for the tiny bit of cylinder that sticks out as well as the spark plug wire...

ANYWAY...Got some time to get back to the Raven and work on drilling the engine mount holes into the firewall. Earlier I showed how I located the engine based on the front of the fuse as it has both the diameter to match the spinner as well as the thrust angle built into it. that sets the spinner backplate location perfectly and gives me thrust angle.
I determined that the best engine mount position was cylinder exactly down, so I cut clearance in the engine bay hatch for the tiny bit of cylinder that sticks out as well as the spark plug wire...
Wacobipe
100cc
That allowed me to set the final critical position which was rotary angle of the engine in the plane...I the taped the engine block to the prop drive lug so that the engine could not turn from that positon...
.JPG")
So now i have the engine spinner locked in place and the rotary angle of the engine as well....setting everything to allow me to position the firewall to the engine and mark the location precisely!
.JPG")
.JPG")
.JPG")
.JPG")
So now i have the engine spinner locked in place and the rotary angle of the engine as well....setting everything to allow me to position the firewall to the engine and mark the location precisely!
Wacobipe
100cc
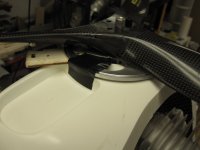
Next problem I encountered is that the engine bay is too tight to allow me to get much of anything inside to mark engine mount center hole locations...and the carbon fiber is so slick I couldn't find anything to mark it  ...
...
My wife came to my rescue...she had this awesome silver metallic Sharpie (getting these on order tomorrow...they are awesome!dries really quickly too.) so I was able to precisely mark the position of the engine spacers against the firewall, which allowed me to then remove the firewall and drill it properly on the workbench
.JPG")
.JPG")
.JPG")
.JPG")
I got the holes all drilled tonight before a glass of wine called my name and I had to go take care of that I need to cut clearance intothr firewall for canister clearance, ignition wire, throttle and choke control arms, and fuel tubing and then I can Hysol this baby into place for good!
...My wife came to my rescue...she had this awesome silver metallic Sharpie (getting these on order tomorrow...they are awesome!dries really quickly too.) so I was able to precisely mark the position of the engine spacers against the firewall, which allowed me to then remove the firewall and drill it properly on the workbench
I got the holes all drilled tonight before a glass of wine called my name and I had to go take care of that
I need to cut clearance intothr firewall for canister clearance, ignition wire, throttle and choke control arms, and fuel tubing and then I can Hysol this baby into place for good!Attachments
Wacobipe
100cc
Barely any at all...and it's underneath the plane so you'll never see it (I can't knife edge that close to the groundLooks like you didn't have to cut much cowl too accomodate the single.
...and I don't hover). I'll try to get a photo of it installed with the engine in place..JPG")
.JPG")